This paneer snack plate is my go-to for when I want something quick, customizable, and a little different from the usual. It’s not about perfect presentation but about a spontaneous mix of flavors and textures you can adapt to your mood or what’s in the fridge. The best part? Everyone gets to build their own little snack bowl, mixing and matching ingredients until it feels just right.
I love how a simple block of paneer can turn into a versatile centerpiece. It’s creamy, slightly chewy, and takes on flavors beautifully—whether grilled, spiced, or served fresh. This platter kind of refuses to be boring, making it perfect for casual get-togethers or a lazy weekend snack that feels a bit special without much fuss.
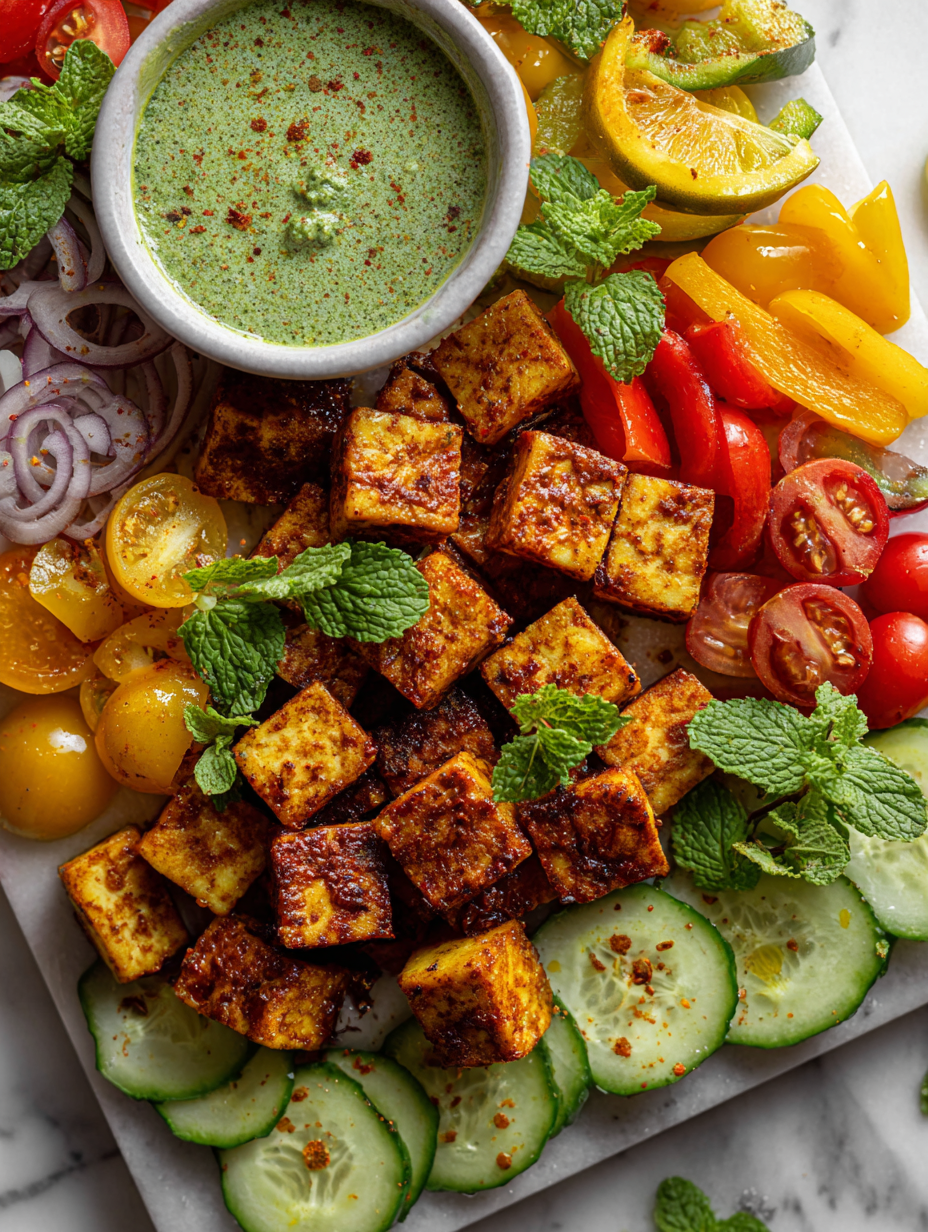
Focusing on how a simple platter of paneer can serve as a versatile, make-your-own snack experience that transforms traditional Indian flavors into a customizable communal feast.
The story behind this recipe
- This recipe started as a way to use up a block of fresh paneer that was sitting in my fridge, leftover from a failed curry experiment. I didn’t want to just cut it up and eat it plain, so I threw together this platter as a kind of snack-mix for friends. It became a hit because everyone loves customizing their bites, especially when there’s a good dash of spice and something crispy involved.
- One evening, I was craving something that felt both familiar and new—something that reminded me of street snacks from my childhood but with a little grown-up twist. I threw together a few ingredients I had lying around, and the result was this lively, colorful plate that’s still my go-to when I want a quick, satisfying bite. It’s funny how a simple combination can turn into a little tradition.
- story_type
Key ingredients and tips
- Paneer: I prefer a firm, fresh block that’s slightly squeaky when you bite into it—aim for a milky aroma. If yours is too soft or crumbly, try pressing out excess moisture before cooking.
- Chili Powder: I love a good smoky chili that adds warmth without overpowering. Adjust the amount based on your spice tolerance, and always taste-test for balance before serving.
- Lemon Juice: Brightens everything up with a zingy pop. If you want more brightness, add a little zest along with the juice—just watch for bitterness if you overdo it.
- Cilantro: Fresh leaves add a herbal freshness and vibrant color. If you’re not a fan or it’s wilting, swap in chopped mint or scallions for a different fresh note.
- Olive Oil: I use a good-quality extra virgin for richness and a slight fruitiness that complements the paneer. If you prefer a milder flavor, a neutral oil like canola works fine—just skip the aromatic punch.
- Assorted Nuts & Seeds: Toasted almonds or sesame seeds bring crunch and nutty depth. Use whatever you’ve got—pistachios, pumpkin seeds—just toast them lightly until fragrant for maximum flavor.
- Spiced Yogurt Dip: I make mine with tangy Greek yogurt, a pinch of cumin, and a splash of lemon. If dairy isn’t your thing, try a tahini drizzle or a spicy chutney for variety.
Spotlight on key ingredients
Paneer:
- I prefer a firm, fresh block that’s slightly squeaky when you bite into it—aim for a milky aroma. If yours is too soft or crumbly, try pressing out excess moisture before cooking.
- Chili Powder: I love a good smoky chili that adds warmth without overpowering. Adjust the amount based on your spice tolerance, and always taste-test for balance before serving.
Fresh herbs and citrus:
- Lemon Juice: Brightens everything up with a zingy pop. If you want more brightness, add a little zest along with the juice—just watch for bitterness if you overdo it.
- Cilantro: Fresh leaves add a herbal freshness and vibrant color. If you’re not a fan or it’s wilting, swap in chopped mint or scallions for a different fresh note.
Notes for ingredient swaps
- Dairy-Free: Swap paneer for firm tofu. It’s milder, less chewy, but still delightful with spices.
- Vegan: Use coconut yogurt instead of dairy to add a subtle sweetness and tropical aroma.
- Nuts & Seeds: If allergic or out of stock, skip or replace with roasted chickpeas for crunch and protein.
- Spices: If you’re out of chili powder, smoked paprika or cayenne can add warmth and smoky depth.
- Herbs: No cilantro? Fresh mint or basil work well to keep that fresh, bright flavor.
- Oil: Swap olive oil for sesame oil for a nuttier, more aromatic profile—just use sparingly.
- Lemon: Lime juice makes a good tart alternative, adding a slightly different citrus brightness.
Equipment & Tools
- Non-stick or cast-iron skillet: For even cooking and browning of paneer.
- Spatula: To flip and turn paneer slices or cubes.
- Small bowl: To mix spices and flavorings.
- Sharp knife: To cut paneer into even pieces.
- Paper towels: To drain excess oil from cooked paneer.
Step-by-step guide to paneer snack plate
- Gather all your equipment: a non-stick or cast-iron skillet, a spatula, a small bowl, and a sharp knife. Preheat the skillet over medium heat, about 160°C (320°F), until hot but not smoking.
- Cut the block of paneer into 1.5 cm (half-inch) thick slices or cubes, depending on your preference. Pat dry with a paper towel to remove excess moisture, which helps with browning.
- Add 1-2 tablespoons of oil to the skillet, enough to coat the bottom lightly. Swirl to distribute and let it heat for about 30 seconds until shimmering.
- Place the paneer pieces in the hot oil, ensuring they don’t touch each other. Cook for 2-3 minutes on one side until golden brown and crispy. Flip carefully and cook the other side for another 2-3 minutes.
- While the paneer cooks, prepare your flavorings. Mix together a teaspoon of chili powder, a squeeze of lemon juice, and a pinch of salt in a small bowl.
- Once the paneer is golden and crispy on all sides, remove from the skillet and place on a paper towel-lined plate to drain excess oil. Immediately toss with your spice mixture for maximum flavor absorption.
- Arrange the paneer on a serving platter. Garnish with chopped cilantro or herbs of your choice, and serve alongside your preferred dips or accompaniments.
- Let the paneer rest for 2 minutes so the flavors settle. Serve warm, encouraging everyone to build their own bites, mixing spicy, tangy, and crispy elements.
- Check for doneness: the paneer should be evenly browned and slightly firm but not hard, with a crispy exterior and a soft, chewy interior.
Serve the paneer immediately while warm. Garnish with fresh herbs and arrange on a platter with sides and dips. Allow a brief 2-minute rest so flavors meld before serving.
How to Know It’s Done
- Paneer is golden brown and crispy on edges.
- Internal texture is firm yet slightly springy when pressed.
- Aromas of toasted paneer and spices are fragrant and inviting.
Customizable Paneer Snack Platter
Ingredients
Equipment
Method
- Slice the paneer into 1.5 cm (half-inch) thick pieces or cubes, then pat dry with paper towels to remove excess moisture. This helps achieve a crispy exterior.
- Heat a tablespoon of oil in a non-stick skillet over medium heat until shimmering and hot, creating a sizzle when you add the paneer.
- Add the paneer slices to the hot skillet in a single layer, making sure they don’t touch. Cook for 2-3 minutes on one side until golden and crispy, then flip carefully with a spatula and cook the other side for another 2-3 minutes.
- Remove the cooked paneer from the skillet and place on paper towels to drain any excess oil. While still warm, gently toss with a mixture of chili powder, lemon juice, and a pinch of salt for flavor.
- Transfer the seasoned paneer to a serving platter. Garnish with chopped cilantro and sprinkle with toasted nuts and seeds for crunch and visual appeal.
- Serve the paneer hot with a side of tangy yogurt or your favorite dips, encouraging everyone to build their own bites with toppings and spreads for a fun, customizable experience.
Pro tips for perfect paneer bites
- Bolded Mini-Head: Use high heat to get that sizzle and crispy exterior quickly, about 200°C (390°F).
- Bolded Mini-Head: Let the paneer sit at room temperature for 10 minutes before cooking to ensure even browning.
- Bolded Mini-Head: When tossing spices, do it off the heat if they start to smoke—this keeps flavors vibrant.
- Bolded Mini-Head: Use a non-stick pan to prevent sticking and make flipping easier, especially with delicate paneer.
- Bolded Mini-Head: For extra crunch, sprinkle toasted nuts or seeds just before serving to keep their texture crisp.
- Bolded Mini-Head: Drizzle the spice mix over hot paneer for better absorption, resulting in more flavorful bites.
- Bolded Mini-Head: If paneer is sticking, add a little more oil or use a well-seasoned pan to prevent tearing.
Common mistakes and how to fix them
- FORGOT to dry paneer before cooking → results in less crispiness, pat dry for better browning.
- DUMPED all spices at once → do a quick taste test after tossing to adjust seasoning.
- OVER-TORCHED the spices → keep an eye on heat, stir frequently to prevent burning.
- MISSED the resting step → let paneer rest 2 minutes to settle flavors and improve texture.
Quick fixes and pantry swaps
- If paneer sticks, splash a little water in the pan to loosen and prevent tearing.
- When spices burn, shield with a lid and lower heat immediately.
- Dumped too much spice? Patch with a squeeze of lemon and fresh herbs.
- Overcooked paneer? Rescue with a quick squeeze of lemon to brighten flavors.
- When in doubt, pantry swap: use sunflower seeds instead of nuts for crunch and mild flavor.
Prep, store, and reheat tips
- Prepare spice mixes and dips ahead—store in airtight containers in the fridge for up to 3 days; flavors deepen over time, releasing warm, toasted aromas when opened.
- Cut and dry paneer slices the day before, then refrigerate in a sealed container; they stay firm and squeaky, making cooking quicker and more even.
- Toast nuts and seeds in advance until fragrant, then keep in an airtight jar; they stay crisp and aromatic, ready to sprinkle just before serving.
- Refrigerate cooked paneer in an airtight container for up to 2 days; reheat gently in a hot skillet until warmed through—listen for a crackle and smell the toasted spices.
- Assemble the platter just before serving to keep ingredients fresh and textures crisp; if needed, reheat paneer briefly, watching for golden edges again.
Top questions about paneer snack plate
1. How do I choose the best paneer for this recipe?
Paneer should be firm and slightly squeaky when you bite into it, with a mild dairy aroma. If it’s too soft, press out excess moisture before cooking.
2. Can I substitute the chili powder if I don’t have any?
Use smoked paprika or cayenne to add warmth if you’re out of chili powder. Adjust according to your spice tolerance and taste-test before serving.
3. What’s the best way to add a citrus kick?
Lemon juice brightens the flavors with a zingy punch. For extra brightness, add some lemon zest along with the juice, but don’t overdo it to avoid bitterness.
4. Can I use other herbs instead of cilantro?
Fresh cilantro adds herbal brightness and vibrant color. If you dislike cilantro or it’s wilted, swap in chopped mint or scallions for a different fresh note.
5. What oil should I use for cooking the paneer?
Use a good-quality extra virgin olive oil for richness and a fruity note. If you prefer a milder flavor, neutral oils like canola or sunflower work fine—just skip the aromatic punch.
6. How do I make the nuts or seeds extra crunchy?
Toast your nuts or seeds lightly until fragrant to bring out their crunch and nutty flavor. Use almonds, sesame seeds, or pumpkin seeds, depending on what you have.
7. What’s a good vegan substitute for paneer?
For dairy-free options, swap paneer with firm tofu. It’s milder and less squeaky, but still absorbs spices well and offers a good texture.
8. How long can I store leftovers and how do I reheat?
Wrap and refrigerate leftover paneer in an airtight container for up to 2 days. Reheat in a hot skillet until warm and listen for a crackle, then smell for toasted spices.
9. What if the paneer sticks during cooking?
If your paneer sticks to the pan, splash a little water or add more oil and gently loosen with a spatula. Keep the heat moderate to prevent burning.
10. How can I prevent spices from burning?
When mixing spices, do it off the heat if they start to smoke. Keep an eye on the pan, stir frequently, and adjust heat as needed to avoid burnt flavors.
This simple paneer platter is more than just a snack; it’s a way to bring people together around a casually assembled table. The aroma of toasted spices and fresh herbs, combined with the satisfying textures, makes every bite a little moment of comfort. In times when quick, nourishing bites matter most, this plate offers both ease and a touch of flair.
No matter if you’re feeding friends or just craving a cozy solo snack, this dish invites improvisation and personal tweaks. It’s a humble reminder that good food doesn’t need to be complicated—just honest, flavorful, and shared with a little bit of care.