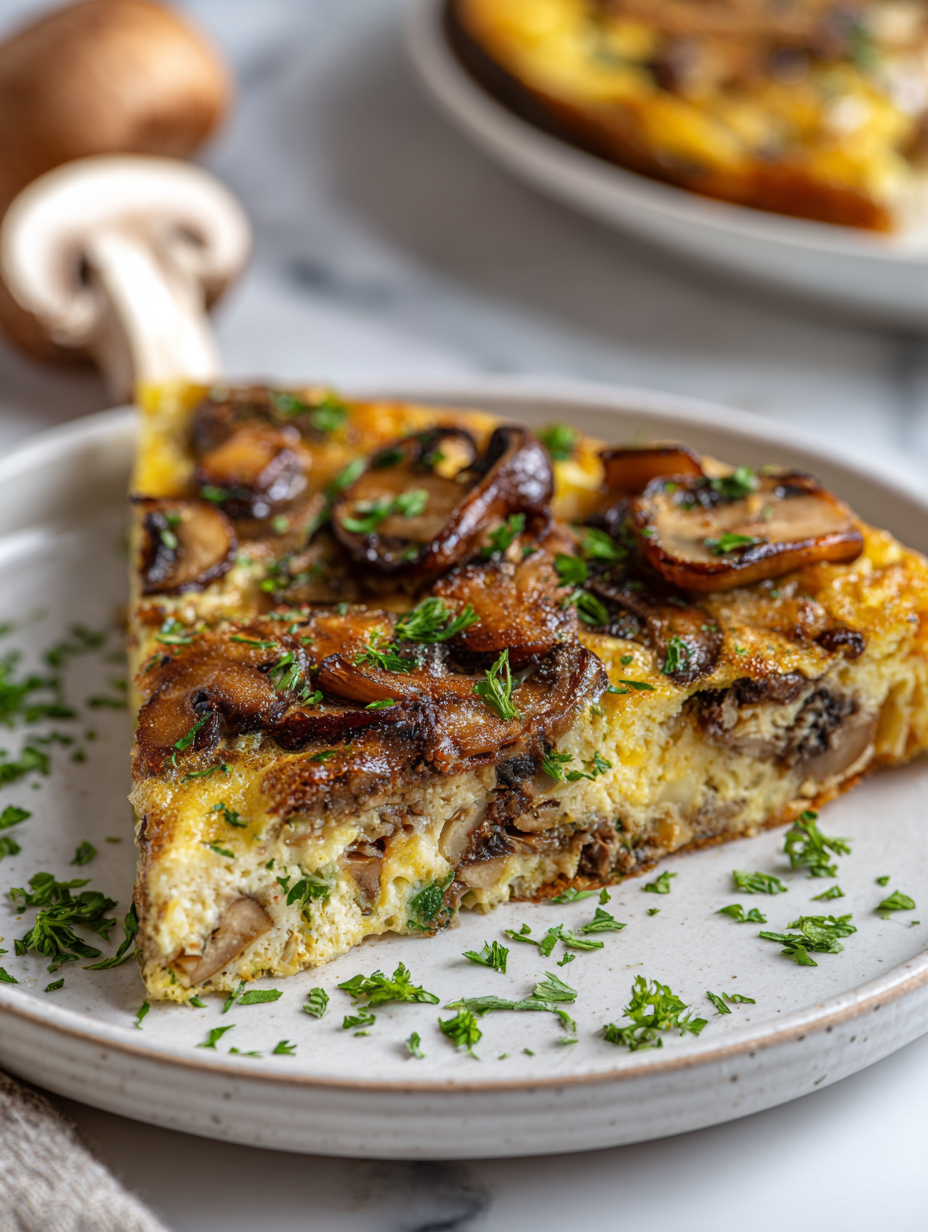
Blog

  • Spooktacularly Weird: The Halloween Monster Mash Punch

    Spooktacularly Weird: The Halloween Monster Mash Punch

    Every October, my kitchen turns into a chaotic carnival of colors and textures as I prepare something truly unconventional—my Halloween Monster Mash Punch. This bright, bubbly brew isn’t just about taste; it’s a visual feast with luminous greens, eerie purples, and blood-red splashes that look straight out of a haunted house. The best part? Its funky scent of citrus and soda that even ghosts can’t resist.

    Unlike typical punches, this recipe embraces the chaos of halloween, blending strange ingredients with a whimsically spooky presentation. It’s a recipe that invites giggles and gasp-worthy reactions from everyone, young and old. The secret? It’s all about turning simple sodas and candies into a monstrous masterpiece that’s as fun to make as it is to sip.

    Halloween Monster Mash Punch

    This vibrant, bubbly punch combines brightly colored sodas, fruit juices, and fun candies to create a visually striking and fizzy beverage. It features a mix of luminous greens, eerie purples, and red splashes, with a lively texture from carbonated drinks and chewy candies, resulting in a fun, spectacle-worthy drink perfect for Halloween festivities.
    Prep Time 15 minutes
    Total Time 15 minutes
    Servings: 8
    Course: Main Course
    Cuisine: Halloween
    Calories: 120

    Ingredients
      

    • 2 cups green fruit punch chilled
    • 2 cups purple grape soda chilled
    • 1 cup red berry-flavored soda chilled
    • 1 cup orange fruit juices chilled
    • 1 cup green gummy worms for garnish
    • 1 cup purple candies (like grapes or gummies) for garnish
    • 1/2 cup red sour candies or red sprinkles for extra blood-red splashes

    Equipment

    • Large punch bowl
    • Mixing spoon

    Method
     

    1. Pour the chilled green fruit punch into a large punch bowl, creating a vibrant base for your monstrous mixture.
    2. Add the purple grape soda to the bowl, pouring gently to maintain the striking color contrast and create a swirling, eerie effect.
    3. Stir the mixture gently with a mixing spoon, blending the different colors while keeping the carbonation lively and bubbly.
    4. Pour in the red berry-flavored soda and the orange fruit juices, watching as the colors meld into a spooky, swirling concoction.
    5. Garnish the punch with green gummy worms by nesting them on the surface, giving a creepy, crawling appearance.
    6. Scatter purple candies across the top, adding pops of color and texture to resemble mysterious gemstones in your potion.
    7. Sprinkle red sour candies or red sprinkles over the surface to mimic blood splashes, enhancing the spooky theme.
    8. Serve the punch immediately in glasses or cups, allowing everyone to enjoy the colorful, bubbling spectacle of your Halloween Monster Mash Punch.

    Notes

    Feel free to add more candies or gummy worms for extra spookiness. For a less sugary version, swap some sodas for fruit-infused waters.

    This punch is a seasonal staple that sparks joy and a little bit of spooky nostalgia at every Halloween gathering. Its playful appearance and surprising flavor combinations make it a standout centerpiece on any party table. Plus, it’s easy enough to whip up in moments when the chaos of costumes and decorations is already in full swing.

    As the night winds down, the glowing remnants of this monstrous drink remain a sweet memory of the evening’s chaos and creativity. The kids will talk about the wild colors and fizzy fun for days, while adults will appreciate how simple ingredients became a jaw-dropping spectacle. Here’s to many more years of creepy sips and spooky cheers!

  • Spice Up Fall with Unusual Pumpkin Cookies

    Spice Up Fall with Unusual Pumpkin Cookies

    As the leaves start to turn and the air crisps, I find myself craving more than just the traditional pumpkin pie. This recipe transforms pumpkin into a cookie experience that balances nostalgia with a surprising twist of spice and texture. It’s perfect for those who want a bake-weekend adventure with a cozy, seasonal outcome.

    Using pumpkin in cookies isn’t new, but infusing them with unexpected ingredients sparks joy and curiosity in my kitchen. Here’s a way to celebrate fall’s bounty with a batch that’s as charming in flavor as it is in appearance. Think of it as a little pumpkin patch in every bite.

    Spiced Pumpkin Cookies

    These cookies incorporate pumpkin puree into a dough flavored with warm spices, resulting in a tender, moist treat with a slightly chewy texture. The cookies are shaped, baked until golden around the edges, and exhibit a soft, cake-like crumb with a festive appearance.
    Prep Time 20 minutes
    Cook Time 12 minutes
    Total Time 32 minutes
    Servings: 12
    Course: Main Course
    Cuisine: American
    Calories: 150

    Ingredients
      

    • 1 1/2 cups all-purpose flour sifted
    • 1/2 cup granulated sugar
    • 1/2 cup brown sugar packed
    • 1/2 cup unsalted butter softened
    • 1 large egg
    • 1 cup plain pumpkin puree or canned pumpkin
    • 1 1/2 teaspoons ground cinnamon
    • 1/2 teaspoon ground ginger
    • 1/4 teaspoon ground nutmeg
    • 1/4 teaspoon salt
    • 1/2 cup chopped walnuts or pecans optional
    • 1/2 cup white chocolate chips optional

    Equipment

    • Mixing bowls
    • Whisk
    • Measuring cups and spoons
    • Baking sheet
    • Parchment paper
    • Cooling Rack

    Method
     

    1. Preheat your oven to 350°F (175°C) and line a baking sheet with parchment paper.
    2. In a large mixing bowl, beat softened butter, granulated sugar, and brown sugar together until the mixture is light and fluffy, about 2-3 minutes. You’ll notice it becoming pale and creamy to the touch.
    3. Add the egg and continue to beat until fully incorporated, giving the batter a smooth, slightly glossy appearance.
    4. Stir in the pumpkin puree until the batter is evenly combined and has a soft, thick consistency.
    5. In a separate bowl, whisk together the sifted flour, cinnamon, ginger, nutmeg, and salt. This ensures even distribution of spices and prevents clumping.
    6. Gradually add the dry ingredients to the wet mixture, folding gently with a spatula or mixing on low speed until just combined. The dough will be thick and slightly sticky.
    7. Fold in the chopped walnuts or pecans and white chocolate chips if using, distributing evenly throughout the dough.
    8. Scoop tablespoon-sized portions of dough and roll into balls, placing them evenly spaced on the prepared baking sheet.
    9. Gently flatten each ball slightly with the back of a fork or your fingers, pressing just enough to encourage even baking and a slightly cracked surface.
    10. Bake in the preheated oven for 10-12 minutes, or until the edges are golden brown and the centers look just set but still soft.
    11. Remove the cookies from the oven and let them cool on the baking sheet for 5 minutes before transferring to a wire rack to cool completely. They will firm up as they cool, revealing a soft, moist crumb.
    12. Serve the cookies once cooled, enjoying their warm spices and tender texture with a cup of tea or coffee.
    These pumpkin cookies are more than a treat; they’re a celebration of fall’s flavors. Perfect for sharing at a family gathering or enjoying quietly on a chilly evening, they bring warmth and a hint of spice.

    Baking these reminds me why seasonal ingredients deserve a special place in our culinary routines. It’s about capturing the essence of the moment and making it taste unforgettable. Sometimes, a simple cookie becomes a cherished memory in the making.

  • Spine-Chilling Elegance: The Halloween Poison Apple Martini

    Spine-Chilling Elegance: The Halloween Poison Apple Martini

    As autumn leaves crunch beneath our feet, the spirit of Halloween beckons our most creative drinks. This Poison Apple Martini is not just a cocktail; it’s a visual and flavorful prank that sparks delight and surprise at any party. Its haunting green hue and candy apple aroma make it impossible to ignore, pulling guests into a world of eerie elegance.

    Today, I explore this luminescent potion from the perspective of a seasoned cocktail enthusiast who loves adding a touch of theatricality to every sip. With a few simple ingredients and a dash of daring, you can craft a drink that feels like liquid Halloween charms. Prepare to enchant your friends with a potion that’s as stunning as it is delicious.

    **WHY I LOVE THIS RECIPE?**

    • It transforms an ordinary evening into a magical experience with minimal effort.
    • The vibrant green color is perfect for Instagram-worthy photos and festive vibes.
    • The combination of sour apple and sweet liqueur hits a nostalgic note for candy-loving hearts.
    • I love how it’s both playful and sophisticated, enchanting guests at any gathering.
    • The scent of green apples and lime makes the whole room feel alive with autumn magic.

    **AVOID MY DISASTER (You’re Welcome)**

    • FORGOT to chill the glass — the cocktail lost its icy crispness. Solution: pre-chill for 15 minutes.
    • DUMPED in too much liqueur — turned into a syrupy mess. Measure carefully to keep balance.
    • OVER-TORCHED the sugar rim — it turned bitter and burnt. Use a gentle blowtorch flame just until golden.
    • SPILLED the red food coloring — accidentally dyed my hand; use a dropper next time for precision.

    **QUICK FIXES THAT SAVE YOUR DAY**

    • When the cocktail is too sour, splash in a dash more apple schnapps to balance sweetness.
    • Patch the color by adding a tiny amount of green food coloring until vibrant.
    • Shield the rim from burning by lowering your torch and moving quickly over the sugar.
    • When you forgot to strain the ice, quickly scoop out large chunks for a cleaner look.
    • When the drink lacks shimmer, stir in a pinch of edible glitter—shimmering potions enchant instantly.

    Crafting the Poison Apple Martini brings a fun and mysterious element to your Halloween table. Its bold look and lively flavors make it a standout among seasonal cocktails. Plus, the playful twist on a classic apple flavor is a sweet reminder of childhood candies with a wicked adult twist.

    As the night deepens and ghosts start to appear, this drink will keep the spirits high. The blend of sour, sweet, and a hint of bitterness captures the essence of spooky season perfectly. Cheers to creating nightmarish delights that are truly unforgettable.

    Poison Apple Martini

    The Poison Apple Martini is a vividly green, visually striking cocktail made with sour apple liqueur, vodka, and lime juice, giving it a tart, sweet flavor. It has a smooth, icy texture with a glowing, luminescent appearance, often enhanced with a sugared rim and edible glitter for a magical presentation.
    Prep Time 10 minutes
    Total Time 10 minutes
    Servings: 2
    Course: Main Course
    Cuisine: Cocktail
    Calories: 180

    Ingredients
      

    • 2 oz sour apple liqueur (e.g., Sour Apple Schnapps)
    • 1 oz vodka
    • 0.5 oz fresh lime juice preferably freshly squeezed
    • a few drops green food coloring adjust for vibrancy
    • pinch edible glitter
    • to taste granulated sugar for rimming the glass

    Equipment

    • Cocktail shaker
    • Martini glasses
    • Small plate for sugar rim
    • Lime wedge

    Method
     

    1. Start by preparing your glasses: spread a thin layer of sugar on a small plate, then rub the rim with a lime wedge and dip it into the sugar to create a sparkling, sugared edge. Set aside.
    2. Fill your cocktail shaker with ice and pour in the sour apple liqueur, vodka, and fresh lime juice. This combination creates the tart base with a refreshing kick.
    3. Add a few drops of green food coloring to the shaker to give the drink its signature glowing, eerie green hue, adjusting until you reach your desired vibrancy.
    4. Secure the lid on the shaker and shake vigorously for about 15 seconds, until the outside feels cold and slightly frosted. You’ll hear the ice clinking and the mixture becoming smooth and chilled.
    5. Remove the shaker from the ice, then strain the vibrant green liquid into your prepared, sugar-rimmed glasses to ensure a clean, ice-free presentation.
    6. Sprinkle a pinch of edible glitter over the top of each cocktail. As you do, you’ll see the glitter shimmer and catch the light, making the drinks look magical and otherworldly.
    7. Garnish each glass with a small lime wedge for a pop of contrasting color and a citrus aroma that complements the drink’s flavor.
    8. Your Poison Apple Martini is now ready to serve. The glowing green color, shimmering glitter, and frosty texture make it perfect for hauntingly festive occasions—enjoy and revel in its eerie charm!

    Notes

    Chill the glasses in advance for an even more refreshing experience. Be careful with the amount of edible glitter to avoid a gritty texture. Use a gentle hand when adding food coloring for the perfect glow.

    Every sip of this Poison Apple Martini is a chance to add a little mystery and magic to your festivities. Its eye-catching color and crisp apple taste are a perfect match for cool autumn nights filled with laughter and stories. Enjoy making it as much as enjoying it—this is the kind of drink that sparks conversations and brings out playful witches and ghouls.

    Remember, the best Halloween parties are those filled with surprises and delightful treats. This cocktail is a small but mighty piece of the spooky puzzle, creating memories that will linger well past October 31. Happy haunting—and cheers to many more spirited creations!

  • Unexpected Twist: Pumpkin Spice Pancakes with a Secret Ingredient

    Unexpected Twist: Pumpkin Spice Pancakes with a Secret Ingredient

    In the quiet of fall mornings, the warm aroma of pumpkin blends effortlessly with cinnamon and nutmeg, creating a nostalgic atmosphere in my kitchen. This recipe takes that comforting scent and transforms it into a stack of pancakes that are both fluffy and bursting with seasonal flavor. What makes these pancakes special isn’t just the spice mix, but one unexpected ingredient that elevates the entire experience.

    As I experimented with traditional pumpkin pancake recipes, I found myself craving a bit more complexity—something that would surprise the palate while still feeling familiar. This twist became my seasonal secret, turning everyday breakfast into a delightful ritual. The smell alone, with hints of pumpkin and toasted spices, invites everyone to gather around the table.

    **WHY I LOVE THIS RECIPE?**

    Pumpkin-Spiced Fluffy Pancakes with Toasted Pecans

    These pumpkin-spiced pancakes are made with a batter that combines pumpkin puree, warm spices, and a fluffy egg mixture, then cooked on a griddle until golden brown. The final pancakes are thick, soft, and studded with toasted pecans, offering a fragrant and visually appealing breakfast treat.
    Prep Time 10 minutes
    Cook Time 15 minutes
    Total Time 25 minutes
    Servings: 4
    Course: Main Course
    Cuisine: American
    Calories: 320

    Ingredients
      

    • 1 1/2 cups all-purpose flour
    • 2 tablespoons brown sugar
    • 1 teaspoon baking powder
    • 1/2 teaspoon baking soda
    • 1/2 teaspoon ground cinnamon
    • 1/4 teaspoon ground nutmeg
    • 1/4 teaspoon ground ginger
    • 1/4 teaspoon salt
    • 1 cup pumpkin puree
    • 2 large eggs
    • 3 tablespoons unsalted butter, melted
    • 1/2 cup milk
    • 1/2 cup toasted pecans, roughly chopped

    Equipment

    • Mixing bowls
    • Whisk
    • Griddle or non-stick skillet
    • Spatula
    • Measuring cups and spoons

    Method
     

    1. In a large mixing bowl, whisk together the flour, brown sugar, baking powder, baking soda, spices, and salt until well combined.
    2. In another bowl, whisk the eggs, then stir in the pumpkin puree, melted butter, and milk until smooth.
    3. Pour the wet mixture into the dry ingredients and gently fold together until just combined; do not overmix, the batter should be slightly lumpy.
    4. Preheat a griddle or non-stick skillet over medium heat until hot, and lightly grease with butter or cooking spray.
    5. Pour 1/4 cup of batter onto the skillet for each pancake. Cook until bubbles form on the surface and the edges look set, about 2-3 minutes.
    6. Flip the pancakes carefully and cook for another 2 minutes, until golden brown and cooked through in the center.
    7. Transfer the cooked pancakes to a plate and repeat with remaining batter, adding more butter or spray as needed.
    8. Once all pancakes are cooked, sprinkle the toasted pecans over the top and serve warm.

    Notes

    For extra flavor, serve with maple syrup or a dollop of whipped cream. To toast pecans, spread them on a baking sheet and bake at 350°F (175°C) for 5-7 minutes until fragrant.
    These pancakes are more than just a seasonal treat; they evoke a sense of cozy mornings and holiday cheer. The secret ingredient is a small but mighty addition that adds a subtle crunch and a hint of caramel, making each bite memorable.

    Now, each time I make these pancakes, I feel a wave of pride knowing I’ve created something both simple and extraordinary. It’s a reminder that little twists can bring new life to familiar comforts, especially during this beautiful season.

  • Spooky Sweetness: Halloween Candy Corn Parfaits to Bewitch Your Taste Buds

    Spooky Sweetness: Halloween Candy Corn Parfaits to Bewitch Your Taste Buds

    As Halloween night descends, I find myself craving something far more enchanting than just candy by the handful. These Candy Corn Parfaits are a playful twist on seasonal treats, merging nostalgia with a touch of elegance in every spoonful. The vibrant layers mimic the iconic candy, but with a sophisticated twist that elevates the simple into the spectacular.

    Crafting these parfaits is like capturing a snapshot of childhood wonder while dressing it up for an adult celebration. The sweet, creamy textures combined with crisp textures and bright colors bring an irresistible charm to your dessert table. They’re perfect for spooky gatherings or a fun twist on your usual Halloween snack.

    ## WHY I LOVE THIS RECIPE?
    – It combines my love for vibrant visuals with delicious flavors.
    – I enjoy the chaotic fun of layers, creating a social media-ready presentation.
    – Nostalgia bubbles up with every sweet, creamy bite.
    – Easy to assemble, making them ideal for last-minute parties.
    – These parfaits turn simple ingredients into a festive centerpiece.

    ## AVOID MY DISASTER (You’re Welcome)
    – FORGOT to chill the whipped cream: It melts quickly. Chill it beforehand.
    – DUMPED the caramel too hot: It melted the layers. Let it cool a bit.
    – OVER-TOASTED the graham crackers: They turned bitter. Watch carefully.
    – MISSED a layer: Flat parfaits look sad. Double-check your layering.

    ## QUICK FIXES THAT SAVE YOUR DAY
    – When whipped cream flattens, stir in a fresh batch of whipped topping.
    – Splash cold milk into melted chocolate for quick solidification.
    – Patch a broken layer using extra whipped cream.
    – Shield with foil if caramel is bubbling over.
    – When in doubt, add more colorful sprinkles for flair.

    Both nostalgic and striking, these parfaits bring a whimsical touch to your Halloween festivities. They echo the playful spirit of the season, combining familiar treats with a fresh presentation. In a world full of pumpkin spice, these colorful cups remind us to enjoy the little, sweet moments.

    As the autumn air turns crisp, indulge in this fun, festive treat that sparks joy and creativity. The bright hues and sweet aroma make it impossible not to smile. Plus, they’re as easy to make as they are delightful to eat, ensuring your party ends on a memorable, colorful note.

    Candy Corn Parfaits

    Candy Corn Parfaits feature vibrant layered desserts that mimic the iconic Halloween candy, combining sweet, creamy elements with crisp cookie layers. The parfaits are assembled into clear glasses to showcase the bright, colorful stripes, resulting in a visually striking and textured treat. The final dessert has a smooth, creamy consistency with crunchy cookie bits and eye-catching color differentiation.
    Prep Time 20 minutes
    Cook Time 10 minutes
    Total Time 30 minutes
    Servings: 4
    Course: Main Course
    Cuisine: Halloween
    Calories: 350

    Ingredients
      

    • 1 cup granulated sugar for the whipped cream
    • 2 cups heavy cream chilled
    • 1 cup Greek yogurt for creaminess
    • 1 cup vanilla pudding store-bought or homemade
    • 24 digestive cookies or graham crackers roughly crushed
    • ½ cup butter melted
    • 1 cup caramel sauce cooled slightly

    Equipment

    • Mixing bowls
    • Blender or food processor

    Method
     

    1. Start by making the whipped cream: pour the chilled heavy cream into a mixing bowl, add sugar, and beat with an electric mixer until soft peaks form, about 3-4 minutes.
    2. Gently fold in the Greek yogurt and vanilla pudding into the whipped cream until smooth and well combined.
    3. In a bowl, combine crushed digestive cookies with melted butter, mixing until the crumbs are evenly coated and sticky.
    4. Spoon a layer of cookie mixture into the bottom of each glass, pressing down lightly to create a firm base.
    5. Add a generous layer of the whipped mixture over the cookie base, smoothing the top with a spoon or spatula.
    6. Pour a thin layer of cooled caramel sauce over the whipped layer, allowing it to drip slightly for a caramel streak effect.
    7. Repeat the layers: add more cookie mixture, then whipped cream, and finish with a caramel drizzle on top.
    8. Decorate the final layer with colorful sprinkles that mimic the iconic candy corn colors for a festive touch.
    9. Chill the parfaits in the refrigerator for at least 15 minutes so flavors meld and the layers set.
    10. When ready to serve, give them a final sprinkle of colorful decorations, and enjoy the vibrant, creamy layers with crisp cookie bits.
    Crafting these Halloween Candy Corn Parfaits offers a delightful way to celebrate the season. Their visual charm and playful layers make them a fun centerpiece for any spooky gathering. Plus, they’re a sweet reminder that sometimes, the simplest ingredients can create the most memorable treats.

    So gather your favorite candies and creamy ingredients. Set out your glasses and let the layering adventure begin. This is more than a dessert; it’s a burst of festive fun that captures the spirit of Halloween in every colorful bite.

  • The Art of the Perfect Turkey Chili: Unexpected Twist That Wins Hearts

    The Art of the Perfect Turkey Chili: Unexpected Twist That Wins Hearts

    As a food blogger obsessed with seasonal flavors, I’ve recently been diving into the comforting world of turkey chili. But this isn’t just any chili; I infuse it with a secret ingredient—smoked paprika and a touch of cinnamon—that transforms the dish into a cozy, almost spicy-sweet masterpiece. It’s the ideal way to warm up during crisp autumn evenings while keeping it light and healthy.

    Sometimes, turkey gets a reputation for being dry or bland, but not in this recipe. The slow simmer unlocks deep savory flavors paired with chunky beans and tender turkey, making every spoonful a revelation. This chili is perfect for those who crave a dish that’s hearty yet unexpectedly nuanced, with just a hint of spice lingering on the tongue.

    Turkey Chili with Smoked Paprika and Cinnamon

    This turkey chili is made using browning and simmering techniques, combining ground turkey with hearty beans and aromatic spices. The dish features a thick, chunky consistency with a rich, savory flavor profile highlighted by smoked paprika and a hint of cinnamon, creating a warm and inviting appearance.
    Prep Time 15 minutes
    Cook Time 45 minutes
    Total Time 1 hour
    Servings: 4
    Course: Main Course
    Cuisine: American
    Calories: 280

    Ingredients
      

    • 1 lb ground turkey lean preferred
    • 1 small yellow onion finely chopped
    • 3 cloves garlic minced
    • 1 tablespoon smoked paprika adds smoky flavor
    • 1 teaspoon ground cinnamon brings warmth
    • 1 can diced tomatoes 14.5 oz can, undrained
    • 1 can kidney beans 15 oz, drained and rinsed
    • 1 cup chicken or vegetable broth for simmering
    • 1 tablespoon olive oil for cooking
    • to taste salt and pepper season as needed

    Equipment

    • Large skillet or Dutch oven
    • Wooden spoon or spatula

    Method
     

    1. Heat olive oil in a large skillet over medium heat until shimmering. Add chopped onion and cook, stirring occasionally, until translucent and slightly golden, about 5 minutes. This builds a fragrant base for the chili.
    2. Add minced garlic to the skillet and cook for another 30 seconds until it becomes fragrant, filling the air with a warm aroma.
    3. Push the onion and garlic mixture to the sides of the pan and add the ground turkey in the center. Break it apart with a wooden spoon and cook until browned all over, about 7-8 minutes.
    4. Sprinkle smoked paprika and ground cinnamon evenly over the browned turkey, stirring to coat and release their warm, smoky scents.
    5. Pour in the diced tomatoes along with their juice, stirring well to combine everything and scrape up any browned bits from the bottom of the pan.
    6. Add drained kidney beans and pour in the broth, stirring to combine. Increase the heat and bring the mixture to a gentle simmer.
    7. Reduce the heat to low, cover, and let simmer gently for about 30 minutes, stirring occasionally, until the chili thickens and flavors meld beautifully.
    8. Uncover and taste the chili, then season with salt and pepper as needed to enhance the flavors.
    9. Give it a good stir and let it simmer uncovered for another 5 minutes to thicken slightly and develop rich flavors.
    10. Turn off the heat and ladle the hot chili into bowls. Garnish with your favorite toppings if desired, and serve warm.

    This turkey chili stands out as a quiet hero on our dinner table, especially as days grow shorter and cravings for something nourishing intensify. The aroma alone—smoky, peppery, with a whisper of cinnamon—can turn a normal evening into something special.

    It’s a recipe that invites experimentation, whether you add a splash of dark beer or a squeeze of fresh lime. The beauty lies in its simplicity and how it perfectly captures the essence of fall comfort. Sharing this bowl feels like wrapping yourself in a warm blanket, ready for any hectic evening to settle into calm and contentment.

  • Unexpected Twist: Orange Zest Chicken Noodle Soup

    Unexpected Twist: Orange Zest Chicken Noodle Soup

    When I think of chicken noodle soup, I imagine it backed with garlic and herbs, yet I recently discovered a secret ingredient that elevates this classic. Orange zest! Adding a splash of citrus brightness transforms the broth into something vibrant and fresh, waking up dull winter flavors.

    This recipe is about the magic of pairing the familiar with a zesty kick. It’s perfect for those days when comfort food needs a little extra sparkle, or when you want to surprise a guest with something both nostalgic and unexpected. The scent of simmering citrus peels mingling with chicken and noodles is truly intoxicating.

    Citrus-Enhanced Chicken Noodle Soup

    This chicken noodle soup features a fragrant broth infused with garlic, herbs, and a splash of fresh orange zest. It’s made by simmering chicken, vegetables, and noodles until tender, resulting in a vibrant, comforting dish with a clear, flavorful broth and a hearty texture.
    Prep Time 15 minutes
    Cook Time 30 minutes
    Total Time 45 minutes
    Servings: 4
    Course: Main Course
    Cuisine: Comfort Food
    Calories: 350

    Ingredients
      

    • 1 lb skinless chicken breasts or thighs
    • 8 cups chicken broth
    • 2 cups egg noodles of your choice
    • 3 cloves garlic minced
    • 2 tablespoons olive oil
    • 2 teaspoons dried thyme
    • 1 orange orange zest freshly grated
    • to taste salt and pepper

    Equipment

    • Large soup pot
    • Chef’s knife

    Method
     

    1. Place the chicken breasts into a large soup pot and cover with chicken broth. Bring to a gentle simmer over medium heat, then cook until the chicken is cooked through and tender, about 15 minutes. Remove the chicken, let it cool slightly, then shred it into bite-sized pieces.
    2. While the chicken is cooking, heat olive oil in a large pot over medium heat. Add the minced garlic and dried thyme, sautéing until fragrant and the garlic turns golden, about 1 minute. The kitchen will fill with a warm, savory aroma.
    3. Add the shredded chicken back into the pot along with the orange zest. Stir everything together, allowing the citrus aroma to mingle with the herbs and chicken for about 2 minutes.
    4. Increase the heat to bring the broth to a gentle boil, then add the egg noodles. Cook for about 8 minutes, or until noodles are tender and plump, and the broth is slightly thickened.
    5. Taste the soup and season with salt and pepper as needed to enhance the flavors. The broth should be vibrant and aromatic, with tender noodles and juicy pieces of chicken floating in it.
    6. Serve the soup hot in bowls, spooning the broth, noodles, and chunks of chicken into each serving. The soup should look inviting with a clear, citrus-infused broth and a hearty, steaming appearance.

    This twist on chicken noodle soup proves that a simple ingredient swap can invigorate a timeless dish. It’s an easy way to brighten up cold evenings or make a comforting lunch feel new. Sometimes, small tweaks create the biggest smiles in the kitchen.

    Enjoy the sunlit aroma of citrus mingling with savory broth, and watch as everyone eagerly ladles up each spoonful. It’s a dish that invites smiles, nostalgia, and a little bit of culinary adventure in every bowl.

  • Spooky Spider Web Cake: A Halloween Showstopper

    Spooky Spider Web Cake: A Halloween Showstopper

    On a chilly October evening, nothing screams Halloween more than a cake that looks like a hauntingly beautiful spider web. This decorating challenge is my guilty pleasure—every swirl of black icing and delicate web pattern feels like casting a spell of delicious chaos. It’s the perfect project to channel your inner pastry artist and impress at any costume party or pumpkin patch gathering.

    Crafting this cake isn’t just about aesthetics; it’s about creating a sensory experience. The rich chocolate layers paired with the vanilla frosting make each bite a delightful mix of sweet, bitter, and creamy textures. The web design adds a touch of spooky artistry, making your dessert not just tasty but a conversation piece.

    Halloween Spider Web Cake

    This cake features rich chocolate layers topped with vanilla frosting, decorated with a black icing web pattern. The web design creates a striking visual effect reminiscent of a haunted web, combining smooth frosting with detailed piping. The final appearance is a spooky yet elegant cake perfect for Halloween festivities.
    Prep Time 30 minutes
    Cook Time 35 minutes
    Total Time 1 hour 5 minutes
    Servings: 8
    Course: Main Course
    Cuisine: Halloween
    Calories: 520

    Ingredients
      

    • 2 cups all-purpose flour sifted
    • 1 3/4 cups granulated sugar
    • 3/4 cup unsweetened cocoa powder unsweetened
    • 1 1/2 teaspoons baking powder
    • 1 1/2 teaspoons baking soda
    • 1/2 teaspoon salt
    • 2 large eggs at room temperature
    • 1 cup whole milk
    • 1/2 cup vegetable oil
    • 2 teaspoons vanilla extract
    • 1 cup boiling water hot
    • 2 cups unsalted butter softened
    • 4 cups confectioners’ sugar sifted
    • 1 teaspoon vanilla extract
    • Black food coloring or black icing for web decoration prepared icing or edible black gel

    Equipment

    • Mixing bowls
    • Electric mixer or whisk

    Method
     

    1. Preheat your oven to 350°F (175°C). Grease and flour two 9-inch round cake pans. In a large bowl, sift together the flour, cocoa powder, baking powder, baking soda, and salt. Add the sugar and mix until combined.
    2. In a separate bowl, whisk the eggs, milk, oil, and vanilla until smooth. Pour the wet mixture into the dry ingredients and beat on medium speed for about 2 minutes until well combined.
    3. Carefully stir in the boiling water; the batter will be thin but that’s normal. Pour the batter evenly into the prepared cake pans.
    4. Bake for 30 to 35 minutes, or until a toothpick inserted into the center comes out clean. Remove from oven and let the cakes cool in the pans for 10 minutes, then turn out onto wire racks to cool completely.
    5. In a large bowl, beat the softened butter until creamy and pale. Gradually add the confectioners’ sugar, mixing well after each addition. Mix in vanilla and beat until fluffy. If desired, tint the frosting black for web decoration.
    6. Place one cake layer on a serving plate and spread an even layer of frosting over the top. Top with the second cake layer and apply a thin crumb coat all over the cake. Chill for 30 minutes to set the crumb coat.
    7. Apply a final thick layer of frosting smoothly around the cake’s surface, creating an even finish. Chill the cake again for 20 minutes to firm up the surface.
    8. Transfer the black icing or gel into a piping bag fitted with a small round tip. Starting at the center of the cake’s top, pipe outward concentric circles to form a web pattern. Use a toothpick or skewer to gently draw lines from the center to the edges, connecting the circles to complete the web.
    9. Continue to refine the web pattern, making sure the lines are clean and evenly spaced. Chill briefly if needed to set the design.
    10. Once the web is complete, transfer the decorated cake to a serving platter. Slice and enjoy your spooky, web-themed chocolate cake!

    This Halloween, this Spider Web Cake isn’t just about impressing guests; it’s about celebrating the joy of creative baking. The blend of spooky aesthetics and rich flavors makes it a memorable centerpiece that will have everyone talking long after the last piece is gone.

    As the season gets darker and the nights grow colder, turning to homemade treats like this keeps the spirits high. The mix of chaos and art reminds me why I adore baking—each cake is a small, sweet rebellion against the ordinary. And really, what’s more Halloween than a web spun with your own two hands?

  • Creep Your Dinner with Halloween Eyeball Pasta!

    Creep Your Dinner with Halloween Eyeball Pasta!

    As October chills the air, I find myself craving a dinner that’s as festively spooky as it is fun to make. Halloween Eyeball Pasta transforms a simple spaghetti dish into a playful, slightly gory centerpiece that kids and adults alike will adore. The secret? Juicy meatball “eyeballs” that seem to stare back with every twirl of your fork.

    Rolling the meatballs into perfectly round, creepy eyeballs is oddly satisfying, reminiscent of childhood costume parties and pumpkin carving chaos. The oozing marinara mimics blood, making each bite a small horror in the best way. It’s a perfect way to combine creativity with comfort food during spooky season.

    Halloween Eyeball Pasta

    Halloween Eyeball Pasta features spaghetti topped with meatball
    Prep Time 20 minutes
    Cook Time 30 minutes
    Total Time 50 minutes
    Servings: 4
    Course: Main Course
    Cuisine: Halloween
    Calories: 620

    Ingredients
      

    • 1 pound spaghetti
    • 1.5 lbs ground beef preferably 80% lean
    • 1/2 cup bread crumbs
    • 1 large egg
    • 2 cloves garlic minced
    • 1 cup marinara sauce
    • 1 small small mozzarella balls for the eyeballs
    • to taste salt and pepper
    • 1 tablespoon olive oil

    Equipment

    • Large pot
    • Baking sheet
    • Mixing bowls
    • Skillet
    • Large spoon

    Method
     

    1. Bring a large pot of salted water to a boil and cook the spaghetti according to package instructions until al dente. Drain and set aside.
    2. Preheat your oven to 400°F (200°C). In a mixing bowl, combine ground beef, bread crumbs, egg, minced garlic, salt, and pepper. Mix until well combined, then roll the mixture into equal-sized meatballs.
    3. Place the meatballs on a baking sheet lined with parchment paper and bake for about 15-18 minutes, until browned and cooked through.
    4. While the meatballs bake, heat olive oil in a skillet over medium heat. Once hot, add marinara sauce and simmer gently, creating a bubbling, fragrant sauce.
    5. Meanwhile, reheat the cooked spaghetti briefly if needed, then toss it with the hot marinara sauce until evenly coated and glossy.
    6. Once the meatballs are done, place the spaghetti on serving plates. Top each serving with three to four meatballs, and insert small mozzarella balls into the center of each meatball, pressing gently to resemble eyeballs with pupils.
    7. Arrange the eyeball meatballs on the pasta, then spoon extra marinara sauce around the dish for a spooky blood-like effect. Optionally, add chopped herbs or red pepper flakes for extra flavor and visual flair.
    8. Serve immediately while hot, allowing everyone to enjoy the fun, creepy appearance and comforting flavors of this Halloween-themed pasta.

    Notes

    For extra spookiness, you can add sliced olives or red pepper to mimic blood vessels around the eyeballs.

    This dish isn’t just about the fun visuals; it’s a flavorful riot too. The savory meatballs, coupled with tangy, spicy tomato sauce, create a wholesome yet mischievous meal. It’s perfect for a family feast that bursts with humor and flavor under the eerie glow of Halloween decorations.

    Plus, it’s surprisingly easy to pull off even during a busy weeknight. The next time you want to turn dinner into a fun, memorable moment, whip up this eerie pasta. It’s a playful reminder that sometimes, the messiest ideas make the most lasting memories.

  • The Art of the Mango Slushie: A Tropical Escape in Your Glass

    The Art of the Mango Slushie: A Tropical Escape in Your Glass

    Imagine capturing the essence of a tropical island on a scorching summer day. The mango slushie isn’t just a drink; it’s a mini vacation for your taste buds, blending the ripe sweetness of mango with a cool, refreshing chill. This recipe transforms simple frozen fruit into a vibrant, zesty treat that instantly lifts your mood.

    What’s unique about this mango slushie? It’s all about the balance—bright citrus notes meet the mellow, honey-like flavor of ripe mango. The texture is silky smooth yet icy, like biting into a freshly frozen mango orchard.

    Mango Slushie

    This mango slushie is a frozen beverage made by blending ripe mango chunks with citrus juice and ice, resulting in a silky, icy texture. The drink offers a vibrant flavor combination of sweet mango and zesty citrus, creating a refreshing tropical treat with a bright appearance. It’s perfect for hot days and captures the essence of a tropical island vacation in a glass.
    Prep Time 10 minutes
    Total Time 10 minutes
    Servings: 2
    Course: Main Course
    Cuisine: Tropical
    Calories: 150

    Ingredients
      

    • 2 cups ripe mango chunks fresh or frozen
    • 1/2 cup fresh citrus juice lime or lemon juice
    • 1 cup ice cubes
    • 1-2 tablespoons honey or agave syrup optional, for added sweetness

    Equipment

    • Blender
    • Measuring cup

    Method
     

    1. Measure out the mango chunks and place them into your blender. If using fresh mango, peel and cut into chunks beforehand.
    2. Add the fresh citrus juice and honey or agave syrup to the blender with the mango. This will enhance the bright, zesty flavor and balance the sweetness.
    3. Pile the ice cubes into the blender, ensuring they are evenly distributed for a consistent icy texture.
    4. Secure the lid on the blender and blend on high speed until the mixture is smooth and frosty, with a silky consistency that’s easy to pour.
    5. Taste the slushie and adjust sweetness if needed by adding more honey or citrus juice, blending briefly to incorporate.
    6. Pour the vibrant mango slushie into glasses, showcasing its bright orange color and inviting icy texture.
    7. Optionally, garnish with a slice of lime or a sprig of mint for a fresh finish.

    Notes

    For an extra smooth texture, blend longer or add a little more citrus juice to help the mixture blend more easily.
    As the heat waves roll in, having a cold mango slushie on hand feels like an instant escape. It’s quick to whip up, and the flavor punch is addictive enough to suit any summer gathering or solo afternoon retreat. Keep a handful of ripe mangoes in your freezer and this refreshing concoction is always within reach.

    The beauty of a mango slushie is how it makes you feel—bright, energized, and ready to conquer the day. Whether it’s for a backyard barbecue or an unexpected guest, this recipe brings a touch of sunshine to your glass. Cheers to cool moments and sweet memories, all in one sip.