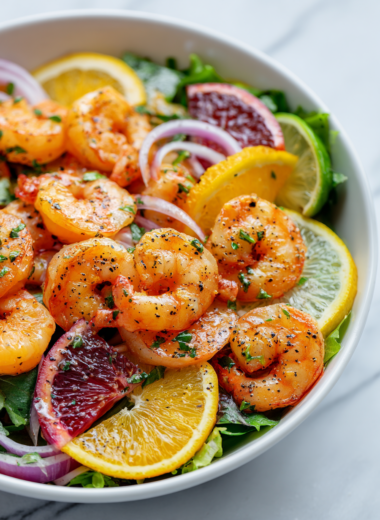
Blog

  • The Secret Vanilla Slushie That Turns Lazy Afternoons Into Flavor Festivals

    The Secret Vanilla Slushie That Turns Lazy Afternoons Into Flavor Festivals

    WHY I LOVE THIS RECIPE?

    • Reminds me of childhood summer afternoons, simple and bursting with vanilla aroma.
    • The texture is playful — crunchy ice that melts into smooth freshness.
    • Very forgiving recipe—adjust sweetness and creaminess easily.
    • Perfect for last-minute cravings, with just a handful of pantry staples.

    AVOID MY DISASTER (You’re Welcome)

    • FORGOT to blend long enough, ended up with chunky ice. Just re-blend, no worries!
    • DUMPED in too much vanilla extract—totally overpowering. Use sparingly!
    • OVER‑TORCHED the sugar syrup — caramel scent was not what I wanted. Keep heat steady.
    • FORGOT to chill the glass, and it spilled everywhere. Chill it beforehand, or serve immediately!

    QUICK FIXES THAT SAVE YOUR DAY

    • When texture is too icy—splash in a splash of milk or cream and re-blend gently.
    • Patch flavor—add a dash of vanilla extract or vanilla bean paste for extra aroma.
    • Shield over-blended ice—pulse instead of continuous blend to keep crunch.
    • When sweetness is lacking—mix in a quick syrup or honey for a quick dress-up.
    • If the mixture isn’t cold enough—blend with ice right before serving for immediate chill.

    Vanilla Blueberry Ice Slush

    This ice slush is made by blending crushed ice with vanilla extract and fresh blueberries to create a refreshing, crunchy-textured dessert. The mixture results in a snowy, smooth consistency with bursts of berry flavor and a fragrant vanilla aroma. It’s a simple, nostalgic treat that showcases the interplay of icy crunch and smooth chill.
    Prep Time 5 minutes
    Total Time 5 minutes
    Servings: 2
    Course: Main Course
    Cuisine: American
    Calories: 120

    Ingredients
      

    • 3 cups crushed ice preferably finely crushed
    • 1 teaspoon vanilla extract use pure vanilla
    • 1/2 cup fresh blueberries washed and stems removed

    Equipment

    • Blender
    • Measuring cups and spoons
    • Serving glasses or bowls

    Method
     

    1. Place the crushed ice into the blender, filling it about three-quarters full for easy blending.
    2. Pour in the vanilla extract over the ice to evenly distribute the fragrant flavor throughout.
    3. Add the fresh blueberries on top of the ice, distributing them for vibrant bursts of color and fruitiness.
    4. Secure the lid tightly on the blender and pulse gently to start breaking down the ice, listening for that satisfying crunching sound.
    5. Blend on medium-high speed until the mixture is smooth and icy, with a slightly slushy texture and visible berry pieces.
    6. Pour the icy mixture into chilled glasses or bowls, letting it overflow slightly for a layered look.
    7. Garnish with a few extra blueberries or a sprig of mint if desired, enhancing visual appeal and freshness.

    Notes

    To prevent over-blending, pulse in short bursts to keep the crunch. If the mixture is too icy, add a splash of milk or cream and gently blend again to achieve the desired consistency.
    This vanilla slushie feels like a small rebellion against the heat, a quick escape into nostalgic bliss. It7s surprisingly versatile and easy to whip up, making it an ideal companion for lazy weekends or spontaneous gatherings.

    As the season shifts and the days grow warmer, having a simple frozen treat on hand becomes more than just a luxury—it’s a necessity. Whether enjoyed on a porch or packed in a cooler for a picnic, these icy vanilla dreams bring a little magic to everyday moments.

  • The Surprising Art of Simmering: A Tomato Sauce with a Twist

    The Surprising Art of Simmering: A Tomato Sauce with a Twist

    Imagine a kitchen filled with the warm aroma of ripe tomatoes, garlic, and a secret ingredient that whispers nostalgia. I stumbled upon this method during a chaotic Sunday, where I was craving something familiar yet unexpectedly complex. The magic happens as the simple ingredients dance together, creating a sauce that’s both comforting and oddly adventurous.

    This recipe isn’t just about the tastiness of the sauce; it’s about rethinking what a tomato sauce can be. It’s perfect for those days when you want something homemade but don’t want to spend hours in the kitchen. Plus, the secret ingredient turns this classic into a conversation starter among friends and family.

    Tomato Garlic Sauce with a Secret Ingredient

    This tomato garlic sauce is made by simmering ripe tomatoes, garlic, and a secret ingredient to develop a rich, velvety texture. The process involves sautéing, blending, and simmering to create a flavorful, smooth sauce with a hint of nostalgia. The final dish showcases a vibrant, thick consistency suitable for serving over pasta, bread, or grilled vegetables.
    Prep Time 10 minutes
    Cook Time 30 minutes
    Total Time 40 minutes
    Servings: 4
    Course: Main Course
    Cuisine: Homestyle
    Calories: 85

    Ingredients
      

    • 4 cups ripe tomatoes chopped
    • 3 cloves garlic minced
    • 1 teaspoon salt
    • 1 tablespoon olive oil
    • 1 teaspoon sugar to balance acidity
    • 1 piece bay leaf optional for depth
    • 1 teaspoon dried oregano
    • 1 teaspoon balsamic vinegar the secret ingredient

    Equipment

    • Chef’s knife
    • Medium saucepan

    Method
     

    1. Heat the olive oil in a medium saucepan over medium heat until shimmering, and then add the minced garlic. Sauté for about 30 seconds until fragrant, hearing a gentle sizzle and noticing the garlic turn a light golden. Stir frequently to prevent burning.
    2. Add the chopped ripe tomatoes to the pan, and cook for 5-7 minutes, stirring occasionally, until they start breaking down and releasing their juices. The mixture should become fragrant and slightly thickened.
    3. Stir in the salt, sugar, dried oregano, and the bay leaf if using. Let the sauce simmer gently for another 15 minutes, until the tomatoes are very soft and the flavors meld together, filling the kitchen with a warm aroma.
    4. Remove the bay leaf, then pour the mixture into a blender or use an immersion blender to purée the sauce until smooth and velvety. Be cautious of hot splatters during blending.
    5. Return the sauce to the saucepan and stir in the balsamic vinegar, the secret ingredient that adds depth and a subtle sweetness. Simmer for an additional 5 minutes to marry the flavors.
    6. Check the seasoning, adjusting with more salt or sugar if needed. The sauce should be thick, glossy, and vibrant in color, with a harmonious balance of acidity and sweetness.
    This tomato sauce is more than just a topping; it’s a reminder of how a few simple ingredients can transform into something extraordinary. Whether draped over pasta or spooned onto crusty bread, it’s a versatile companion ready to elevate any meal.

    Don’t be surprised if this becomes your go-to recipe during busy weekdays or lazy weekends. The depth of flavor and the warm, inviting smell make it a true home cook’s treasure. Every simmer releases more than just aroma—it ignites a little joy in the kitchen.

  • Chilling Secrets: The Surprising Art of Caramel Slushie Crafting

    Chilling Secrets: The Surprising Art of Caramel Slushie Crafting

    Imagine a sweltering summer day where the only thing that could save you from the heat is a drink so decadent, it whispers of caramel dreams. Instead of the usual icy mixes, I stumbled upon a method that amplifies that rich caramel aroma with a hint of salty chaos, transforming a simple slushie into an obsession. This recipe isn’t just about cooling down; it’s about elevating your frozen treat game to a whole new level.

    What makes this caramel slushie stand out is its layered history and unconventional twist. I experimented with different caramel intensities and added a splash of sea salt to balance the sweetness, creating a flavor profile that dances on the tongue. Now, whenever I need a quick reprieve, this chilly delight is my go-to, turning even the gloomiest days into moments of sugary joy.

    Salted Caramel Slushie

    This salted caramel slushie combines rich caramel with a splash of sea salt, blended into a icy, smooth beverage. The mixture is prepared using caramel sauce and then frozen and blended until creamy, resulting in a visually appealing, velvety texture. It offers a sweet, salty, and indulgent frozen treat perfect for hot days.
    Prep Time 10 minutes
    Total Time 10 minutes
    Servings: 2
    Course: Main Course
    Cuisine: Modern
    Calories: 200

    Ingredients
      

    • 1/2 cup Caramel sauce preferably salted
    • 1 cup Milk dairy or non-dairy alternative
    • 1 cup Crushed ice or ice cubes enough to fill the blender
    • 1/4 teaspoon Sea salt to enhance caramel flavor

    Equipment

    • Blender
    • Measuring cups and spoons
    • Ice cube tray or crushed ice

    Method
     

    1. Pour the caramel sauce and milk into the blender, and blend on low speed until the mixture is well combined and slightly frothy.
    2. Add the crushed ice or ice cubes to the blender, filling it up to the top.
    3. Sprinkle the sea salt over the mixture, then increase the blender speed to high, blending until the ice is broken down and the mixture becomes smooth and slushy, about 30-40 seconds.
    4. Pause briefly to check the texture; if it’s too thick, add a splash more milk and blend again for a softer consistency.
    5. Once the slushie is thick, creamy, and vibrant in color, turn off the blender and pour into chilled glasses.
    6. Optional: Garnish with a drizzle of caramel or a pinch of sea salt on top for extra flavor and visual appeal.
    7. Serve immediately with a straw and enjoy this cold, decadent treat.

    Notes

    For best results, use high-quality caramel sauce and freshly crushed ice. Adjust the salt to taste for a more or less salty flavor.

    Every spoonful delivers a satisfying crunch of ice combined with utterly luscious caramel that stays with you long after the last sip. It’s a reminder that some simple ingredients, when handled with a bit of flair, can become pure magic during the hottest months.

    As the season slides into peak summer, this caramel slushie offers a nostalgic yet fresh escape. It’s perfect for backyard gatherings, solo indulgence, or a quick burst of happiness in the middle of a hectic day. Keep the blender ready; this treat is bound to become your new favorite way to beat the heat.

  • Chill Out with the Most Unexpected Chocolate Slushie Twist

    Chill Out with the Most Unexpected Chocolate Slushie Twist

    On those scorchingly hot days, I crave icy treats that shock my taste buds. But instead of reaching for the usual popsicle, I stumbled upon a secret trick to make a chocolate slushie that combines childhood nostalgia with a daring flavor twist. This recipe is my go-to when I want a frozen hug, but with a kick of something extraordinary.

    What makes this chocolate slushie special isn’t just the velvety richness of cocoa but how it transforms with unexpected ingredients—think a dash of smoky salt or a swirl of spicy chili. It’s perfect for backyard parties or a solo escape after a busy day. I promise, it’s not just a drink, it’s an adventure in every sip.

    **WHY I LOVE THIS RECIPE?**

    • My childhood favorite with a modern, rebellious twist.
    • The surprising flavors make it feel like a special treat every time.
    • It’s so easy—blend, freeze, enjoy — no fuss.
    • Perfect for spontaneous hot days or unexpected guests.
    • The texture is insanely smooth, almost like velvet melting on your tongue.

    **AVOID MY DISASTER (You’re Welcome)**

    • FORGOT to check the ice-to-liquid ratio? Ended up waterlogged. Reduce the ice slightly!
    • DUMPED in too much cocoa powder? Bitter slush. Balance with a little milk or cream.
    • OVER-TORCHED the chocolate? Smells burnt. Use gentle heat and stir constantly.
    • FROZEN fruit got stuck to the freezer? Let it thaw for a few minutes to blend better.

    **QUICK FIXES THAT SAVE YOUR DAY**

    • When the texture’s too icy, splash in a little more milk and blitz again.
    • Patch a flavor dullness with a dash of vanilla extract or a pinch of sea salt.
    • Shield chaos by pre-chopping frozen ingredients to avoid clumping.
    • If mixture is too thick, add a splash of cold water—shimmering with ease.
    • When in doubt, a quick run under hot water melts stubborn blocks in seconds.

    Chocolate Spicy Chili Slushie

    This chocolate slushie combines the richness of cocoa with a spicy kick, resulting in a velvety, frozen beverage. It uses blending and freezing techniques to achieve a smooth, icy texture with surprising flavor contrasts. The final appearance is a thick, chocolatey slush with a glossy surface and hints of spice and smokiness.
    Prep Time 10 minutes
    Total Time 10 minutes
    Servings: 2
    Course: Main Course
    Cuisine: Fusion
    Calories: 150

    Ingredients
      

    • 1 cup whole milk for blending and smooth texture
    • 1/2 cup unsweetened cocoa powder for rich chocolate flavor
    • 1/4 teaspoon smoked sea salt adds smoky depth
    • 1 teaspoon chili powder for a spicy kick
    • 1 tablespoon honey sweetens and balances spice
    • 1 cup ice cubes for chilling and thickening

    Equipment

    • Blender
    • Freezer

    Method
     

    1. Add milk, cocoa powder, smoked salt, chili powder, and honey into a blender. Blend on high until the mixture is smooth and velvety, with no lumps, and the aroma of cocoa and spices is fragrant.
    2. Add the ice cubes to the blender and pulse a few times to start crushing the ice, then blend on high until the mixture is thick, slushy, and glossy, about 30-45 seconds. The texture should be creamy but with a noticeable icy bite.
    3. Stop the blender and check the texture; if it’s too icy, add a splash more milk or honey and blend briefly again until desired consistency is achieved. If it’s too thin, add a few more ice cubes and blend again for a thicker consistency.
    4. Pour the slushie mixture into chilled glasses. The surface should be a glossy, thick layer with visible flecks of chili and smoky salt particles for an appealing look and flavor burst.
    5. Garnish with a tiny sprinkle of smoked salt or a chili flake if desired. Serve immediately with a straw or spoon, enjoying the contrast of cold, creamy chocolate and spicy warmth.

    Notes

    Ensure the ice is fresh and slightly crushed before blending for a smoother texture. Adjust spice levels according to your taste. For an extra smoky flavor, add a dash of smoked paprika instead of smoked salt.

    This chocolate slushie recipe is a true reflection of summer’s playful spirit. Its sudden burst of unconventional spices or textures reminds us to enjoy the moments of surprise. Each sip carries a burst of joy that’s perfect for relishing in the present.

    Even as the season shifts, this recipe stays fresh because it captures that carefree, spontaneous vibe. It’s a simple but memorable way to turn ordinary ingredients into a memorable frozen treat. Let it be your secret weapon on the hottest days or whenever you crave an unexpected chocolate escape.

  • The Hidden Smokiness of Eggplant Parmesan: A Unique Twist

    The Hidden Smokiness of Eggplant Parmesan: A Unique Twist

    Most Eggplant Parmesan recipes stick to the classic baked breaded slices topped with marinara and melted cheese. But today, I want to share a version inspired by smoky, charred flavors that brings a new dimension to this familiar comfort.

    This recipe was born out of my obsession with outdoor grilling. I discovered that eggplants develop a complex, smoky aroma when charred over open flames, which transforms the whole dish. It’s a game-changer for anyone looking to elevate their vegetable game with a hint of rustic fire.

    Instead of conventional breading, I broil the slices until slightly blackened for that irresistible smoky aroma. Then, layering them with seasoned tomato sauce and a mix of cheeses creates a rich, layered experience. This dish is about celebrating the eggplant’s natural umami while adding a bit of outdoor grill magic.

    Smoky Charred Eggplant Parmesan

    This variation of classic Eggplant Parmesan involves grilling eggplant slices over open flames until charred and smoky, then layering them with seasoned tomato sauce and cheese. The dish features tender, smoky, and slightly crisp eggplant layers topped with melted cheese, creating a flavorful, layered casserole with a rustic appearance.
    Prep Time 15 minutes
    Cook Time 30 minutes
    Total Time 45 minutes
    Servings: 4
    Course: Main Course
    Cuisine: Italian-inspired
    Calories: 350

    Ingredients
      

    • 2 large eggplants sliced into 1/2-inch thick rounds
    • 2 cups marinara sauce seasoned and warmed
    • 1 cup mozzarella cheese shredded
    • 1/2 cup Parmesan cheese grated
    • 2 tablespoons olive oil for brushing
    • to taste salt and pepper for seasoning

    Equipment

    • Grill or open flame
    • Baking sheet
    • Cooking tongs
    • Oven broiler
    • Cooking brush
    • Mixing bowls

    Method
     

    1. Preheat your grill or prepare an open flame. Brush the eggplant slices lightly with olive oil and season with salt and pepper. Place the slices directly over the flame or on the grill grates, charring each side until the skin blisters and the flesh develops a smoky aroma, about 3-4 minutes per side.
    2. Remove the eggplant slices from the heat and let them cool slightly until they are comfortable to handle, about 5 minutes.
    3. Lay the grilled eggplant slices flat on a baking sheet. If some slices are larger, cut them into manageable pieces for layering.
    4. Spoon a generous layer of seasoned marinara sauce over each eggplant slice, covering the surface evenly.
    5. Sprinkle shredded mozzarella over the tomato sauce layer, followed by a sprinkle of grated Parmesan cheese for added flavor.
    6. Repeat the layering process—eggplant, sauce, cheese—until all slices are assembled into a layered stack or casserole.
    7. Place the assembled dish under the broiler in the oven until the cheese is bubbly and golden, about 5-7 minutes. Keep an eye on it to prevent burning.
    8. Remove from the oven, let it rest for a few minutes to set, then serve hot, enjoying the smoky, cheesy layers.

    Notes

    For extra smoky flavor, you can also add a touch of smoked paprika to the eggplant before grilling.

    This recipe arrives just in time for the season when fresh eggplants are at their peak. The smoky notes pair beautifully with rustic bread or a crisp green salad. It’s a dish that tells a story—one of outdoor summer evenings and simple, honest flavors.

    Sharing this version of Eggplant Parmesan feels like inviting a little of the backyard into the cozy kitchen. Every bite carries a hint of the flames, a reminder that good food is often about embracing imperfectly perfect moments. Enjoy the subtle chaos of flavors and textures this dish offers—just don’t forget that smoky aroma lingering on your fingertips.

  • Sun-Kissed Peach Crumble: A Nostalgic Summer Delight

    Sun-Kissed Peach Crumble: A Nostalgic Summer Delight

    There’s something magical about the scent of ripe peaches bubbling under a golden crumble. It transports me straight back to lazy summer afternoons at my grandparents’ orchard, where peaches were fresh and flavors were pure. This recipe captures that essence with just a handful of pantry ingredients and a simple baking ritual.

    What makes this peach crumble stand out is its ability to balance the juicy, floral sweetness of peaches with a crunchy, buttery topping. Each bite offers a satisfying contrast—soft fruit with a crisp crust—perfect for cooling down and indulging this season. It’s a humble dessert that holds a special place in my summer kitchen.

    Peach Crumble

    This peach crumble involves tossing fresh peach slices with sugar and a bit of lemon juice, then topping them with a buttery, oat-filled crumble mixture. The dish is baked until the fruit is bubbling and the topping is golden brown, resulting in a warm, juicy interior with a crispy, crumbly crust.
    Prep Time 15 minutes
    Cook Time 35 minutes
    Total Time 50 minutes
    Servings: 4
    Course: Main Course
    Cuisine: American
    Calories: 290

    Ingredients
      

    • 4 cups fresh peaches, sliced ripe and fragrant
    • 0.5 cup granulated sugar for tossing peaches
    • 1 tablespoon lemon juice to enhance peach flavor
    • 1 cup all-purpose flour for the crumble topping
    • 1 cup old-fashioned oats adds crunch
    • 0.5 cup brown sugar for sweetness in topping
    • 0.5 cup unsalted butter, cold cut into small pieces
    • 0.25 teaspoon salt balances sweetness

    Equipment

    • Mixing bowls
    • Baking dish
    • Pastry cutter or fork
    • Measuring cups and spoons

    Method
     

    1. Preheat your oven to 375°F (190°C) and lightly butter a baking dish to prevent sticking.
    2. Combine sliced peaches with granulated sugar and lemon juice in a large mixing bowl. Toss gently until the peaches are evenly coated and look glistening with syrup.
    3. Spread the juicy peach slices into the prepared baking dish in an even layer, creating a vibrant, fruit-filled base.
    4. In a separate bowl, combine the flour, oats, brown sugar, and salt. Mix well to distribute all dry ingredients evenly.
    5. Add the cold butter pieces to the dry mixture. Use a pastry cutter or fork to cut in the butter until the mixture resembles coarse crumbs with pea-sized pieces.
    6. Sprinkle the crumble topping evenly over the peaches, covering the fruit completely for a generous, craggy surface.
    7. Bake in the preheated oven for about 35 minutes, or until the topping is golden brown and the mixture is bubbling along the edges.
    8. Remove from the oven and let cool slightly—this helps the juices thicken. Serve warm, ideally with a scoop of vanilla ice cream or a dollop of whipped cream.

    Notes

    For a more rustic look, slightly roughen the crumble topping with your hands before baking. Adjust sweetness according to peach ripeness and personal taste.

    In the end, this peach crumble is more than just a dessert—it’s a memory waiting to happen each time it’s baked. The aroma alone sparks conversations and smiles around my table. Whether for a laid-back weekend or a spontaneous get-together, it’s a go-to treat that always impresses.

    As summer drifts away, I find myself turning to recipes like this—simple, nostalgic, yet full of flavor. The best part is how adaptable it is to seasonal fruits or whatever I have in the pantry. It keeps the spirit of sun-ripened peaches alive in every warm, fragrant slice.

  • Spooky Delight: Halloween Mummy Hot Dogs

    Spooky Delight: Halloween Mummy Hot Dogs

    Every October, I find myself craving a mix of nostalgia and chaos, especially when it comes to holiday treats. This year, I decided to get a little creative with the classic hot dog, transforming it into an eerie mummy that’s both playful and surprisingly satisfying. The smell of sizzling puff pastry and hot dogs is an instant reminder of childhood Halloweens, infused with a mischievous twist.

    What sets these Mummy Hot Dogs apart is their simplicity and the fun chaos of wrapping dough with a messy, mummy-like flair. They’re perfect for last-minute parties or a fun kitchen adventure with kids. Plus, their spooky appearance guarantees plenty of oohs, ahhs, and giggles at your gathering.

    **WHY I LOVE THIS RECIPE?**

    • I love how this recipe combines fun and flavor effortlessly.
    • The chaos of wrapping is pure joy, especially with little helpers.
    • The aroma of baked pastry with smoky hot dogs is irresistible.
    • It’s a nostalgic trip to childhood Halloween parties.
    • The quick prep makes it a perfect last-minute treat.

    **AVOID MY DISASTER (You’re Welcome)**

    • FORGOT to pinch edges, hot dog slid out—re-pinch and patch the pastry tightly.
    • DUMPED ketchup on my costume—cleaned, then used edible eyes for a spooky touch.
    • OVER-TORCHED pastry—set a timer and watch carefully for that golden glow.
    • MISSED the marking on dough—use a ruler or freehand confidently for uneven shapes.

    **QUICK FIXES THAT SAVE YOUR DAY**

    • When pastry sticks, splash cold water along the edges to loosen.
    • Patch a torn puff pastry with extra dough pieces and a quick egg wash.
    • Shield hot spots by rotating tray for even baking.
    • When in doubt, serve with a smear of mustard—adds flavor and covers imperfections.
    • Swap out frozen puff pastry if fresh isn’t available; it still crisps beautifully.

    Mummy Hot Dogs

    Mummy Hot Dogs are a playful appetizer featuring hot dogs wrapped in flaky puff pastry that resemble mummies. The dough is wrapped loosely to create a messy, spooky appearance, then baked until golden and crispy. The final dish has a crunchy exterior with hot, smoky hot dogs peekaboo from the wrapping.
    Prep Time 10 minutes
    Cook Time 15 minutes
    Total Time 25 minutes
    Servings: 6
    Course: Main Course
    Cuisine: American
    Calories: 220

    Ingredients
      

    • 1 pack puff pastry sheets thawed if frozen
    • 6 large hot dogs
    • 1 egg egg, beaten for egg wash
    • optional for decoration edible eyes small candy or icing eyes for added spookiness

    Equipment

    • Baking sheet
    • Parchment paper
    • Knife
    • Pastry brush

    Method
     

    1. Preheat your oven to 400°F (200°C) and line a baking sheet with parchment paper.
    2. Unroll the puff pastry sheets on a lightly floured surface. Cut each sheet into 3–4 strips, about 1 inch wide, to create enough length for wrapping hot dogs.
    3. Place a hot dog on the end of a pastry strip and gently wrap the dough around it, leaving a slight gap at the top for the ‘face.’ Loosely overlap the dough so it resembles a mummy, with some strips hanging or uneven for a spooky look.
    4. Repeat this process with all hot dogs, arranging them spaced out on the prepared baking sheet.
    5. Brush each wrapped hot dog lightly with the beaten egg to help the pastry turn golden and shiny when baking.
      1 pack puff pastry sheets
    6. Bake for 12–15 minutes, or until the pastry is puffed up, golden brown, and crispy to the touch.
    7. Remove from the oven and let cool slightly. Use edible eyes or small candies to add spooky facial features to each mummy for extra fun.
      1 pack puff pastry sheets
    8. Serve these fun Mummy Hot Dogs warm, with mustard or ketchup on the side for dipping. Enjoy the crispy, savory bites that are perfect for any Halloween celebration.
    These Mummy Hot Dogs are a celebration of chaos and creativity, perfect for Halloween’s playful spirit. Their quirky appearance and satisfying bites make them a favorite for both kids and adults alike. Plus, the ease of making them means you’ll have more time to enjoy the shadows and screams of the evening.

    This recipe captures the unpredictably fun side of Halloween while satisfying that craving for salty, crispy treats. It’s a small, delicious reminder that sometimes, the messiest ideas turn out to be the most memorable. No matter the chaos in the kitchen, these mummies always bring smiles and spooky cheer.

  • Halloween Dirt Cake with Gummy Worms: A Playful Spooky Dessert

    Halloween Dirt Cake with Gummy Worms: A Playful Spooky Dessert

    As the leaves turn crunchy and the air gets a brisk chill, my kitchen transforms into a playground of whispers from childhood. Crafting a Halloween Dirt Cake isn’t just about satisfying a sweet tooth; it’s about conjuring up those vivid memories of mischievous scares and candy-stuffed afternoons. An unusual twist? I love adding a secret ingredient that transforms this simple treat into a nostalgic adventure.

    Picture this: a smooth chocolate base, topped with crumbled cookies that mimic dirt, and the surprise of squirmy gummy worms lurking underneath. This dessert isn’t just fun; it’s an unexpected splash of chaos amid the candy chaos. Perfect for parties or just a cozy night with spooky vibes, it invites everyone to dig right in.

    Halloween Dirt Cake

    Halloween Dirt Cake is a layered dessert featuring a smooth chocolate pudding base topped with crumbled cookies that resemble dirt. Gummy worms are hidden within, adding a playful, squirmy element that enhances its visual appeal and texture. The final dish has a creamy, crumbly appearance with surprises lurking beneath the surface.
    Prep Time 20 minutes
    Cook Time 10 minutes
    Total Time 30 minutes
    Servings: 8
    Course: Main Course
    Cuisine: Holiday
    Calories: 340

    Ingredients
      

    • 3 cups whole milk for pudding
    • 1 pouch (3.9 oz) instant chocolate pudding mix
    • 1 cup heavy cream for extra creaminess
    • 1/2 cup granulated sugar
    • 1 teaspoon vanilla extract
    • 2 1/2 cups ground chocolate sandwich cookies for the ‘dirt’ topping
    • 1 package gummy worms for hiding in the dirt

    Equipment

    • Mixing bowls
    • Whisk
    • Rubber Spatula
    • 9×13 inch serving dish
    • Plastic wrap or lid

    Method
     

    1. Pour the milk into a mixing bowl, then whisk in the instant chocolate pudding mix until fully combined and slightly thickened, about 2 minutes.
    2. In a separate bowl, whip the heavy cream with granulated sugar and vanilla extract using a hand or stand mixer until soft peaks form and the mixture becomes light and fluffy.
    3. Gently fold the whipped cream into the chocolate pudding mixture to create a smooth, creamy base, being careful not to deflate the whipped cream.
    4. Transfer the pudding mixture into a 9×13 inch serving dish, spreading it evenly with a spatula or back of a spoon.
    5. Crush the chocolate sandwich cookies into coarse crumbs using a food processor or by placing them in a plastic bag and crushing with a rolling pin. Sprinkle the cookie crumbs evenly over the pudding layer, covering completely.
    6. Insert gummy worms into the crumbed dirt, positioning some peeking out and some partially embedded to look like squirming underneath the surface.
    7. Cover the assembled dirt cake with plastic wrap or a lid and refrigerate for at least 2 hours, allowing the flavors to meld and the pudding to set.
    8. Just before serving, add a final layer of cookie crumbs on top for a fresh ‘dirt’ appearance, if desired.
    9. Serve chilled, with gummy worms visible and the crumbly ‘dirt’ texture inviting scoops with a spoon.

    Notes

    For an extra spooky touch, decorate with plastic spiders or small Halloween-themed decorations.
    Bite into this Dirt Cake, and you’re met with rich chocolate, crunchy cookie bits, and the playful tug of gummy worms. It’s a reminder that Halloween should be about joy, chaos, and a little bit of messy fun. Plus, it’s so easy that even the busiest home chef can whip it up between trick-or-treating rounds.

    As the season dips into full spooky mode, this dessert becomes the centerpiece of any Halloween table. Its blend of nostalgia and surprise is what makes it a seasonal favorite year after year. Just a few simple ingredients, and you have a treat that captures the spirit of mischief and delight.

  • Chill Out with an Exotic Iced Tea Slushie Adventure

    Chill Out with an Exotic Iced Tea Slushie Adventure

    Most iced tea recipes stick to the familiar: a splash of lemon, a dash of sweetness. But I recently discovered a way to turn this classic into a summer spectacle, with just a blender and a splash of daring. The secret? Infusing the tea with unexpected flavors like fresh basil or a hint of spicy ginger before turning it into a frosty slushie.

    As the ice hits the fruity or herbal notes, the texture becomes icy yet smooth, like biting into a refreshing cloud. This recipe lets you customize the flavor palette, transforming your ordinary iced tea into a conversation-starting chill-out drink. Perfect for those long, lazy afternoons or spontaneous gatherings in the backyard.

    Frosted Basil Ginger Iced Tea Slushie

    This iced tea slushie combines brewed black tea infused with fresh basil and spicy ginger, blended with ice until smooth and icy. The final texture is a frosty, refreshing beverage with a vibrant herbal and spicy flavor profile, resembling a chilled cloud of flavor.
    Prep Time 10 minutes
    Cook Time 5 minutes
    Total Time 15 minutes
    Servings: 4
    Course: Main Course
    Cuisine: Fusion
    Calories: 120

    Ingredients
      

    • 4 cups water for brewing tea
    • 4 bags black tea bags or 4 teaspoons of loose leaf tea in a infuser
    • 1 cup fresh basil leaves roughly chopped, for infusion
    • 1 inch fresh ginger sliced thin
    • 0.5 cup honey or simple syrup adjust sweetness to taste
    • 4 cups ice cubes plus extra for serving

    Equipment

    • Kettle or saucepan
    • Blender
    • Measuring cups and spoons
    • Fine strainer

    Method
     

    1. Bring water to a boil in a kettle or saucepan. Once boiling, pour it over the black tea bags in a heatproof container and steep for 5 minutes. Remove the tea bags and let the tea cool to room temperature.
    2. While the tea cools, add chopped basil and sliced ginger to the cooled tea. Stir in honey or simple syrup until fully dissolved. Cover and refrigerate for at least 30 minutes to allow the flavors to infuse deeply.
    3. Strain the infused tea through a fine strainer into a blender, discarding the herbs and spices. Add the remaining ice cubes to the blender.
    4. Blend on high speed until the mixture is smooth, frosty, and thickened—about 30 seconds. The texture should be icy and slushie-like, with the herbal and spicy notes well incorporated.
    5. Pour the frosty iced tea slushie into glasses, garnishing with fresh basil leaves if desired. Serve immediately for a refreshing, chilled beverage.

    Notes

    Adjust sweetness and herbal intensity based on personal preference. For a spicier kick, add more ginger or a dash of cayenne pepper before blending.

    Living through these warm months, I find that a cold, flavorful slushie can swiftly change the mood of any day. It’s a simple joy that combines the familiarity of iced tea with a cool twist, making even the hottest days bearable. Plus, it’s a delightful way to sip something sweet while craving less sugar.

    Enjoying this drink offers a little escape, a moment to pause, and a burst of refreshment that’s both satisfying and easy to whip up. The next time the sun is blazing, remember that a frozen tea delight might just be what you need to beat the heat with style.

  • Unusual Cozy Fall Casseroles That Surprise and Delight

    Unusual Cozy Fall Casseroles That Surprise and Delight

    As the leaves turn and the air gets crisply cool, many of us crave the comfort of a hearty casserole. But this season, I decided to shake things up with fall casseroles that carry a surprising twist—think roasted root vegetables topped with a spicy maple glaze. It’s about blending nostalgia with a dash of daring in every bite.

    This isn’t just about warmth; it’s about creating a dish that sparks curiosity at your dinner table. Imagine the sizzle of seasonal veggies as they bake, filling your kitchen with aromas of cinnamon, sweet potatoes, and a smoky hint of chipotle. It’s a little chaos, a lot of cozy, and perfect for these brisk fall evenings.

    Roasted Root Vegetables with Spicy Maple Glaze

    This dish features an assortment of seasonal root vegetables roasted until tender and caramelized. They are finished with a spicy-sweet maple glaze that adds a bold flavor contrast and a glossy, enticing appearance. The final dish has a crispy exterior with a tender, slightly sticky interior coated in a flavorful glaze.
    Prep Time 15 minutes
    Cook Time 40 minutes
    Total Time 55 minutes
    Servings: 4
    Course: Main Course
    Cuisine: Fall
    Calories: 250

    Ingredients
      

    • 2 cups cubed sweet potatoes peeled and cut into chunks
    • 2 cups chopped carrots peeled and sliced
    • 1 cup beetroot chunks peeled and cut into pieces
    • 2 tablespoons olive oil for tossing vegetables
    • 0.5 cup maple syrup for glazing
    • 1 teaspoon chipotle powder adds heat and smoky flavor
    • 1 teaspoon cinnamon enhances sweetness
    • 1 pinch salt

    Equipment

    • Baking sheet
    • Mixing bowl
    • Brush

    Method
     

    1. Preheat the oven to 400°F (200°C). Line a baking sheet with parchment paper for easy cleanup.
    2. In a large mixing bowl, combine sweet potatoes, carrots, and beetroot. Drizzle with olive oil and toss until all pieces are evenly coated.
    3. Spread the vegetables into an even layer on the prepared baking sheet, ensuring space for even roasting.
    4. Roast the vegetables in the oven for about 30-35 minutes, flipping halfway through, until they are tender and slightly caramelized around the edges.
    5. While the vegetables roast, mix maple syrup, chipotle powder, cinnamon, and a pinch of salt in a small bowl to create the spicy maple glaze.
    6. Once the vegetables are roasted and still hot, brush them generously with the maple glaze using a pastry brush or tablespoon, coating all sides evenly.
    7. Return the glazed vegetables to the oven for an additional 5-10 minutes, allowing the glaze to set and develop a sticky, glossy finish.
    8. Remove the tray from the oven and let the vegetables cool slightly. They should be tender inside with a shimmering, caramelized coating outside.
    9. Transfer the roasted root vegetables to a serving platter, drizzle any remaining glaze over the top, and serve warm.

    Fall casseroles don’t have to be boring or predictable. This season, I encourage you to experiment with unexpected ingredients and flavors that mirror the vibrant change outside your window. These dishes not only fill you up but also bring a sense of adventure to your weekly menu.

    There’s something magical about transforming everyday ingredients into a comforting masterpiece. So gather your ingredients, turn up the oven, and let the season inspire your next cozy creation.