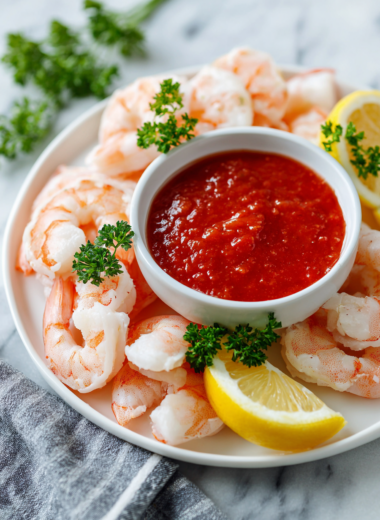
Blog

  • Spooky Stir: Bloody Spaghetti & Sausage Fingers for Halloween

    Spooky Stir: Bloody Spaghetti & Sausage Fingers for Halloween

    As October chill winds sweep in, I find myself craving something wildly fun and a tad mischievous for the holiday table. Enter Bloody Spaghetti with Sausage Fingers, a dish that’s part horror show, part comfort food. Its vibrant red sauce and creepy sausages mimic a hauntingly delicious scene straight out of a Halloween night mystery.

    This recipe is a delightful chaos of textures—tangy tomato sauce, chewy pasta, and crispy sausage fingers. It’s perfect for kids and adults alike, bringing a ghoulish grin to everyone’s face. Plus, the spooky vibe makes it an instant conversation starter during your seasonal party.

    Bloody Spaghetti with Sausage Fingers

    This dish features cooked spaghetti coated in a tangy tomato sauce, topped with creatively shaped sausage pieces resembling fingers. The sausages are baked or fried until crispy, creating a spooky, textured appearance with a combination of tender pasta and crunchy sausage parts, ready to serve as a fun and eerie Halloween meal.
    Prep Time 15 minutes
    Cook Time 25 minutes
    Total Time 40 minutes
    Servings: 4
    Course: Main Course
    Cuisine: Halloween
    Calories: 450

    Ingredients
      

    • 12 oz spaghetti uncooked
    • 1 cup tomato sauce preferably marinara
    • 4 sausages preferably cooked or pre-cooked hot dogs for easy shaping
    • 2 cloves garlic minced
    • 2 tablespoons olive oil
    • to taste salt and pepper

    Equipment

    • Large pot
    • Skillet or saucepan
    • Baking sheet or frying pan
    • Knife
    • Cutting board

    Method
     

    1. Bring a large pot of salted water to a boil. Add the spaghetti and cook until al dente, about 8-10 minutes. Drain and set aside.
    2. Heat olive oil in a skillet over medium heat. Add the minced garlic and sauté until fragrant and golden, about 30 seconds.
    3. Stir in the tomato sauce, season with salt and pepper, and simmer gently until warmed through, about 5 minutes. Toss the cooked pasta with the sauce to coat evenly.
    4. While the sauce simmers, cut the sausages into fourths lengthwise to create finger-like shapes. Use a sharp knife for clean cuts.
    5. Place the sausage pieces on a baking sheet or in a frying pan. If baking, cook at 400°F (200°C) for about 8-10 minutes until crispy and browned. If frying, cook in a skillet over medium heat until golden and crispy, about 5-7 minutes.
    6. Arrange the cooked spaghetti with sauce on serving plates. Carefully place the crispy sausage fingers on top, lining them up to resemble spooky fingers protruding from the pasta.

    Notes

    For added spooky effect, you can draw on ketchup or red sauce to create blood drips around the sausages. Serve immediately for best crispiness.

    This dish isn’t just about the screams and giggles; it’s a reminder of how playful and inventive simple ingredients can be. It’s a celebration of Halloween’s spirit—bold, cheeky, and slightly terrifying—served on a plate.

    Made with everyday pantry staples, this spaghetti screams creativity and versatility. Just a quick tweak here or there, and you’ve got a party centerpiece that’s as fun to eat as it is to make. It’s a spirited way to get everyone involved in the countdown to All Hallows’ Eve.

  • Spooky Elegance: The Haunted Vampire Punch

    Spooky Elegance: The Haunted Vampire Punch

    As October winds down, I love diving into recipes that mix the creepy with the chic. This Halloween Vampire Punch isn’t just a drink; it’s a theatrical experience, simmering with the blood-red hue of ripe cherries and pomegranate juice. Its bubbling, vibrant look is like a potion straight from a Gothic novel.

    What makes this potion really special is how it combines simplicity with theatrical flair. A splash of sparkling water or soda transforms the deep red into a shimmering, effervescent spectacle. It’s perfect for haunted gatherings or just when you want to feel a little witchy at home.

    WHY I LOVE THIS RECIPE?

    • Unusual color sparks instant attention and makes my party unforgettable.
    • The mixture of tart and sweet flavors balances surprisingly well.
    • I love how easy it is to whip up with just a few ingredients.
    • The shimmering effect makes kids and adults smile.
    • Perfect for themed celebrations, no fancy equipment needed.

    AVOID MY DISASTER (You’re Welcome)

    • FORGOT the ice—ended up with a watered-down nightmare, so add plenty of it next time.
    • DUMPED too much rum—got a fiery mess, fix with extra juice to dilute.
    • OVER‑TORCHED the fruit garnish—lost the bright red color; re-chill before serving.
    • BURNED the sugar syrup—smelled like a campfire; use low heat and stir constantly.

    QUICK FIXES THAT SAVE YOUR DAY

    • When the punch is too sweet, SPLASH in some lime juice for a zing.
    • Patch bitter spots with a touch more tart cherry juice.
    • Shield from over-dilution by adding a splash of concentrated fruit syrup.
    • When the color dulls, sprinkle in a few crushed red candies for vibrance.
    • Work in a 5-second rescue—stir vigorously to reincorporate fizz and color.

    As the night falls and shadows deepen, this Vampire Punch glows ominously on the table. Its bright, blood-red hue makes it a centerpiece without needing elaborate decor. It’s a reminder that even simple ingredients can turn into a scene-stealing spectacle.

    This recipe feels like a mini adventure—playful, a little chaotic, and utterly fun. Perfect for Halloween, yes, but also for any dark, moody gathering where you want a splash of the supernatural. Cheers to casting a spell with something as easy as a glass of vibrant red brew.

    Vampire Punch

    Vampire Punch is a vibrant, blood-red beverage made by combining cherry and pomegranate juices with sparkling water, creating a bubbling, effervescent cocktail. The drink has a striking appearance with a deep red hue and a shimmering surface, perfect for Halloween or dark-themed gatherings.
    Prep Time 10 minutes
    Total Time 10 minutes
    Servings: 6
    Course: Main Course
    Cuisine: Gothic
    Calories: 80

    Ingredients
      

    • 1 cup cherry juice preferably tart or unsweetened
    • 1 cup pomegranate juice for rich color and flavor
    • 2 cups sparkling water or soda chilled, for shimmer and fizz
    • to taste ice cubes plenty to keep the punch cold

    Equipment

    • Large Mixing Pitcher
    • Measuring cups and spoons

    Method
     

    1. Pour the cherry juice into a large mixing pitcher, filling it about halfway.
    2. Add the pomegranate juice to the pitcher, creating a deep, blood-red mixture.
    3. Stir gently with a spoon to combine the juices thoroughly, watching the vibrant color blend smoothly.
    4. Add a generous handful of ice cubes to the pitcher, cooling the mixture instantly and creating a slight crackling sound.
    5. Slowly pour the chilled sparkling water or soda into the pitcher, allowing it to bubble up and create a shimmering, effervescent surface.
    6. Gently stir the punch again to distribute the bubbles evenly and enhance the sparkling effect.
    7. Serve the Vampire Punch in glasses filled with additional ice cubes for a chilling presentation and enjoy the bubbling, blood-red spectacle.

    Notes

    For extra theatrical effect, add some crushed red candies or a cherry garnish on top before serving.

    Once the glasses are raised, and the eerie glow begins to shimmer in the dark, you’ll see how this drink brings extra magic to the night. It’s not just about the looks but also the surprise of flavors that dance on the tongue with each sip.

    Even after Halloween, this Vampire Punch stays a favorite for its instant cheer factor and simple charm. A little chaos, a lot of color, and a touch of mystery make it an ideal choice for celebrating the spooky season or just adding some dark whimsy to your evening.

  • Wickedly Delightful Halloween Witch Finger Cookies

    Wickedly Delightful Halloween Witch Finger Cookies

    The eerie allure of Halloween often calls for treats that thrill the eyes as much as the taste buds. These Witch Finger Cookies are not just spooky but crafted with a strange charm that makes them irresistible, even in a haunted house. Carefully molded and baked to mimic gnarled witch fingers, they bring a fun, creepy twist to your seasonal table.

    What makes these cookies special is the unsettling realism from their crumbly texture and almond nail details. Baking them feels like a small act of magic, transforming simple ingredients into spooky art. They’re perfect for parties or a mischievous family bake that gets everyone giggling and shrieking.

    With their flaky, tender bite and a hint of almond flavor that lingers just right, these cookies evoke both nostalgia and playful chaos. Each finger promises a little surprise—perhaps a broken knuckle or a dribble of blood-red jam—and keeps folks chatting long after the last crumb falls.

    Witch Finger Cookies

    Witch Finger Cookies are almond-flavored, crumbly cookies shaped to resemble gnarled, spooky fingers. They are baked until golden, with realistic almond nail details and an unsettling, flaky texture that enhances their creepy appearance. Often decorated with red jam or icing to simulate blood, they add a fun, eerie touch to Halloween treats.
    Prep Time 20 minutes
    Cook Time 15 minutes
    Total Time 35 minutes
    Servings: 24
    Course: Main Course
    Cuisine: Halloween
    Calories: 80

    Ingredients
      

    • 1 cup unsalted butter softened
    • 1 cup confectioners’ sugar
    • 1 teaspoon vanilla extract
    • 2 1/2 cups all-purpose flour sifted
    • 1/2 cup almond meal
    • 1 pinch salt
    • 24 pieces almond slices for nails
    • 24 teaspoons red fruit jam for blood effect

    Equipment

    • Mixing bowls
    • Baking sheet

    Method
     

    1. Cream the softened butter and confectioners’ sugar together in a mixing bowl until the mixture is light and fluffy, with a pale color and a slightly airy texture.
    2. Stir in vanilla extract for added flavor, blending it well into the butter-sugar mixture.
    3. In a separate bowl, whisk together sifted flour, almond meal, and a pinch of salt to combine evenly.
    4. Gradually add the dry ingredients to the wet mixture, folding them together until a crumbly dough begins to form.
    5. Using your hands, gently knead the dough in the bowl until it comes together into a firm, but workable, mass. Wrap the dough in plastic wrap and chill in the refrigerator for about 15 minutes to relax.
    6. Preheat your oven to 350°F (175°C) and line a baking sheet with parchment paper.
    7. Remove the chilled dough from the fridge and divide it into small portions. Roll each into a thin, elongated finger shape, tapering the ends slightly for a more gnarled look.
    8. Place each shaped finger on the prepared baking sheet, spacing them about 1 inch apart.
    9. Press an almond slice into the top of each finger to resemble a creepy fingernail.
    10. Bake the cookies in the preheated oven for 12 to 15 minutes, or until they are golden brown and slightly cracked.
    11. Once out of the oven, let the cookies cool slightly on the baking sheet for a few minutes before transferring them to a wire rack.
    12. Use the red fruit jam to carefully add small drops around the knuckles or the base of the fingernails for a bloody effect, creating a spooky, bloodied appearance.

    Notes

    For extra creepiness, dust the fingers lightly with powdered sugar or a dusting of cocoa powder before decorating.

    These Witch Finger Cookies come alive with just a few ingredients and a dash of creativity. They add a dash of spooky fun and a lot of giggles to any Halloween gathering. Plus, they’re the perfect way to channel your inner baker and unleash some holiday mischief.

    As the season deepens and costumes gather dust, the memories of making these creepy treats will keep the spirit alive. Their charmingly grotesque appearance reminds us that Halloween is about blending the playful with the petrifying. Happy haunting, and happy baking!

  • Spooky Snack Attack: The Halloween Mummy Pizza

    Spooky Snack Attack: The Halloween Mummy Pizza

    Every October, I find myself craving playful, nostalgic foods that stir up childhood memories. This year, I decided to merge the eerie charm of Halloween with the comforting crunch of pizza—enter the Mummy Pizza! Its improvisational mummy wrappings made from cheese strips turn a simple pie into a delightful, spooky spectacle.

    What I love most is how easily this recipe transforms a regular pizza into a conversation piece. The gooey cheese, the crispy crust—each bite sparks a giggle. Plus, it’s a fantastic way to get little hands involved in the kitchen chaos during this festive season.

    Mummy Pizza

    Mummy Pizza is a fun, Halloween-themed dish that involves decorating a pizza with cheese strips to resemble wrapped mummies. It combines a crisp pizza crust with gooey melted cheese, creating a playful and visually spooky appetizer or snack. The final appearance features a golden-brown crust topped with cheese strips that mimic mummy bandages.
    Prep Time 15 minutes
    Cook Time 15 minutes
    Total Time 30 minutes
    Servings: 4
    Course: Main Course
    Cuisine: American
    Calories: 350

    Ingredients
      

    • 1 pre-made pizza dough store-bought or homemade
    • 1 cup pizza sauce
    • 2 cups shredded mozzarella cheese
    • 1 cup sliced pepperoni or olives optional for eyes
    • to taste seasonings e.g., oregano, basil

    Equipment

    • Baking sheet
    • Rolling pin
    • Oven
    • Pizza cutter or knife
    • Piping bag or plastic bag with a corner cut

    Method
     

    1. Preheat your oven to 400°F (200°C). Lightly flour a surface and roll out the pizza dough into a large circle or rectangle, about 12 inches wide.
    2. Transfer the rolled dough onto a baking sheet lined with parchment paper. Spread an even layer of pizza sauce over the crust, leaving a small border around the edges.
    3. Sprinkle a generous layer of shredded mozzarella cheese evenly across the sauce, covering most of the surface to create a gooey base.
    4. Optional: Add small pieces of pepperoni or olives for the eyes, positioning them near the top of the pizza.
    5. Wander to a piping bag or plastic bag and fill it with shredded mozzarella to create cheese strips that will become the mummy’s bandages.
    6. Pipe long, thin cheese strips across the pizza in crisscrossing patterns to mimic mummy wrappings, making sure to cover most of the surface for a fun, spooky look.
    7. Once decorated, transfer the pizza into the preheated oven and bake for about 12-15 minutes, or until the crust is golden brown and the cheese is bubbly and slightly browned.
    8. Remove the pizza from the oven and let it cool for a few minutes; the cheese will set slightly, making it easier to slice.
    9. Slice the pizza into squares or triangles, revealing the cheese ‘bandages’ and eyes, and serve while warm.
    10. Enjoy the playful presentation and gooey, cheesy crunch of your Mummy Pizza!

    Notes

    For extra spooky effect, add small carved cheese or veggie eyes on the mummy’s ‘wrappings’. Feel free to customize with your favorite toppings!
    This Mummy Pizza is more than just a fun dish; it’s a reminder that cooking can be both whimsical and comforting. As the season shifts to cozy, chilly evenings, this recipe fits right in with the nostalgic, spirited vibe of Halloween. It’s a perfect centerpiece for family gatherings or a spooky movie night feast.

    With just a handful of ingredients and a sprinkle of creativity, you can whip up this creepy yet tasty treat in no time. It’s a recipe that invites chaos, laughter, and maybe a few messy fingers—what’s Halloween without a little fun? Enjoy creating these spooky mummies and making memories around the dinner table.

  • Chill Out with an Unusual Strawberry Slushie Twist

    Chill Out with an Unusual Strawberry Slushie Twist

    Imagine transforming a simple strawberry slushie into a sensory journey that surprises your palate. This recipe dives into the playful side of summer drinks, combining fresh strawberries with a hint of unexpected spices. It’s perfect for those who crave a cool refreshment with an unusual twist that sparks conversation.

    As someone who loves blending tradition with a dash of chaos, I found that a pinch of sea salt and a splash of balsamic vinegar elevate the fruity sweetness. This isn’t your average frozen treat; it’s a small adventure in a glass, bursting with bold flavors and icy crunch. Perfect for hot days or when you need a vibrant pick-me-up that feels anything but ordinary.

    Spiced Strawberry Slushie

    This spiced strawberry slushie is a frozen beverage made by blending fresh strawberries with spices, ice, and a splash of vinegar. The mixture results in a vibrant, icy drink with a smooth texture and bold flavor contrasts. The final appearance is a bright pink, slushy consistency, perfect for hot days or an adventurous palate.
    Prep Time 10 minutes
    Total Time 10 minutes
    Servings: 2
    Course: Main Course
    Cuisine: Contemporary
    Calories: 90

    Ingredients
      

    • 1 pint fresh strawberries hulled and halved
    • 1 cup ice cubes
    • 1 teaspoon balsamic vinegar adds depth and tang
    • 1/4 teaspoon sea salt enhances sweetness and flavor
    • 1 tablespoon honey or to taste

    Equipment

    • Blender
    • Measuring cups and spoons

    Method
     

    1. Place the halved strawberries into the blender jar.
    2. Add the ice cubes to the blender over the strawberries.
    3. Pour in the balsamic vinegar and sprinkle the sea salt over the mixture.
    4. Secure the lid on the blender and blend on high until the mixture is smooth and icy, about 30-40 seconds.
    5. Pause to check the texture—if it’s too thick, add a splash of water or juice and blend briefly again.
    6. Pour the slushie into glasses, jolts of icy pink ready to serve.
    7. Optionally, garnish with a fresh strawberry or a sprig of mint for visual appeal.

    This strawberry slushie captures the essence of summer’s playful spirit, ideal for spontaneous gatherings or solo moments of bliss. The surprise ingredients keep every sip interesting, making it a memorable addition to your drink repertoire. Enjoy the burst of freshness—simple ingredients, maximum impact—right in your own kitchen, whenever the heat calls for it.

    Remember, sometimes the quirkiest recipes make the best stories. Keep experimenting, stay cheerful, and let each sip remind you that a little chaos can lead to the sweetest discoveries.

  • Chill with a Twist: The Unexpected Charm of Whiskey Slushies

    Chill with a Twist: The Unexpected Charm of Whiskey Slushies

    As summer wanes and the evenings turn crisper, I find myself craving a drink that’s both playful and unexpected. Enter the whiskey slushie, a frozen cocktail that whispers nostalgia while daring to be different. The scent of bourbon mingles with sweet fruit, conjuring lazy sunsets and spontaneous backyard parties.

    This recipe is not just about cooling off; it’s about embracing the chaos of flavor—rich, boozy, and refreshingly icy. It’s a reminder that even in the glow of twilight, a little rebellion can be delicious. Perfect for those warm nights when you want a little more than a regular pour.

    Whiskey Slushie

    A whiskey slushie is a frozen cocktail made by blending bourbon, fruit juice, and sugar with ice until smooth and icy. The resulting dessert-like drink has a thick, slushy texture with a vibrant, frosty appearance and a balanced mix of sweetness and boozy warmth. It’s served chilled, often topped with fresh fruit or a sprig of mint for garnish.
    Prep Time 10 minutes
    Total Time 10 minutes
    Servings: 4
    Course: Main Course
    Cuisine: American
    Calories: 250

    Ingredients
      

    • 1 ½ cups bourbon or your preferred whiskey
    • 2 cups fruit juice (e.g., orange or cranberry) choose your favorite for flavor
    • ½ cup simple syrup or sugar syrup, adjust sweetness to taste
    • 3 cups ice cubes crushed ice works best

    Equipment

    • Blender
    • Measuring cups and spoons

    Method
     

    1. Measure out the bourbon, fruit juice, and simple syrup, then add them to the blender.
    2. Add the ice cubes to the blender on top of the liquid ingredients.
    3. Secure the lid on the blender and pulse a few times to start breaking up the ice.
    4. Blend on high for about 30-60 seconds until the mixture is smooth, thick, and frosty with a slushy consistency.
    5. Check the texture—if it’s too thick, add a splash of juice and blend briefly to loosen; if too thin, add more ice and pulse again.
    6. Pour the whiskey slushie into glasses, optionally garnished with fresh fruit or a sprig of mint.

    Notes

    Serve immediately for the best icy texture. You can freeze leftovers briefly to keep the consistency firm before serving.
    Whiskey slushies are surprisingly easy to make, and they add a splash of excitement to any gathering. Whether you’re reminiscing about summer or chasing away the evening chill, this drink carries a bold twist that always catches the eye.

    Next time you want a frozen treat with attitude, remember this simple recipe. It’s the kind of refreshment that sparks conversations and keeps the spirit lively well into the night.

  • Sinister Smiles: The Halloween Brain Jello Mold

    Sinister Smiles: The Halloween Brain Jello Mold

    The sight of a lumpy, pinkish brain staring back at you from the dessert table is enough to send shivers down the spine. Crafting this Halloween Brain Jello Mold became a delightful experiment in combining creepy aesthetics with playful flavors. The aromatic scent of fruity gelatin mingling with a hint of vanilla makes it even more irresistible.

    What sets this project apart is the chance to embrace chaos in the kitchen—molding, swirling, and shaping something that looks terrifying yet tastes surprisingly delightful. It’s a perfect centerpiece for ghastly gatherings or spooky family nights. Plus, it’s a fun way to challenge your food artistry with just a few simple ingredients.

    Halloween Brain Jello Mold

    This dish is a gelatin-based dessert molded into a brain-like shape, using colored fruit gelatin layered and swirled to resemble a creepy brain. The final product has a firm, jelly-like texture with a lumpy, pinkish appearance that mimics a brain’s surface. It is assembled through melting, pouring, layering, and setting in a mold, creating a striking centerpiece for Halloween parties.
    Prep Time 20 minutes
    Cook Time 10 minutes
    Total Time 30 minutes
    Servings: 8
    Course: Main Course
    Cuisine: Halloween
    Calories: 120

    Ingredients
      

    • 3 packages unflavored gelatin powder to set the mold
    • 4 cups fruit juice (pink or red such as cherry or strawberry flavored) for the colored gelatin layers
    • 1 cup water hot for dissolving gelatin
    • 1 cup milk or coconut milk for added creaminess and flavor
    • 1/2 cup granulated sugar to sweeten the gelatin layers
    • pink or red food coloring few drops food coloring to intensify color for the brain appearance

    Equipment

    • Mixing bowls
    • Saucepan
    • Measuring cups and spoons
    • Brain-shaped mold or silicone mold
    • Whisk

    Method
     

    1. Start by blooming the unflavored gelatin in hot water, stirring until fully dissolved and smooth. This creates a clear gelatin base to use for layering.
    2. Pour the fruit juice into a saucepan, then add sugar and heat gently until the sugar dissolves completely, creating a sweet, flavored liquid.
    3. Remove the fruit juice mixture from heat, then whisk in the dissolved unflavored gelatin until fully combined. Add a few drops of food coloring to enhance the pinkish hue for the brain effect.
    4. Pour a thin layer of the pink gelatin mixture into the mold, just enough to cover the bottom. Chill in the refrigerator until it begins to set, about 10-15 minutes, until slightly firm but still jiggles.
    5. Meanwhile, warm the milk with a little sugar in a separate pan until steaming but not boiling. Stir in some dissolved gelatin if needed for additional firmness.
    6. Once the first layer is set, carefully pour a layer of the milk mixture over it, avoiding disturbing the base. Return to the fridge to set again for about 15 minutes.
    7. Repeat the process by adding more colored gelatin layers, swirling gently with a toothpick to create a brain-like pattern. Chill each layer until firm before adding the next.
    8. Once the final layer has hardened completely, run warm water around the outside of the mold to loosen the gelatin. Carefully invert the mold onto a serving platter.
    9. Gently lift the mold to reveal your creepy, brain-like Jello. Feel free to add some edible decorations like red icing or fruit for extra gore and visual effect.
    10. Slice into portions and serve immediately, showcasing the vibrant, lumpy, brain-like appearance with a firm, gelatinous texture.

    Notes

    For best visual effect, use a detailed brain-shaped mold. You can adjust the colors and layers to increase the eerie appearance.

    This creepy, yet charming dessert taps into the spirit of Halloween with its spooky looks and nostalgic flavors. It’s more than just a treat—it’s a conversation starter that adds a splash of chaos and creativity to any spooky fête.

    Enjoy playing with textures and colors, knowing that this eerie delicacy will thrill children and adults alike. It’s proof that even the most chilling aesthetics can be coated in familiar flavors, making your Halloween table both haunting and memorable.

  • Spooky Gourmet: Halloween Deviled Egg Eyeballs That Wow

    Spooky Gourmet: Halloween Deviled Egg Eyeballs That Wow

    Choosing a Halloween appetizer that’s both creepy and delicious can be tricky. This year, I decided to push the boundaries with an eerie twist on classic deviled eggs. The idea of transforming simple deviled eggs into eyeballs combines eeriness with familiar comfort, making them a perfect party center piece.

    Striking visuals matter almost as much as taste during the spooky season. I experimented with different edible

    Eerie Eyeball Deviled Eggs

    This dish features hard-boiled eggs with creamy yolk filling, topped with visual elements that resemble eyeballs. The eggs are prepared by boiling, halving, and filling, then decorated with pea or olive pupils to create a spooky, realistic appearance. The final presentation is both creepy and appealing, ideal for Halloween-themed gatherings.
    Prep Time 15 minutes
    Cook Time 10 minutes
    Total Time 25 minutes
    Servings: 6
    Course: Main Course
    Cuisine: American
    Calories: 80

    Ingredients
      

    • 6 pieces large eggs fresh, room temperature for easier peeling
    • 3 tablespoons mayonnaise creamy filling base
    • 1 teaspoon yellow mustard adds tang to the filling
    • to taste salt seasoning
    • to taste black pepper optional, for seasoning
    • 1/4 cup green peas or sliced black olives for the eyeball pupils

    Equipment

    • Saucepan
    • Mixing bowl
    • Small spoon or piping bag
    • Knife
    • Plate for serving

    Method
     

    1. Place the eggs in a saucepan and cover with cold water. Bring to a boil over medium-high heat, then reduce to a simmer and cook for 9–10 minutes.
    2. Once cooked, transfer the eggs to a bowl of ice water to stop the cooking process and make peeling easier. Let them cool for at least 5 minutes.
    3. Peel the eggs carefully, then slice them in half lengthwise with a sharp knife. Gently remove the yolks and place them in a mixing bowl.
    4. Mash the yolks with a fork until smooth, then stir in mayonnaise, yellow mustard, salt, and pepper until the mixture is creamy and well combined.
    5. Use a small spoon or piping bag to carefully fill each egg white half with the yolk mixture, creating a smooth, domed top.
    6. Slice green peas or black olives to create small round pupils, then place a pea or olive in the center of each filled egg to resemble an eyeball.
    7. Arrange the decorated eggs on a serving plate, ensuring the eyeballs are prominently displayed for maximum spooky effect.

    Notes

    For extra creepiness, add a small pooled drop of red food coloring around each eyeball or use red bell pepper strips for veins.

    These eyeball deviled eggs turn an ordinary snack into a conversation starter. Their shock factor promises to delight guests and spark lots of playful squeals. Plus, they’re surprisingly easy to whip up in advance, keeping your kitchen chaos-free during party prep.

    In a season that celebrates all things spooky, these eggs add just the right touch of grotesque charm. They remind us that fun is about breaking the rules and embracing a little chaos at the dinner table. And honestly, nothing beats the smile of a guest realizing they’re biting into a tiny eyeball.

  • The Art of Making the Perfect Watermelon Slushie on a Hot Day

    The Art of Making the Perfect Watermelon Slushie on a Hot Day

    Whether you’re lounging in your backyard or hosting a weekend gathering, this watermelon slushie is your go-to. It’s easy, quick, and impossible to mess up — a sweet relief when the heat is relentless. Plus, it feels like a small victory every time you sip on something so beautifully chilled and colorful.

    Watermelon Slushie

    This watermelon slushie is made by blending ripe watermelon chunks with ice until smooth, resulting in a cold, refreshing beverage. Its vibrant pink color and icy texture make it ideal for hot days, offering a sweet and juicy final result that’s both visually appealing and thirst-quenching.
    Prep Time 5 minutes
    Total Time 5 minutes
    Servings: 2
    Course: Main Course
    Cuisine: Global
    Calories: 120

    Ingredients
      

    • 4 cups cubed watermelon seedless or deseeded
    • 1 cup ice cubes adjust for desired consistency

    Equipment

    • Blender
    • Measuring cup

    Method
     

    1. Place the watermelon chunks and ice cubes into a blender.
    2. Secure the lid and blend on high speed until the mixture is smooth, icy, and uniform in texture. This usually takes about 30 seconds to 1 minute.
    3. Stop the blender and check the consistency; if it’s too thick, add a splash of water or more watermelon and blend again until it reaches your preferred smoothness.
    4. Pour the blended mixture into glasses, allowing the vibrant pink color and icy texture to spill over the rims.
    5. Serve immediately with a straw or small spoon, enjoying the refreshing, icy sensation and juicy flavor.
    As the heat builds outside, knowing you have a batch of vibrant watermelon slushie ready to go can be a game changer. It’s a reminder that the best moments sometimes come from the simplest ideas. Stay cool, enjoy the sunshine, and savor every frozen sip.

  • The Unexpected Charm of Rosé Wine Slushies for Summer Surprises

    The Unexpected Charm of Rosé Wine Slushies for Summer Surprises

    Imagine turning a simple glass of rosé into a shimmering icy treat that refreshes more than just your palate. This recipe transforms the usual summer sipper into a playful frozen delight, perfect for those lazy afternoons when the heat hits unexpectedly hard. It’s a bit chaotic, a little nostalgic, and undeniably fun.

    What makes this frosé stand out isn’t just its cooling effect, but the way it captures the spirit of carefree summer days. As the wine combines with icy crunch, it sparks memories of childhood treats and long conversations under the sun. Plus, it’s surprisingly easy to whip up, even with a busy schedule or last-minute guests.

    WHY I LOVE THIS RECIPE?

    • It’s a symbol of spontaneity, perfect for unplanned summer moments.
    • The aroma of chilled rosé mixed with frozen fruit is irresistibly inviting.
    • I love how it turns a simple wine into a show-stopping dessert.
    • Each sip offers a refreshing burst that’s both tart and mildly sweet.
    • Sharing it sparks joy and messy laughter.

    AVOID MY DISASTER (You’re Welcome)

    • FORGOT to chill the rosé overnight — the slushie turned into icy water. Freeze extra wine ahead.
    • DUMPED too much sugar — the flavor was too sweet. Use less for a balanced taste.
    • OVER-TORCHED the fruit — it caramelized and lost freshness. Use fresh, ripe berries instead.
    • FORGOT to blend long enough — texture was grainy. Pulse until smooth and creamy.

    QUICK FIXES THAT SAVE YOUR DAY

    • When the mixture is too liquid, add more frozen fruit and blend briefly.
    • Splash in a little lemon juice to brighten dull flavors.
    • Patch by adding a splash of sparkling water for extra shimmer.
    • If it’s too icy, let it sit a few minutes at room temperature.
    • Shield by serving immediately to prevent melting and loss of texture.

    This frozen rosé treat is more than just a drink; it’s a conversation starter and a sweet escape wrapped into one.

    Right now, as summer tips into its hottest moments, this recipe offers an effortless way to keep cool while embracing the playful chaos of the season. It’s a reminder that sometimes, the best moments come from simple, spontaneous choices — like turning wine into something icy and magical.

    Frozen Rosé Treat

    This frozen rosé dessert is made by blending chilled rosé wine with frozen fruit and sugar to create a slushy, icy texture. The mixture is processed until smooth and scoopable, resulting in a vibrant, shimmering frozen drink that resembles a slushie with a wine-infused flavor. It has a refreshing, tart-sweet taste with a visually appealing icy appearance.
    Prep Time 10 minutes
    Total Time 10 minutes
    Servings: 4
    Course: Main Course
    Cuisine: Summer
    Calories: 120

    Ingredients
      

    • 2 bottles (750 ml each) rosé wine chilled overnight
    • 2 cups frozen mixed berries ripe and fresh
    • 1/4 cup granulated sugar optional, for sweetness

    Equipment

    • Blender
    • Measuring cups and spoons

    Method
     

    1. Measure out the chilled rosé and pour it into the blender.
    2. Add the frozen mixed berries to the blender, ensuring they are evenly distributed for a vibrant color and flavor.
    3. Pulse the blender gently at first to break up the frozen fruit, then increase to high speed, blending until the mixture becomes smooth and slushy, with no large chunks remaining.
    4. Taste the mixture and adjust sweetness if needed by adding a splash more sugar or lemon juice, then pulse briefly to combine.
    5. Once the mixture is creamy, vibrant, and evenly blended, pour it into glasses or bowls.
    6. Optional: Garnish with fresh mint, edible flowers, or a rim of sugar for a decorative touch.
    7. Serve immediately with a straw or spoon, enjoying the cool, icy burst of flavor.

    Notes

    For best results, freeze extra rosé ahead of time to ensure a perfect slushy texture. You can customize sweetness and fruit choices to suit your taste. Serve immediately to prevent melting.

    Whether you’re lounging on a porch or hosting a last-minute gathering, this rosé slushie adds a bit of merry chaos to any summer scene. Its tangy, fruity character is a gentle reminder to embrace the imperfect and enjoy fleeting moments of joy.

    So next time the sun blazes high and plans fall apart, remember this easy, crowd-pleasing treat. It’s all about making the most of the warm days and creating memories that taste as sweet as the slushie itself.