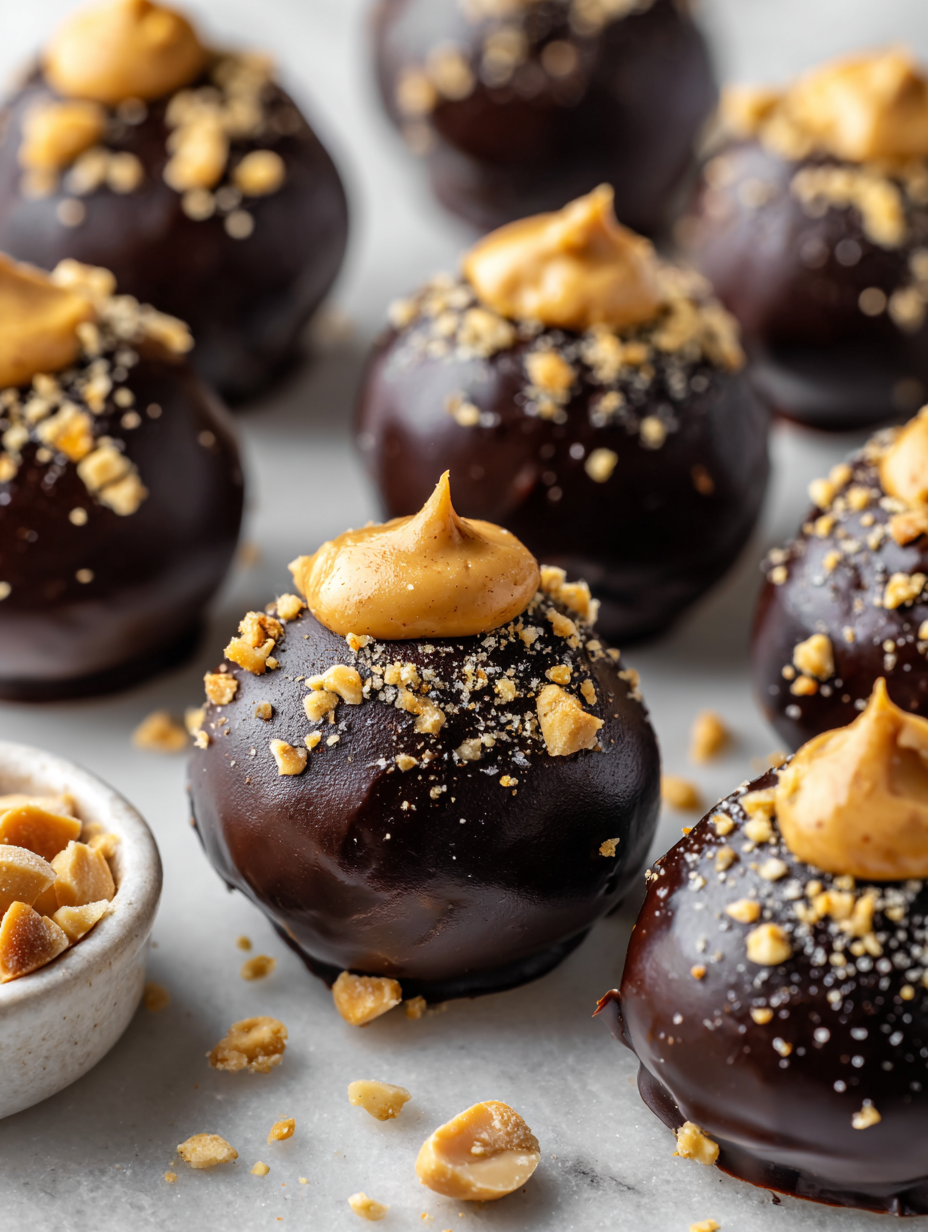
Blog

  • The Cold Brew Twist: Elevate Lemonade with a Chill

    The Cold Brew Twist: Elevate Lemonade with a Chill

    Imagine opening your freezer and discovering a batch of homemade lemonade slowly transforming into a frosty, slushy delight. This recipe isn’t just about making a cold drink; it’s about reinventing a classic with a surprising twist. The frozen lemon pieces crackle gently as they meld into a smooth, icy batch that’s perfect for unexpected summer visits or a spontaneous brunch.

    Lemonade slushies are trending, but I love pushing the boundaries by adding a hint of ginger or even a splash of sparkling water. It’s the promise of icy citrus with a zing that keeps every sip lively. Plus, this recipe is a nod to childhood, capturing that thrilling moment of crushing ice and sipping through a paper straw.

    Frozen Lemonade Slushies with a Zing

    This recipe combines fresh lemon juice with ice and sweetener, then blends until smooth and icy. The final texture is a frosty, slushy consistency with a bright, citrus flavor and optional spicy or sparkling accents for added flair.
    Prep Time 10 minutes
    Total Time 10 minutes
    Servings: 4
    Course: Main Course
    Cuisine: American
    Calories: 70

    Ingredients
      

    • 1 cup fresh lemon juice preferably freshly squeezed
    • 2 cups ice cubes adjust amount for desired consistency
    • 1/4 cup simple syrup or honey for sweetness, optional more to taste
    • 1/2 teaspoon fresh ginger juice or grated ginger optional, for a zing
    • sparkling water to taste optional splash for a fizzy twist

    Equipment

    • Blender
    • Measuring cups and spoons

    Method
     

    1. Pour the fresh lemon juice into the blender, ensuring it’s fresh for the brightest flavor.
    2. Add the simple syrup or honey to the blender, measuring carefully for the right balance of sweetness.
    3. Toss in the ice cubes, filling the blender until it reaches just below the top. This creates the icy base for your slushie.
    4. If you’re using ginger for a zing, add the grated ginger or a splash of ginger juice now to give the drink a spicy kick.
    5. Secure the lid on the blender and blend on high for about 30-45 seconds until the mixture is slushy, thick, and smooth, with tiny ice crystals visible.
    6. Pour the frozen lemonade into tall glasses. If you like a sparkling twist, add a splash of sparkling water for fizz.
    7. Serve immediately with a straw or a garnish of lemon slice for a refreshing, icy treat.
    Making a lemonade slushie is about capturing the essence of summer in a glass—frosty, tart, and refreshingly simple. It’s a versatile treat that you can tweak endlessly, making it a staple for those hot days or lazy weekends.

    This recipe reminds me that sometimes the best moments come from quick improvisations. It’s a cool way to cool down, no fancy equipment needed, just a freezer and a little bit of patience. Keep your freezer stocked, and this delightful drink can be your go-to whenever the sun heats up.

  • Chill Out with this Refreshing Gatorade Slushie Hack

    Chill Out with this Refreshing Gatorade Slushie Hack

    During scorching summer days, a cold drink can feel like a mini vacation. This Gatorade slushie isn’t just a frozen beverage; it’s a nostalgic throwback to childhood sports sidelines mixed with a grown-up thirst for fun. I recently discovered how turning a classic sports drink into a slush transforms hydration into a frosty delight.

    The secret is in the simple blending process that captures the sweet, salty, and tangy notes of Gatorade with icy crunch. It’s perfect for spontaneous cooling or family get-togethers. Plus, it’s ridiculously easy—you probably already have everything you need in your freezer and pantry.

    Gatorade Slushie

    This Gatorade slushie is made by blending chilled sports drink with ice until it reaches a thick, icy consistency. The result is a frosty, vibrant beverage with a salty, sweet, and tangy flavor, featuring a granular texture with frozen ice crystals. It serves as a refreshing cold drink perfect for hot days or casual gatherings.
    Prep Time 10 minutes
    Total Time 10 minutes
    Servings: 2
    Course: Main Course
    Cuisine: American
    Calories: 70

    Ingredients
      

    • 2 cups Gatorade chilled
    • 1 cup ice cubes preferably crushed or small pieces

    Equipment

    • Blender
    • Measuring cup

    Method
     

    1. Add the chilled Gatorade and ice cubes to the blender.
    2. Secure the lid on the blender and blend on high speed for about 20-30 seconds, until the mixture is thick, icy, and well combined.
    3. Stop the blender and check the consistency—it’s ready when it has a granular, icy texture that is scoopable with a spoon.
    4. Pour the slushie into glasses, and serve immediately for the best icy crunch.

    Notes

    For a smoother texture, pulse the mixture briefly if it becomes too thick. Adjust ice depending on how thick you prefer your slushie.
    This icy Gatorade slushie is more than just a frozen treat; it’s a quick escape from the heat with a familiar flavor twist. It’s ideal when you need a refresh without overcomplicating things. As summer rolls in, this recipe offers a simple way to beat the sweat and feel a little more playful.

  • Monster Burgers: A Halloween Feast of Creativity

    Monster Burgers: A Halloween Feast of Creativity

    Halloween is not just about costumes and candies; it's also a chance to turn the kitchen into a playground of spooky delights. This year, I'm obsessed with crafting Monster Burgers that look like they jumped straight out of a haunted house. The secret is in the wild, gooey toppings and the eerie, monster-like shapes you can create with simple ingredients.

    These burgers are perfect for playful parties where children and adults alike can dive into the chaos of food art. I love how each burger becomes a mini canvas for your imagination, turning ordinary beef patties into monstrous faces and writhing creatures. Plus, the aroma of seasoned meat and crispy toppings fills the room, adding to the fun ambiance of Halloween night.

    WHY I LOVE THIS RECIPE?

    • Joy of transforming simple ingredients into spooky art
    • Chaos that ignites kids’ and adults’ playful spirits
    • Priceless reactions to these monstrous creations
    • Comfort of familiar flavors with a fun twist
    • Relief in knowing how easy it is to assemble

    Halloween Monster Burgers

    Halloween Monster Burgers are creatively shaped beef patties adorned with gooey toppings and spooky decorations to resemble monstrous faces or creatures. The burgers are grilled until juicy and browned, then customized with colorful condiments, crispy toppings, and edible decorations, resulting in playful, visually striking final dishes with a juicy interior and crispy exterior.
    Prep Time 20 minutes
    Cook Time 15 minutes
    Total Time 35 minutes
    Servings: 4
    Course: Main Course
    Cuisine: American
    Calories: 650

    Ingredients
      

    • 1 pound ground beef
    • 1 teaspoon salt
    • 1/2 teaspoon black pepper
    • 4 burger buns preferably with sesame seeds
    • 1 cup cheddar cheese sliced, for melting and topping
    • 1 cup lettuce shredded, for decoration
    • 1 cup ketchup for decoration
    • 1 cup mustard for decoration
    • 1/2 cup sliced olives for eyes and features
    • 1 cup crispy onions or fried shallots for hair or texture

    Equipment

    • Grill or Grill Pan
    • Spatula
    • Knives
    • Cutting board
    • Bowl

    Method
     

    1. Preheat your grill or grill pan over medium-high heat. In a bowl, combine ground beef with salt and black pepper, mixing gently to incorporate the seasonings without overworking the meat.
    2. Divide the seasoned beef into four equal portions and shape each into a flat, wide patty, about 3/4 inch thick. Use your hands to create a slightly irregular shape for a more monster-like appearance.
    3. Place the patties onto the hot grill, cooking for about 4-5 minutes per side until nicely browned and cooked through. During the last minute, top each patty with slices of cheddar cheese to melt.
    4. While the burgers are grilling, prepare your toppings. Slice olives into small rounds for eyes and other facial features, and set aside. Arrange shredded lettuce, ketchup, and mustard in small bowls for decorating the monsters.
    5. Toast the burger buns briefly on the grill or in a toaster until golden and slightly crispy. This adds a nice texture and prevents sogginess.
    6. Assemble each monster burger by placing the grilled beef patty on the bottom bun. Decorate the top with sliced olives for eyes and other features, use ketchup and mustard for facial details, and add lettuce for hair or monstrous textures.
    7. Finish by placing the top bun on each assembly, pressing gently to set the decorations, and garnish with crispy onions or fried shallots for added hair or texture.
    8. Serve the Monster Burgers immediately while still warm, with extra condiments on the side for extra fun and flavor.

    Notes

    Feel free to get creative with the monster faces—use additional ingredients like sliced bell peppers or cheese to craft different expressions and monstrous features.

    Creating Halloween Monster Burgers turns an ordinary dinner into an extraordinary party experience. Their playful, slightly chaotic appearance perfectly captures the spirit of the holiday. Plus, you get to enjoy all your favorite burger flavors, just with a spooky upgrade.

    As the night winds down, these burgers will be remembered as the highlight of your spooky feast. They blend creativity with comfort, making them a fantastic choice for any Halloween celebration. Get ready for lots of giggles and delighted squeals around the table.

  • Hidden Twist: The Cinnamon-Caramel Apple Cake You Never Knew You Needed

    Hidden Twist: The Cinnamon-Caramel Apple Cake You Never Knew You Needed

    Many apple cake recipes stay safe with straightforward ingredients. But today, we’re shaking things up with a hint of toasted sesame in the batter, adding a nutty complexity that counterbalances the sweetness. It’s a small secret that turns an ordinary apple cake into a layered experience.

    Plus, I’reventuring into a season of apple abundance with a technique for caramelizing apple slices beforehand, intensifying their flavor. The aroma of cinnamon, caramelized apples, and toasted sesame fills the kitchen, inviting eager anticipation. You’ll soon be baking something comfy, yet provocative enough to impress the most seasoned palate.

    Ready to rethink your apple cake? Let’s dive into a recipe that’s both familiar and intriguingly different, combining textures and flavors in every bite.

    Apple Sesame Cake

    This apple sesame cake combines tender, moist layers infused with toasted sesame seeds and caramelized apple slices. The batter is enriched with toasted sesame for a nutty flavor, while the apples are pre-cooked to deepen sweetness and add a soft, caramelized texture. The finished cake has a golden crust with a moist crumb and beautifully browned apple topping.
    Prep Time 20 minutes
    Cook Time 40 minutes
    Total Time 1 hour
    Servings: 8
    Course: Main Course
    Cuisine: Fusion
    Calories: 350

    Ingredients
      

    • 2 cups all-purpose flour sifted
    • 1 cup granulated sugar
    • 1/2 cup unsalted butter melted
    • 3 large eggs at room temperature
    • 1 tsp vanilla extract
    • 1 1/2 cups toasted sesame seeds
    • 3 medium apples preferably tart variety
    • 2 tbsp brown sugar for caramelizing apples
    • 1 tbsp cinnamon

    Equipment

    • Mixing bowls
    • Wooden spoon or spatula
    • Knife
    • Cutting board
    • Baking dish or cake pan
    • Oven
    • Saucepan
    • Measuring cups and spoons

    Method
     

    1. Preheat your oven to 350°F (175°C). Grease your baking pan and set aside.
    2. Peel, core, and thinly slice the apples. Place them in a saucepan with brown sugar and cinnamon, then cook over medium heat until they become tender and caramelized, about 8-10 minutes. Stir occasionally and watch for a golden, sticky syrup coating the slices.
    3. In a large mixing bowl, whisk together the eggs, sugar, vanilla extract, and melted butter until smooth and slightly frothy.
    4. Gradually add the sifted flour and toasted sesame seeds to the wet mixture, folding gently until just combined. Be careful not to overmix to keep the batter light.
    5. Pour the batter into the prepared baking dish and spread evenly with a spatula.
    6. Arrange the caramelized apple slices on top of the batter in an appealing pattern, slightly pressing them down so they embed into the batter.
    7. Bake the cake in the oven for about 40 minutes, or until the top is golden brown and a toothpick inserted into the center comes out clean.
    8. Remove the cake from the oven and let it cool in the pan for 10 minutes, then transfer to a wire rack or serve directly from the pan to enjoy the warm, caramelized aroma.
    9. Slice the cake to reveal the tender apple slices nestled within the moist, sesame-infused crumb. The caramelized apples top the cake with a glossy finish.

    This apple cake isn’t just a dessert; it’s a story in layers, perfect for cozy fall mornings or a casual gathering. The homey smell of baked apples and toasted sesame is a silent welcome, making every slice feel like a small celebration.

    As seasons change, so do our tastes. This recipe’s balance of nostalgic apple warmth and a surprising twist might just become your new favorite. Whatever the occasion, it’s a simple joy to have this comforting cake on hand, ready to serve with a cup of tea or a splash of cream.

  • Spooky Sweetness: Pumpkin-Carved Jack-o’-Lantern Stuffed Peppers

    Spooky Sweetness: Pumpkin-Carved Jack-o’-Lantern Stuffed Peppers

    Imagine turning your kitchen into a mini haunted house with just a few bell peppers and some creativity. These Jack-o’-Lantern stuffed peppers add a playful twist to Halloween, blending vibrant colors with indulgent flavors. The best part? They’re surprisingly easy to prepare, making your spooky feast both fun and stress-free.

    Carving faces into peppers feels nostalgic, like reliving childhood craft projects with a touch of culinary flair. As the peppers roast, they release a sweet aroma of roasted vegetables, mingling with hints of melted cheese and savory stuffing. It’s a perfect way to celebrate the season with a dish that’s as charming as it is delicious.

    Halloween Jack-o’-Lantern Stuffed Peppers

    These stuffed peppers are carved to resemble jack-o’-lanterns, filled with a savory mixture of cooked rice, ground meat, and vegetables. They are baked until tender, with melted cheese on top, and their bright orange color and carved faces create a festive, playful appearance suited for Halloween celebrations.
    Prep Time 20 minutes
    Cook Time 30 minutes
    Total Time 50 minutes
    Servings: 4
    Course: Main Course
    Cuisine: Western
    Calories: 320

    Ingredients
      

    • 4 large bell peppers preferably orange for a classic jack-o’-lantern look
    • 1 cup cooked rice white or brown rice, cooled
    • 0.5 pound ground meat beef, turkey, or chicken
    • 1 small onion finely chopped
    • 2 cloves garlic minced
    • 1 cup shredded cheese cheddar or mozzarella
    • 2 tablespoons olive oil
    • to taste salt and pepper

    Equipment

    • Baking sheet
    • Chef’s knife
    • Spoon
    • Small paring knife
    • Mixing bowl
    • Cooking pot

    Method
     

    1. Preheat your oven to 375°F (190°C). Place the bell peppers on a baking sheet and cut out a small, circular lid from the top of each, then carefully carve face holes into the front of each pepper to resemble jack-o’-lanterns using a small paring knife. Scoop out the seeds and membranes, then set aside.
    2. Heat olive oil in a skillet over medium heat. Add the chopped onion and cook until translucent, about 3-4 minutes, releasing a sweet aroma. Add the minced garlic and cook for another minute until fragrant.
    3. Add the ground meat to the skillet, breaking it apart with a spoon, and cook until browned and cooked through, about 5-7 minutes. Season with salt and pepper to taste. Stir in the cooked rice and mix until evenly combined and heated through.
    4. Spoon the filling into each hollowed-out pepper, pressing gently to pack it in. Top each with a generous sprinkle of shredded cheese to add a melty, golden layer when baked.
    5. Place the carved peppers back onto the baking sheet, then bake in the preheated oven for about 25-30 minutes, or until the peppers are tender and slightly charred around the edges. The cheese on top should be bubbly and golden.
    6. Remove the peppers from the oven and let them cool slightly. Serve warm, displaying your spooky jack-o’-lanterns on a festive platter, ready to impress and delight.

    Notes

    Feel free to get creative with the face carving—zigzags, triangles, or smiley faces add extra fun. You can also prepare the filling ahead of time for a quicker assembly.

    These festive stuffed peppers are more than just a party trick—they bring a cozy, savory bite to your Halloween table. Perfect for kids and adults alike, they spark joy and a bit of chaos in the kitchen, in the best way. Plus, their visual impact makes every bite feel like a little Halloween adventure.

    As fall deepens, dishes like these remind us that celebration and creativity go hand-in-hand. Whether you’re hosting a gathering or just want a playful weeknight dinner, these peppers make every meal a spooky delight. Now, it’s time to get carving and create your own edible masterpiece.

  • Embrace Autumn: The One-Pan Fall Chicken Dinner You Never Knew You Needed

    Embrace Autumn: The One-Pan Fall Chicken Dinner You Never Knew You Needed

    Imagine a skillet filled with the aroma of roasted fall apples, caramelized onions, and herbs, all coalescing into a symphony of seasonal flavors. This One-Pan Fall Chicken Dinner isn’t just a meal; it’s an experience that turns a weeknight into a cozy celebration. The simplicity of one-pan cooking brings out the richness of each ingredient, making it perfect for those crisp autumn evenings.

    As the leaves turn fiery shades outside, my kitchen becomes a haven of warmth and spice. This recipe is my go-to for quick comfort, with the added bonus of colorful seasonal produce. Whether you’re hosting friends or just craving a wholesome meal, this dish adapts effortlessly, conveying autumn’s bounty in every bite.

    One-Pan Fall Chicken Dinner

    This dish features chicken breasts cooked with roasted fall apples, caramelized onions, and herbs all in a single skillet. The ingredients develop a caramelized, tender texture with a flavorful, aromatic sauce by the end of cooking. The presentation is rustic and colorful, highlighting the seasonal ingredients.
    Prep Time 15 minutes
    Cook Time 30 minutes
    Total Time 45 minutes
    Servings: 4
    Course: Main Course
    Cuisine: American
    Calories: 350

    Ingredients
      

    • 4 pieces chicken breasts boneless, skinless
    • 2 apples firm fall varieties like Fuji or Honeycrisp, cored and sliced
    • 1 large onion thinly sliced
    • 3 cloves garlic minced
    • 2 tablespoons olive oil
    • 1 teaspoon fresh thyme or ½ teaspoon dried thyme
    • ½ teaspoon ground cinnamon
    • to taste salt and pepper

    Equipment

    • Skillet or large frying pan
    • Sharp knife
    • Cutting board
    • Measuring spoons

    Method
     

    1. Pat the chicken breasts dry and season generously with salt, pepper, thyme, and cinnamon on both sides.
    2. Heat a tablespoon of olive oil in a large skillet over medium-high heat until shimmering.
    3. Place the chicken breasts in the skillet and cook for about 6-7 minutes on each side until golden brown and cooked through. Remove and set aside.
    4. Add the sliced onions to the skillet and reduce heat to medium. Cook, stirring occasionally, until onions are soft and caramelized around 10 minutes, releasing a sweet aroma.
    5. Stir in the minced garlic and cook for another minute until fragrant and slightly golden.
    6. Add the sliced apples to the skillet, stirring well to coat them with juices and caramelized bits. Cook for about 5 minutes until apples are tender but still hold their shape.
    7. Return the chicken breasts to the skillet, nestling them among the apples and onions. Let everything cook together for 5 minutes to meld the flavors.
    8. Taste and adjust seasoning with more salt and pepper if needed. Serve hot, garnished with extra thyme if desired.

    Notes

    For added richness, a splash of cider or white wine can be included during simmering. Using firm apples like Fuji or Honeycrisp helps them hold their shape throughout cooking.
    In moments when time feels tight but your craving for hearty, flavorful food is strong, this dish delivers with ease. The skillet’s sizzling sounds and inviting scents create a moment of pure joy, even during the busiest days.

    This recipe marks a seasonal shift in my cooking, a way to savor the fleeting beauty of fall without the fuss. It’s a reminder that sometimes, the simplest ingredients cooked together can create the most memorable meals.

  • The Art of the Chill: Elevate Your Vodka Slushie Game with Unexpected Flavors

    The Art of the Chill: Elevate Your Vodka Slushie Game with Unexpected Flavors

    Shaking up a vodka slushie might seem simple, but adding an unexpected ingredient can turn a basic chill into a memorable experience. Imagine the icy tang combined with a splash of exotic fruit or a hint of herbal complexity. This approach transforms your casual summer drink into a conversation starter at any gathering.

    Today, I’m diving into a world where everyday ingredients meet daring flavor twists. The secret is in the balance—sweet, tangy, and boozy—frozen into a smooth, refreshing treat that surprises every time. It’s a playful reminder that even classics benefit from a little inventive flair.

    Exotic Fruit Vodka Slushie

    This vodka slushie combines icy crushed ice with fruit-flavored syrup and a splash of vodka, blended into a smooth, icy drink. The texture is thick and chilled, with a vibrant, slightly frosty appearance that’s perfect for summer gatherings. It features a refreshing balance of sweetness, tang, and alcohol with a visually appealing frozen consistency.
    Prep Time 10 minutes
    Total Time 10 minutes
    Servings: 4
    Course: Main Course
    Cuisine: Fusion
    Calories: 150

    Ingredients
      

    • 2 cups crushed ice preferably finely crushed or pelletized
    • 1/2 cup fruit syrup (e.g., mango or berry) adds flavor and sweetness
    • 3 oz vodka adjust based on strength preference

    Equipment

    • Blender
    • Measuring cups and spoons

    Method
     

    1. Place the crushed ice into the blender, filling it about three-quarters full.
    2. Add the fruit syrup over the ice, pouring it evenly to distribute flavor.
    3. Pour the vodka into the blender, making sure to add it over the ice and syrup for even mixing.
    4. Cover the blender securely and blend on high speed until the mixture is thick, smooth, and evenly frozen, about 30-45 seconds.
    5. Stop the blender and check the consistency—it should be thick and scoopable with a frosty exterior.
    6. Pour the slushie into chilled glasses, using a spoon if necessary to scoop it out for a neat presentation.
    7. Optionally, garnish with fresh fruit slices or a sprig of mint for visual appeal.

    Notes

    Serve immediately for the best texture. For a sweeter flavor, add more syrup; for a stronger kick, increase the vodka slightly.

    This recipe is perfect for those hot weekends when you crave something more than just a plain icy drink. It combines nostalgia with innovation, offering a cool escape with every sip. Plus, it’s so easy to customize with what’s in your pantry or fridge, making it an adaptable favorite.

    As the seasons shift, having a few bold, frostbitten cocktails up your sleeve keeps your summer spirits high. Whether you’re lounging alone or entertaining friends, this vodka slushie will always be a refreshing twist on your usual repertoire.

  • Spook-tacular Ghost Veggie Platter: A Halloween Snack with a Friendly Fright

    Spook-tacular Ghost Veggie Platter: A Halloween Snack with a Friendly Fright

    Halloween often leads us to indulge in sweets and treats that might leave us craving something fresh and crunchy. This Ghost Veggie Platter turns healthy snacks into a fun, ghostly centerpiece that kids and adults alike will adore. It’s a playful way to encourage veggie eating amidst the chaos of costume parties and festive chaos.

    Imagine this: a platter sprinkled with bright bell peppers, crisp cucumbers, and snowy cauliflower, all crafted into ghostly shapes with adorable eyes. The aroma of fresh veggies mixed with a hint of garlic and tangy dips fills the room, making it as tempting as any candy bowl. Plus, it’s quick to assemble, perfect for last-minute Halloween prep or a spontaneous spooky gathering.

    Ghost Veggie Platter

    This Ghost Veggie Platter features an assortment of fresh vegetables arranged into ghostly shapes using bell peppers, cucumbers, and cauliflower. The crunchy textures and vibrant colors create a playful centerpiece, complemented by tangy dips and subtle garlic flavor. It offers a healthy, visually appealing snack that’s quick to assemble for Halloween gatherings.
    Prep Time 15 minutes
    Total Time 15 minutes
    Servings: 8
    Course: Main Course
    Cuisine: Halloween
    Calories: 50

    Ingredients
      

    • 2 each bell peppers (preferably white or yellow) for ghost shapes
    • 1 large cucumber for ghost bodies
    • 1 head cauliflower for snowy ghost figures
    • to taste for dipping hummus or ranch dip
    • to taste fresh garlic optional
    • 1 tbsp olive oil optional for dipping

    Equipment

    • Vegetable peeler
    • Melon baller or small cookie cutter
    • Serving platter

    Method
     

    1. Wash all vegetables thoroughly. Slice the bell peppers into thin strips and then cut out small ghost-shaped figures using a melon baller or small cookie cutter.
    2. Peel the cucumber lightly to create a smooth surface. Cut the cucumber into manageable sections, then carve small eye holes into each ghost-shaped piece using a small spoon or cookie cutter to mimic eyes.
    3. Separate the cauliflower into small fluffy clusters, resembling tiny snowballs or ghosts. Rinse and pat dry. You can also dip the cauliflower in a mixture of olive oil and minced garlic for extra flavor if desired.
    4. Arrange the bell peppers, cucumbers, and cauliflower on a large serving platter, positioning the ghost shapes to create a playful scene. Place small dollops of your chosen dip for easy access and added flavor.
    5. Optionally, drizzle a little olive oil over the cauliflower ghosts and sprinkle with minced garlic for enhanced flavor. Add more dip around the platter for dipping fun.
    6. Serve the spooky veggie ghosts immediately, encouraging everyone to pick up their favorite shapes and dip into the delicious sauces. Enjoy this healthy, fun Halloween centerpiece!

    Notes

    For easier carving, slightly chill vegetables beforehand. Feel free to add additional vegetables or dips to customize your platter.
    Creating this Halloween Ghost Veggie Platter is a perfect way to elevate your party spread with something healthy and delightful. It’s not just a snack but a conversation starter, adding a touch of whimsy to your festive table.

    As you gather around, let the vibrant colors and charming ghost shapes bring a sense of fun and nostalgia. It’s a reminder that even spooky season can be fresh, vibrant, and full of cheerful surprises.

  • Lazy Weekend Cozy: The Ultimate Lasagna Soup Hack

    Lazy Weekend Cozy: The Ultimate Lasagna Soup Hack

    Sometimes, the craving for lasagna hits but the time is too tight for all those layers and oven waits. That’s where this innovative lasagna soup comes in—bringing all those cheesy, rich flavors into a comforting bowl in a fraction of the time. It’s the perfect weekend fix that offers the indulgence of a classic without the fuss.

    Imagine the aroma of garlic and simmering tomatoes filling your kitchen, just as if you’re assembling a glorious batch of lasagna. A few simple pantry staples turn into a hearty, cheesy soup that warms you from the inside out. It’s not only quick but also an easy way to impress without stressing over perfect pasta layering.

    Lasagna Soup

    Lasagna soup combines the rich, cheesy flavors of traditional lasagna into a hearty, comforting broth. The dish is prepared by simmering tomatoes, garlic, and herbs, then stirring in cheese and cooked noodles to create a thick, flavorful soup with a creamy texture and bubbling finish.
    Prep Time 10 minutes
    Cook Time 30 minutes
    Total Time 40 minutes
    Servings: 4
    Course: Main Course
    Cuisine: Italian
    Calories: 350

    Ingredients
      

    • 2 cloves garlic minced
    • 1 can (28 oz) crushed tomatoes
    • 4 cups chicken or vegetable broth
    • 1 teaspoon dried oregano
    • 1 cup small pasta noodles such as mini penne or broken lasagna noodles
    • 1 cup ricotta cheese
    • 1 cup shredded mozzarella cheese
    • to taste salt and pepper
    • 2 tablespoons olive oil

    Equipment

    • Large pot
    • Wooden spoon

    Method
     

    1. Heat olive oil in a large pot over medium heat until shimmering, then add the minced garlic. Sauté for about 30 seconds until fragrant, with a gentle aroma filling the kitchen.
      1 can (28 oz) crushed tomatoes
    2. Pour in the crushed tomatoes and broth, then stir everything together with a wooden spoon. Bring the mixture to a gentle simmer, allowing the flavors to meld while the liquid heats up.
      1 can (28 oz) crushed tomatoes
    3. Add dried oregano, a pinch of salt, and pepper to taste, then cook the soup uncovered for about 10 minutes to develop a deeper flavor.
      1 can (28 oz) crushed tomatoes
    4. Stir in the small pasta noodles and cook until al dente, following the package instructions, usually about 8 minutes, until they’re tender but still hold their shape.
      1 can (28 oz) crushed tomatoes
    5. Reduce the heat to low and gently fold in the ricotta cheese, stirring until it melts into the soup, creating a creamy, slightly thickened texture.
      1 can (28 oz) crushed tomatoes
    6. Sprinkle the shredded mozzarella cheese over the hot soup, allowing it to melt and form a bubbly, cheesy surface that looks inviting and extra comforting.
      1 can (28 oz) crushed tomatoes
    7. Taste and adjust the seasoning with more salt or pepper if needed to balance the flavors.
      1 can (28 oz) crushed tomatoes
    8. Serve hot in bowls, garnished with extra cheese or herbs if desired, and enjoy the hearty, cheesy goodness of this lasagna-inspired soup.

    Notes

    Feel free to customize with cooked ground meat or sautéed vegetables for extra flavor.

    This soup is a reminder that comfort food doesn’t need to be complicated or time-consuming. It’s a flexible, forgiving dish that adapts to what you have on hand, making dinner both effortless and satisfying. As the days grow cooler, it’s a bowl that comforts your soul and fills your home with irresistible smells.

    Sometimes, mixing familiar flavors in unexpected ways creates the best surprises. This lasagna soup embodies that spirit—quick, cheesy, and utterly delicious. It’s perfect for cozy nights and busy weeknights alike, turning a simple meal into something memorable and warm.

  • Spooky Bats & Green Mash: Halloween Guacamole with Tortilla Chips

    Spooky Bats & Green Mash: Halloween Guacamole with Tortilla Chips

    Halloween is a time for creative bites that scare and delight in equal measure. This year, I decided to ditch the usual with a fun twist—bats! These bat-shaped tortilla chips framing a vibrant, creamy guacamole make my kitchen feel like a spooky cave.

    What makes this recipe special is the playful chaos it brings to the table. The smell of fresh avocados blending with zesty lime and a hint of smoky cumin creates a festive aroma ready to charm any ghost or goblin. Plus, the bat chips are easy, fast to make, and oddly mesmerising.

    Bat-Shaped Tortilla Chips with Guacamole

    This dish consists of crispy tortilla chips cut into bat shapes, served alongside a smooth, creamy guacamole made from ripe avocados, lime juice, and spices. The chips provide a crunchy texture, while the guacamole offers a cool, vibrant contrast, making for an eye-catching appetizer or snack.
    Prep Time 15 minutes
    Cook Time 10 minutes
    Total Time 25 minutes
    Servings: 4
    Course: Main Course
    Cuisine: American
    Calories: 220

    Ingredients
      

    • 4 pieces tortillas corn or flour tortillas
    • 2 ripe avocados soft, for easy mashing
    • 1 lime lime juice freshly squeezed
    • 1/2 teaspoon smoked cumin ground
    • 1/2 teaspoon salt
    • 1 tablespoon olive oil

    Equipment

    • Baking sheet
    • Sharp knife
    • Mixing bowl
    • Fork or masher
    • Serving platter

    Method
     

    1. Preheat your oven to 375°F (190°C). Place tortilla rounds on a baking sheet and bake until crispy, about 8–10 minutes, watching to prevent burning.
    2. While the chips are baking, peel and pit the avocados, then transfer the flesh to a mixing bowl.
    3. Add freshly squeezed lime juice and a pinch of salt to the mashed avocados, then mash with a fork or masher until smooth and creamy.
    4. Stir in the ground smoked cumin and olive oil to enhance flavor and achieve a silky, vibrant green guacamole.
    5. Remove the baked tortilla chips from the oven once they are golden and crispy. Let them cool slightly for easier handling.
    6. Use a sharp knife to cut each tortilla into bat shapes—create two small wings and a rounded body for each chip, ensuring they look like bats.
    7. Arrange the shaped chips on a serving platter around a bowl of the prepared guacamole, creating a spooky bat display.
    8. Serve immediately to enjoy the crispy texture of the chips with the cool, flavorful guacamole.
    This Halloween treat isn’t just about looks—it’s about the joy of mixing up something fresh and snackable. The crunch of the bat chips paired with the silky smooth guacamole makes every bite memorable.

    As the evening unfolds, this dish can be styled to suit any spooky theme or simple get-together. It’s a reminder that sometimes, the smallest ideas—like tiny bat silhouettes—can turn an ordinary snack into a memorable party highlight.