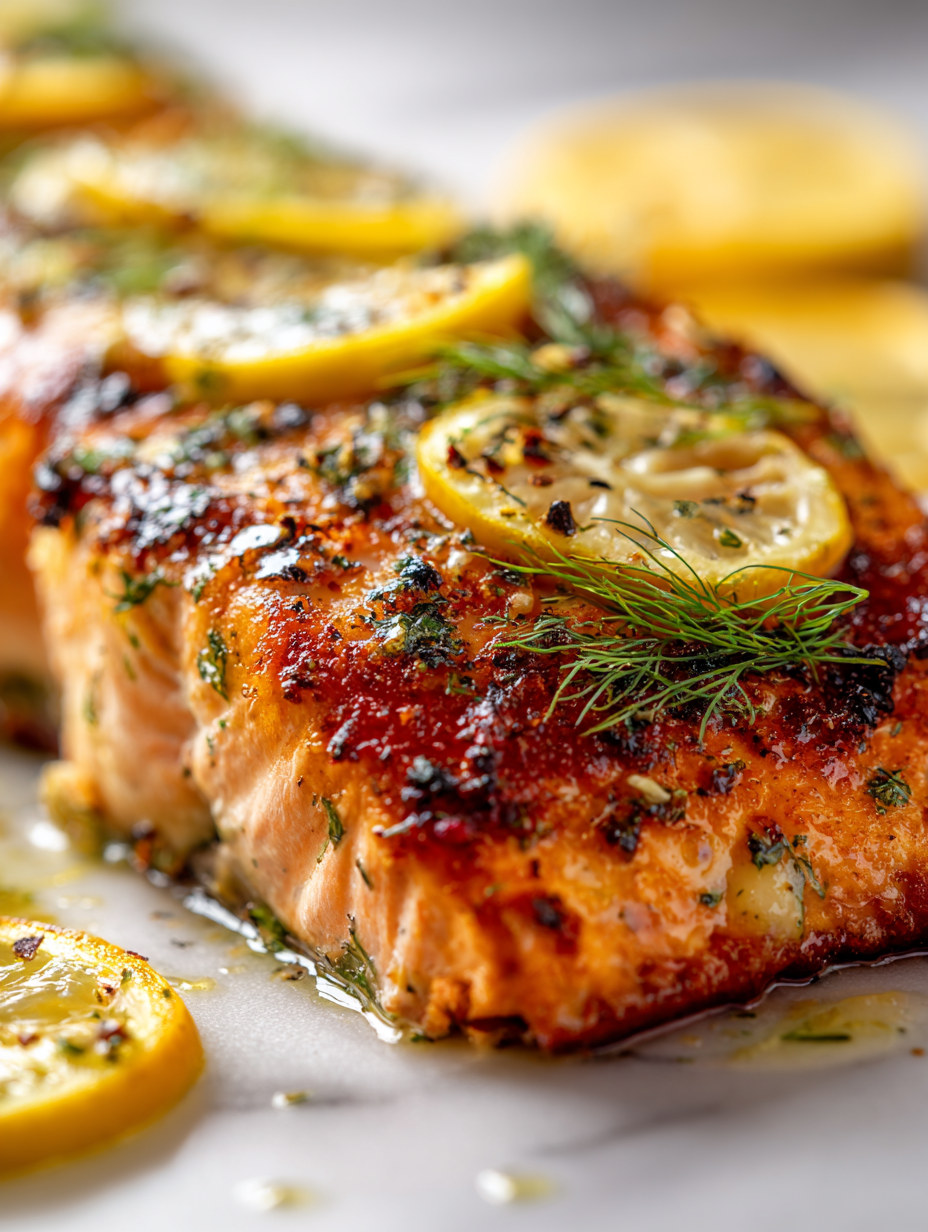
Blog

  • Unleashing Nostalgia: The Unexpected Charm of Sprite Slushie

    Unleashing Nostalgia: The Unexpected Charm of Sprite Slushie

    Ever stumble upon a food idea so simple yet so evocative that it transports you back to childhood in an instant? Thats exactly how I felt when I discovered the art of turning Sprite into a frosty delight. Its a quirky twist on the traditional slushie, but the familiar zesty sparkle of Sprite makes every sip feel like a tiny celebration.

    Making a Sprite slushie at home is almost meditative—mixing, freezing, then chipping away at that icy crown. The scent of lemon-lime sweetness mingling with a hint of cold frost awakens all sorts of memories of summer days and impromptu treats. Itss so straightforward, yet the flavor bursts with the kind of joy that sneaks up unexpectedly.

    Sprite Slushie

    This Sprite slushie is made by freezing lemon-lime soda to create a frosty, icy treat with a sparkling, refreshing flavor. The key ingredients are Sprite and ice, resulting in a crunchy, slushy texture that glistens and shakes with each sip. It’s a simple frozen beverage perfect for hot days and nostalgic moments.
    Prep Time 10 minutes
    Cook Time 3 minutes
    Total Time 13 minutes
    Servings: 2
    Course: Main Course
    Cuisine: American
    Calories: 150

    Ingredients
      

    • 1 liter Sprite chilled for best results
    • 2 cups ice cubes or crushed ice enough to fill the freezer-safe container

    Equipment

    • Freezer
    • Large mixing bowl
    • Ice cube tray or crushed ice
    • Fork or spoon for chipping
    • Tall glasses or cups

    Method
     

    1. Pour the chilled Sprite into a large, freezer-safe container or baking dish, spreading it out evenly.
    2. Add the ice cubes or crushed ice to the Sprite, distributing it evenly across the surface.
    3. Place the container in the freezer and let it freeze for about 3 hours, stirring every 30 minutes with a fork or spoon to break up ice crystals and promote even freezing.
    4. Once fully frozen and slushy in consistency, remove the container from the freezer.
    5. Use a fork or spoon to chip away at the icy surface, breaking it into smaller, fluffy flakes that resemble a snow-like texture.
    6. Serve the Sprite slushie immediately in tall glasses or cups, using a spoon to scoop the icy, sparkling treat.

    Notes

    For a finer texture, you can blend the frozen mixture briefly in a food processor before serving.

    This simple frozen drink is more than just a quick refreshment; itss a trip down memory lane, stirred with a touch of childhood chaos. Perfect for those hot afternoons or a spontaneous gathering, it needs no fancy ingredients or tools—just a trusty freezer and a little patience.

    Whenever life feels a bit too serious, a chilled Sprite slushie reminds us to enjoy the small, fizzy moments. Itss a reminder that sometimes, the simplest pleasures are the most delightful. Cheers to rediscovering old favorites and making new memories, one icy sip at a time.

  • Autumnal Cozy Revival: The Secret to Perfect Roasted Pumpkin Soup

    Autumnal Cozy Revival: The Secret to Perfect Roasted Pumpkin Soup

    As the leaves turn vibrant shades of amber and crimson, there’s something about the aroma of pumpkin roasting that seems to capture autumn’s essence. This isn’t just about warmth; it’s about celebrating a moment of seasonal bounty that fills your kitchen with a spicy-sweet scent that’s hard to resist. I’ve discovered that roasting the pumpkin brings out a depth of flavor that boiling can’t match, turning humble ingredients into a culinary hug.

    This recipe is my attempt to slow down and savor the gift of fall, minus the fuss. It’s a bowl of comfort that’s perfect after a crisp walk through the park or as the star of a low-key dinner. Plus, it’s so forgiving—great for fledgling cooks eager to impress without stress.

    Roasted Pumpkin Soup

    This pumpkin soup is made by roasting chunks of pumpkin until caramelized and tender, then blending them into a smooth, velvety texture. The roasting process deepens the pumpkin’s natural sweetness and adds a rich, smoky flavor to the final dish. The result is a warm, creamy soup with a vibrant orange color and a comforting, autumnal aroma.
    Prep Time 15 minutes
    Cook Time 40 minutes
    Total Time 55 minutes
    Servings: 4
    Course: Main Course
    Cuisine: Autumn
    Calories: 150

    Ingredients
      

    • 1 kg pumpkin cubes peeled and seeded
    • 2 tablespoons olive oil for roasting
    • 1 small onion chopped
    • 2 cloves garlic minced
    • 4 cups vegetable broth
    • 1/2 teaspoon ground nutmeg
    • Salt and pepper to taste

    Equipment

    • Baking sheet
    • Blender or immersion blender
    • Mixing bowl
    • Cooking pot

    Method
     

    1. Preheat your oven to 400°F (200°C). Arrange the pumpkin cubes on a baking sheet, drizzle with olive oil, and toss to coat evenly.
    2. Roast the pumpkin in the oven for about 25-30 minutes until they are golden and caramelized around the edges, filling the kitchen with a sweet aroma.
    3. While the pumpkin roasts, chop the onion and mince the garlic. Sauté them in a pot over medium heat with a little oil until translucent and fragrant, about 5 minutes.
    4. Once the pumpkin is roasted and cooled slightly, transfer the chunks into a blender or use an immersion blender directly in the pot. Add the sautéed onion and garlic to the blender.
    5. Pour in the vegetable broth, then blend until smooth and silky—about 1-2 minutes. Taste and season with salt, pepper, and nutmeg as desired.
    6. Transfer the blended mixture back into the pot and bring to a gentle simmer over low heat to allow the flavors to meld, about 10 minutes.
    7. Adjust seasoning if necessary, then serve the soup hot, garnished with a drizzle of cream or herbs if desired.
    Making this roasted pumpkin soup has become my seasonal ritual—a way to feel connected to the season’s shifts. It’s a simple pleasure that warms not just the body, but the soul, as the chilly days set in.

    Sharing this dish, I remember the importance of embracing the little joys in the kitchen—those moments when a humble pumpkin turns into a bowl of pure comfort. I hope this soup brings a quiet moment of peace to your busy days, just as it does to mine.

  • Chill Out with a Spicy Peach Slushie Adventure

    Chill Out with a Spicy Peach Slushie Adventure

    Imagine a summer afternoon where you crave something cool but with a surprising twist. That’s exactly what inspired me to craft this peach slushie with a splash of ginger and a sprinkle of chili. It’s a daring voyage through sweet, spicy, and icy textures that awaken all your senses.

    I love turning simple fruit into an experience. This recipe is about bringing out the peach’s juicy sweetness while adding a daring layer of heat and aroma that’s unexpected. It’s perfect for those who seek a flavor adventure without leaving their couch.

    Peach Spicy Ginger Slushie

    This peach slushie is made by blending ripe peaches with fresh ginger, chili powder, and ice to create a cold, refreshing beverage. The resulting texture is icy and smooth with vibrant flavors that balance sweetness, spiciness, and heat, garnished with a slice of peach or a sprinkle of chili for presentation.
    Prep Time 10 minutes
    Total Time 10 minutes
    Servings: 2
    Course: Main Course
    Cuisine: Fusion
    Calories: 150

    Ingredients
      

    • 2 cups ripe peaches, pitted and chopped preferably chilled for extra coldness
    • 1 inch fresh ginger root, peeled and sliced
    • 1/2 teaspoon chili powder adjust to taste for heat
    • 1 cup ice cubes more for extra frostiness
    • 1 tablespoon honey or agave syrup optional, for sweetness

    Equipment

    • Blender
    • Cutting board

    Method
     

    1. Place the chopped peaches, sliced ginger, chili powder, honey, and ice cubes into the blender.
    2. Secure the lid and blend on high speed until the mixture is smooth and icy, about 30-45 seconds. You should see a frosty, vibrant orange-pink puree.
    3. Stop the blender and check the consistency—if it’s too thick, add a splash of cold water or more ice and blend again until desired smoothness.
    4. Pour the slushie into chilled glasses, ensuring an even distribution of ice and flavor.
    5. Garnish with a small peach slice or a sprinkle of chili powder on top for visual appeal and extra flavor.
    6. Serve immediately with a straw, enjoying the icy, fruity, and spicy combination.

    Notes

    For a milder heat, reduce the chili powder or omit it. You can also experiment with adding lime juice for extra tang.
    This peach slushie isn’t just a drink; it’s a mini escape to a tropical, spicy locale. The bright aroma, the tingling spice — it’s a full sensory ride in every sip. Perfect for hot days or when you want a little twist to your usual refreshment.

    Whether you’re sharing it at a gathering or savoring it solo, this recipe invites you to indulge in something refreshingly different. Keep a jar of frozen peaches in your freezer for instant summer, and soon you’ll have a cool, spicy treat ready at a moment’s notice.

  • The Secret Ingredient for the Perfect Blueberry Slushie

    The Secret Ingredient for the Perfect Blueberry Slushie

    Imagine a sweltering summer day when all you want is something cool and refreshing. But what if your go-to frozen drink could surprise you with a burst of unexpected flavor and texture? Enter the blueberry slushie, a vibrant blend that balances sweet, tart blueberries with a splash of citrus and a whisper of mint.

    This isn’t your average fruit smoothie. It’s a playful, icy concoction that captures the essence of lazy afternoons and childhood nostalgia, yet feels utterly modern with its bold color and invigorating chill. The best part? It’s remarkably easy to whip up with just a handful of pantry staples and fresh berries.

    ## WHY I LOVE THIS RECIPE?
    – I love how this slushie captures summer in every icy sip, reminding me of picnics and sunset evenings.
    – The bright purple hue makes it a showstopper on any table, even if you’re just enjoying a quiet afternoon alone.
    – It’s an unexpected way to serve blueberries, which usually just sit shyly on scones or yogurt.
    – I get to play with textures — creamy, icy, and bursting with berry goodness.
    – Plus, it’s so quick to prepare, I can make it anytime the craving strikes.

    Blueberry Slushie

    A vibrant, icy beverage made by blending fresh blueberries, citrus juice, and mint with crushed ice. The texture is refreshingly thick and slushy, with a bright purple hue and bursting berry flavor that evokes summer afternoons.
    Prep Time 10 minutes
    Total Time 10 minutes
    Servings: 2
    Course: Main Course
    Cuisine: none
    Calories: 120

    Ingredients
      

    • 1 cup fresh blueberries
    • 1/2 cup fresh citrus juice (lemon or lime)
    • 1 tbsp honey or agave syrup optional, for sweetness
    • 8 oz crushed ice
    • 4 small fresh mint leaves for garnish and a hint of flavor

    Equipment

    • Blender
    • Measuring cups and spoons

    Method
     

    1. Measure out the blueberries and place them into the blender.
      1 cup fresh blueberries
    2. Add the freshly squeezed citrus juice to the blender with the berries.
      1/2 cup fresh citrus juice (lemon or lime)
    3. If desired, pour in the honey or agave syrup to enhance sweetness.
      1 tbsp honey or agave syrup
    4. Top the mixture with crushed ice, filling the blender close to the rim.
      8 oz crushed ice
    5. Secure the lid on the blender and blend on high until the mixture is smooth, thick, and icy, about 30 seconds.
    6. Pour the vibrant purple slushie into glasses, dividing it evenly.
    7. Garnish each glass with fresh mint leaves for aroma and visual appeal.
      4 small fresh mint leaves
    8. Enjoy immediately with a straw or a spoon, relishing its icy, refreshing texture.

    Notes

    Feel free to adjust sweetness with more honey or citrus to suit your taste. For a creamier texture, add a splash of Greek yogurt before blending.
    This blueberry slushie isn’t just a drink — it’s an experience. Perfect for lazy weekends, spontaneous gatherings, or when you need a little pick-me-up. It’s a reminder that summer’s best moments often come in a glass, cold and full of flavor.

    As the season shifts, I find myself reaching for this icy treat more than ever. It’s a simple pleasure that renews the spirit and cools down the day. No matter how many variations I try, this recipe remains a beloved favorite, spontaneous and perfectly refreshing.

  • Poisonous Charm: Halloween Toffee Apples That Dazzle & Frighten

    Poisonous Charm: Halloween Toffee Apples That Dazzle & Frighten

    Every October, I love diving into the darker side of sweet treats, and these Halloween Poison Toffee Apples hit all the right notes. Their glossy, ominous sheen hints at danger, but inside, they’re a crispy, sticky delight. It’s a celebration of spooky aesthetics mixed with satisfying crunch.

    The secret lies in the artistry of balancing the sugar’s crackle with a hint of unsettling color that screams Halloween. Crafting these involves a bit of chaos—think splatters of black and green—making the process as fun as the creepy final look. They turn a simple apple into a captivating, eerie centerpiece perfect for any ghostly gathering.

    Halloween Poison Toffee Apples

    This recipe features whole apples dipped in a glossy toffee coating that hardens to a crisp, crunchy shell. The toffee is flavored with sugar and adorned with spooky black and green coloring for a Halloween-themed treat, resulting in a sticky, brittle exterior with a juicy apple interior.
    Prep Time 15 minutes
    Cook Time 20 minutes
    Total Time 35 minutes
    Servings: 4
    Course: Main Course
    Cuisine: Halloween
    Calories: 200

    Ingredients
      

    • 4 large apples preferably tart varieties like Granny Smith
    • 1 cup granulated sugar for the toffee
    • 1/4 cup water helps dissolve sugar
    • 1/4 cup light corn syrup for smooth toffee consistency
    • 1/2 teaspoon vanilla extract adds flavor to toffee
    • black food coloring gel or liquid for eerie black accents
    • green food coloring gel or liquid for creepy green accents

    Equipment

    • Candy thermometer
    • Baking sheet lined with parchment
    • Wooden skewers or sticks
    • Saucepan
    • Cooking spoon

    Method
     

    1. Wash and thoroughly dry the apples, then insert a wooden skewer or stick into the stem end of each apple, setting them on a lined baking sheet.
    2. Combine sugar, water, and corn syrup in a saucepan over medium heat, stirring gently until the sugar dissolves completely and the mixture begins to boil.
    3. Insert a candy thermometer and cook the toffee without stirring until it reaches 300°F (hard crack stage), about 10-15 minutes, watching for a deep amber color.
    4. Remove the saucepan from heat and stir in vanilla extract, then divide the hot toffee into two bowls.
    5. In each bowl, add a few drops of black food coloring to one and green food coloring to the other, stirring well to achieve vibrant, spooky hues.
    6. Working quickly while the toffee is still hot, dip each apple into the black or green toffee, swirling to cover completely and letting excess drip off.
    7. Place the dipped apples back on the prepared baking sheet and let the toffee harden at room temperature, about 15-20 minutes.
    8. Once the toffee is set, use a knife or scissors to add splatters or streaks of black and green to enhance the spooky effect.
    9. Serve the Poison Toffee Apples on a platter, showcasing their glossy, dark shells and creepy color accents.

    Notes

    Work quickly when dipping the apples, as the toffee hardens fast. For extra spooky effects, drizzle additional melted chocolate or edible glitter once the toffee is set.

    While these poison apples look daring and a little terrifying, they’re still a treat for anyone with a sweet tooth. The combination of tart apple, caramel sweetness, and the dark, glossy toffee coating makes each bite a moment of playful indulgence. They’re perfect to serve alongside other ghoulish goodies or as a stand-alone spooky spectacle.

    This season, let your creative juices flow and embrace the whimsical side of holiday baking. These apples are more than just a snack—they’re an experience that sparks conversation and a few surprised squeals. Happy haunting and baking!

  • Spooky Good: Halloween Pumpkin Rice Krispie Treats

    Spooky Good: Halloween Pumpkin Rice Krispie Treats

    Imagine biting into a soft, gooey Halloween treat that captures the haunting essence of autumn. These pumpkin Rice Krispie treats aren’t just festive—they’re a nostalgic throwback to childhood, infused with the warm scent of cinnamon and pumpkin pie spices. Each bite delivers a crunch that’s balanced perfectly by sweet, melted marshmallow magic, making it impossible to stop at just one.

    This year, I decided to elevate the classic square by shaping them into mini pumpkins. That little twist adds a charming, spooky touch to any Halloween spread and sparks joy for both kids and adults alike. Plus, they’re incredibly easy to make, giving you more time to plan costumes and spooky decorations.

    Pumpkin Halloween Rice Krispie Treats

    These pumpkin-shaped Rice Krispie treats are made by melting marshmallows and butter, then mixing in pumpkin puree and warm spices to create a festive, seasonal snack. Once combined, the mixture is stirred with crispy rice cereal, pressed into shapes, and decorated to resemble small pumpkins, resulting in a soft, crunchy, and sweet final texture with a charming autumnal appearance.
    Prep Time 15 minutes
    Cook Time 10 minutes
    Total Time 25 minutes
    Servings: 12
    Course: Main Course
    Cuisine: American
    Calories: 150

    Ingredients
      

    • 10 cups rice cereal Cheerios or Rice Krispies
    • 4 cups marshmallows mini or standard
    • 1/2 cup unsalted butter
    • 1 cup canned pumpkin puree unsweetened
    • 1 teaspoon ground cinnamon
    • 1/2 teaspoon ground nutmeg
    • Optional decorative mini chocolate chips or candy eyes for pumpkin faces

    Equipment

    • Large saucepan
    • Rubber Spatula
    • Measuring cups and spoons
    • Silicone mold or parchment paper for shaping
    • Small knife or toothpick for decorating

    Method
     

    1. Grease a silicone mold or line a baking sheet with parchment paper to shape the treats.
    2. In a large saucepan, melt the butter over low heat, producing a gentle bubbling sound. Add the marshmallows and stir constantly until completely melted and smooth, creating a sticky, marshmallowy mixture.
    3. Stir in the pumpkin puree along with ground cinnamon and nutmeg, mixing well until the mixture is fragrant and evenly combined, with a creamy orange hue.
    4. Remove the saucepan from heat and gradually fold in the rice cereal, stirring until the cereal is well coated with the pumpkin-spiced marshmallow mixture and looks glossy.
    5. Quickly scoop the mixture into the prepared mold or onto the parchment-lined sheet, pressing down gently with a spatula or your fingers to create an even layer or shape into small mounds.
    6. While still warm, shape the mixture into small pumpkin-like rounds or press into a mold to give the treats a rounded form. Let them cool and set at room temperature for about 15 minutes.
    7. Once cooled, use a small knife or toothpick to decorate the tops of each treat with mini chocolate chips or candy eyes to resemble pumpkin faces or add charming details.
    8. Serve the pumpkin Rice Krispie treats at room temperature, enjoying their crunchy exterior and soft, sweet inside with a festive appearance.

    These pumpkin Rice Krispie treats are more than just a sweet bite—they bring a dash of seasonal spirit to your table. Their rustic, homemade charm pairs beautifully with the chilly fall air and the flickering glow of jack-o’-lanterns. Whether you’re handing them out to trick-or-treaters or sneaking a handful after carving pumpkins, they’re sure to delight.

    Embrace the chaos of Halloween baking with this simple recipe, and enjoy the warm, spiced aroma that fills your home. No matter how you celebrate, these treats add a cozy, festive touch. Here’s to many more spooky, sweet moments with loved ones around the table.

  • Hidden Herb Twist: Roasted Butternut & Carrot Soup That Surprises

    Hidden Herb Twist: Roasted Butternut & Carrot Soup That Surprises

    Imagine peeling back the layers of a comforting bowl to discover an unexpected hint of fresh thyme and basil, right alongside the sweetness of roasted squash and carrots. This soup isn’t just about rich flavors—it’s about the thrill of adding a whisper of garden herbs that elevate the entire experience. The aroma of roasting vegetables mingled with the earthy scent of herbs creates a cozy scene you’ll want to recreate.

    This recipe is a warm embrace on chilly evenings, but with a twist: it’s designed with a secret ingredient that intrigues the senses. Think of a smooth, velvety texture that coats your tongue with every spoonful, complemented by a dash of spice for a surprise kick. It’s a simple dish, yet packed with unexpected layers that turn ordinary into extraordinary.

    Roasted Vegetable Soup with Herbs

    This soup features roasted squash and carrots blended into a smooth, velvety base, enhanced by fresh thyme and basil for an aromatic herbal note. The dish involves roasting the vegetables, then pureeing them until creamy, with a final touch of spices that add a subtle kick. The result is a warm, visually appealing bowl with a rich, consistent texture.
    Prep Time 15 minutes
    Cook Time 40 minutes
    Total Time 55 minutes
    Servings: 4
    Course: Main Course
    Cuisine: Fusion
    Calories: 150

    Ingredients
      

    • 2 cups butternut squash, peeled and cubed roughly 1-inch pieces
    • 2 cups carrots, peeled and sliced
    • 2 tablespoons olive oil for roasting
    • 1 small onion, chopped
    • 3 cloves garlic, minced
    • 4 cups vegetable broth
    • 1 teaspoon dried thyme
    • 1/2 teaspoon ground black pepper
    • 1 cup fresh basil leaves roughly chopped, divided
    • 1 pinch red pepper flakes optional, for a spicy kick
    • salt to taste

    Equipment

    • Baking sheet
    • Food processor or blender
    • Large pot
    • Stirring spoon

    Method
     

    1. Preheat your oven to 400°F (200°C). Spread the cubed squash and sliced carrots on a baking sheet, then drizzle with olive oil and toss to coat evenly. Roast for about 25-30 minutes, until tender and lightly caramelized.
    2. Meanwhile, in a large pot, sauté the chopped onion over medium heat until it becomes translucent and fragrant, about 5 minutes. Add the minced garlic and cook for another minute until fragrant.
    3. Add the roasted vegetables to the pot, pouring in the vegetable broth. Stir in the dried thyme, black pepper, and red pepper flakes if using. Bring to a gentle simmer and cook for about 10 minutes to allow flavors to meld.
    4. Remove the pot from heat and add half of the chopped basil leaves. Use an immersion blender or transfer the mixture to a blender to puree until smooth and velvety. Return to the pot if needed and reheat gently.
    5. Taste the soup and add salt as needed. Stir in the remaining basil leaves for a fresh burst of flavor. The soup should be warm, smooth, and fragrant with herbal notes.
    6. Serve the soup hot, optionally garnished with extra basil leaves or a drizzle of olive oil for presentation. Enjoy the comforting, herbaceous flavor in every spoonful.
    As the seasons change, this soup offers a perfect way to celebrate the humble butternut squash and carrots, enhanced with bits of unexpected flavor. It’s a reminder that even familiar ingredients can surprise us with the right touch of creativity. Plus, it’s a hearty, nourishing choice for anyone craving comfort without the heaviness.

    When you serve this soup, let the aroma fill the room and evoke nostalgia for cozy kitchens and slow weekends. It’s a dish that welcomes friends to gather around and share stories, stirred by its bright colors and inviting scent. A simple bowl, but packed with enough warmth to make any day feel just a little more special.

  • Spooky Goodness: Haunted Pumpkin Cheesecake Bars

    Spooky Goodness: Haunted Pumpkin Cheesecake Bars

    Halloween is the perfect time to embrace the eerie with a touch of sweet comfort. These Pumpkin Cheesecake Bars are more than just a festive dessert; they’re a nostalgic swirl of pumpkin spice and creamy richness, topped with a hint of graham cracker crumble. As you prep them, the warm aroma of cinnamon and ginger will fill the air, setting the scene for a cozy Halloween gathering.

    What makes this recipe truly special is its unassuming sophistication. Inspired by the quiet thrill of carving pumpkins, each bite offers a delicate balance of smooth cheesecake and spicy pumpkin tones. It’s a dessert that whispers tales of haunted nights and pumpkin patches, perfect for serving up spooky delight with every slice.

    Pumpkin Cheesecake Bars

    Pumpkin Cheesecake Bars are a layered dessert featuring a graham cracker crust topped with a creamy pumpkin-spiced cheesecake filling. The bars are baked until set and have a smooth, velvety texture, often garnished with a graham cracker crumble for added crunch and flavor.
    Prep Time 20 minutes
    Cook Time 40 minutes
    Total Time 1 hour
    Servings: 12
    Course: Main Course
    Cuisine: American
    Calories: 350

    Ingredients
      

    • 1 1/2 cups graham cracker crumbs about 10 full crackers crushed finely
    • 1/4 cup granulated sugar
    • 1/2 cup unsalted butter melted
    • 3 8 oz packages cream cheese softened
    • 1/2 cup granulated sugar
    • 1 cup canned pumpkin puree not pumpkin pie filling
    • 3 large eggs
    • 1 1/2 teaspoons ground cinnamon
    • 1/2 teaspoon ground ginger
    • 1/4 teaspoon ground nutmeg
    • 1/4 teaspoon ground cloves
    • 1/2 cup heavy cream optional, for a richer texture

    Equipment

    • 9×13 inch baking pan
    • Mixing bowls

    Method
     

    1. Preheat your oven to 350°F (175°C). Mix graham cracker crumbs with sugar and melted butter until the crumbs are evenly coated and hold together when pressed.
    2. Press this mixture firmly into the bottom of your baking pan, creating an even crust layer. Bake for about 10 minutes until lightly golden, then remove and set aside to cool.
    3. In a large mixing bowl, beat softened cream cheese with sugar until smooth and fluffy, about 2-3 minutes, breaking up any lumps.
    4. Add pumpkin puree, eggs, cinnamon, ginger, nutmeg, and cloves to the cream cheese mixture. Whisk until all ingredients are well incorporated and the mixture is smooth.
    5. Pour the pumpkin cheesecake filling over the cooled crust, spreading it evenly with a spatula for a flat surface.
    6. Bake the cheesecake for 35-40 minutes, or until the edges are lightly set and the center slightly jiggles when shaken. The top may turn a light golden color.
    7. Let the bars cool completely in the pan on a wire rack, then refrigerate for at least 2 hours or until chilled and firm.
    8. Once cooled and chilled, slice into squares. Optional: dust with a sprinkle of graham cracker crumbs or whipped cream before serving.

    Notes

    For best flavor, let the cheesecake chill overnight. You can also add a dollop of whipped cream or a sprinkle of cinnamon on top for extra presentation.

    This Halloween treat is a heartfelt reminder of the simple joys of seasonal baking. Every bite conjures a flickering jack-o’-lantern and that comforting scent of cinnamon and pumpkin. It’s not just a dessert; it’s part of the spooky season’s charm.

    Whether you’re hosting a haunted dinner or just craving a cozy evening at home, these Pumpkin Cheesecake Bars will add a touch of festive magic. The combination of flavors and textures makes them stand out among typical holiday sweets. It’s a small batch of spooky delights worth every bite, year after year.

  • Harvest Comfort: Fall Turkey Chili with Sweet Potatoes

    Harvest Comfort: Fall Turkey Chili with Sweet Potatoes

    As the leaves turn amber and the air dips into a crisp chill, I find myself craving more than just pumpkin spice. I discover that simmering a hearty turkey chili with sweet potatoes transforms the kitchen into a cozy autumn haven. The aroma of spiced meat mingling with the gentle sweetness of roasted tubers is my seasonal symphony.

    This recipe is about embracing the chaos of fall—layering flavors, adjusting spice levels, and no two pots ever quite alike. It’s a reminder that comfort food can be both simple and surprisingly sophisticated, echoing the vibrant, fleeting beauty of the season. Plus, it’s a perfect reason to break out every spice jar lurking in the back of your cabinet.

    Hearty Turkey and Sweet Potato Chili

    This turkey chili features tender ground turkey simmered with sweet potatoes, tomatoes, and spices, resulting in a thick, flavorful stew. The dish has a comforting, chunky texture with vibrant ingredients thoroughly melded, perfect for cozy autumn evenings.
    Prep Time 15 minutes
    Cook Time 45 minutes
    Total Time 1 hour
    Servings: 6
    Course: Main Course
    Cuisine: American
    Calories: 350

    Ingredients
      

    • 1 pound ground turkey lean preferred
    • 2 medium sweet potatoes peeled and diced
    • 1 can diced tomatoes 14.5 oz can
    • 1 large onion chopped
    • 3 cloves garlic minced
    • 2 tablespoons chili powder
    • 1 teaspoon cumin
    • 0.5 teaspoon black pepper
    • 2 cups chicken broth
    • 1 tablespoon olive oil for sautéing
    • salt to taste

    Equipment

    • Large pot or Dutch oven
    • Cutting board

    Method
     

    1. Heat olive oil in a large pot over medium heat, then add chopped onion. Sauté until translucent and fragrant, about 5 minutes, stirring occasionally.
    2. Add minced garlic to the pot and cook for another minute until fragrant. Stir frequently to prevent burning.
    3. Push the onion and garlic aside, then add ground turkey to the pot. Cook until browned all over, breaking it apart with a spoon, about 6-8 minutes.
    4. Stir in chili powder, cumin, black pepper, and a pinch of salt. Cook for 1-2 minutes to toast the spices and enhance their aroma.
    5. Add diced sweet potatoes, diced tomatoes with their juices, and chicken broth. Bring the mixture to a gentle boil.
    6. Reduce heat to low, cover the pot, and simmer for about 30 minutes, or until the sweet potatoes are tender and the chili has thickened slightly.
    7. Uncover the pot, taste, and adjust salt and pepper as needed. Let it simmer uncovered for another 5 minutes if you’d like a slightly thicker consistency.
    8. Serve the chili hot, garnished with your favorite toppings like chopped herbs or sour cream if desired.

    This chili comes together quickly on a busy autumn evening, filling the house with warm, rustic scents. It’s a dish that tastes like a hug after a walk through falling leaves, hearty yet bright with seasonal flavor. Making it is a little act of seasonal self-care you’re likely to repeat.

    As the days grow shorter, this chili reminds us that comfort can be found in slow-simmered moments and familiar flavors. It’s a dish that celebrates the bounty of fall while warming you from the inside out, whether for a family dinner or a cozy night solo. Enjoy every spicy, sweet spoonful.

  • Autumn Harvest Frittata: A Cozy Kitchen Experiment

    Autumn Harvest Frittata: A Cozy Kitchen Experiment

    As the leaves turn vibrant shades of amber and crimson, my kitchen becomes a playground for seasonal flavors. Today, I stumbled upon a quirky idea—incorporating roasted chestnuts into a fall-inspired frittata—just for that unexpected crunch and sweetness. This recipe isn’t just about ingredients; it’s a celebration of autumn’s gift of nutty, earthy aromas filling the air.

    The beauty of this dish is in its flexibility. Whether you have leftover roasted vegetables or are eyeing those last ripe apples at the market, you can adapt it easily. This frittata is perfect for cozy weekend mornings or a casual family brunch, warming the senses and bringing everyone to the table for a shared moment.

    Autumn Chestnut Frittata

    This frittata combines eggs with roasted chestnuts and seasonal vegetables, resulting in a tender, fluffy dish with a golden top and crunchy nutty bits. It is cooked on the stovetop and finished in the oven to achieve a set, slightly browned surface with a moist interior. The final presentation showcases a colorful, hearty dish perfect for brunch or a cozy breakfast.
    Prep Time 10 minutes
    Cook Time 20 minutes
    Total Time 30 minutes
    Servings: 4
    Course: Main Course
    Cuisine: Fall
    Calories: 220

    Ingredients
      

    • 6 large eggs beaten
    • 1/2 cup roasted chestnuts chopped
    • 1 cup mixed fall vegetables such as bell peppers, spinach, or zucchini
    • 1/4 cup grated cheese optional, for topping
    • 2 tbsp olive oil
    • to taste salt and pepper

    Equipment

    • Whisk
    • Oven-safe skillet or cast-iron pan

    Method
     

    1. Preheat your oven to 375°F (190°C). In a bowl, whisk the eggs until smooth and slightly frothy to incorporate air.
    2. Set an oven-safe skillet over medium heat and add the olive oil. Once shimmering, add the chopped mixed vegetables and sauté until tender and fragrant, about 5 minutes.
    3. Stir the roasted chestnuts into the cooked vegetables, allowing them to warm through for about 2 minutes, and season with salt and pepper.
    4. Pour the beaten eggs evenly over the vegetable and chestnut mixture in the skillet, tilting the pan to distribute the eggs uniformly. Let it cook undisturbed for 2-3 minutes until the edges start to set.
    5. Sprinkle grated cheese on top, if using, and transfer the skillet to the preheated oven. Bake until the frittata is puffed and golden around the edges, about 15 minutes.
    6. Remove the skillet from the oven and let the frittata rest for a couple of minutes. Slice into wedges and serve warm, showcasing the vibrant vegetables and crunchy chestnuts inside.

    Notes

    Feel free to customize with your favorite seasonal vegetables or herbs for added flavor.
    Serving this warm, hearty frittata makes me realize how simple ingredients can come together in unexpected ways. It’s a reminder that cooking is as much about experimentation as tradition, especially when seasons change.

    As chill mornings settle in, this dish provides comfort with every bite. It’s more than just a meal—it’s a slow, savory pause before diving into a busy day, wrapped in flavors that echo the changing landscape outside.