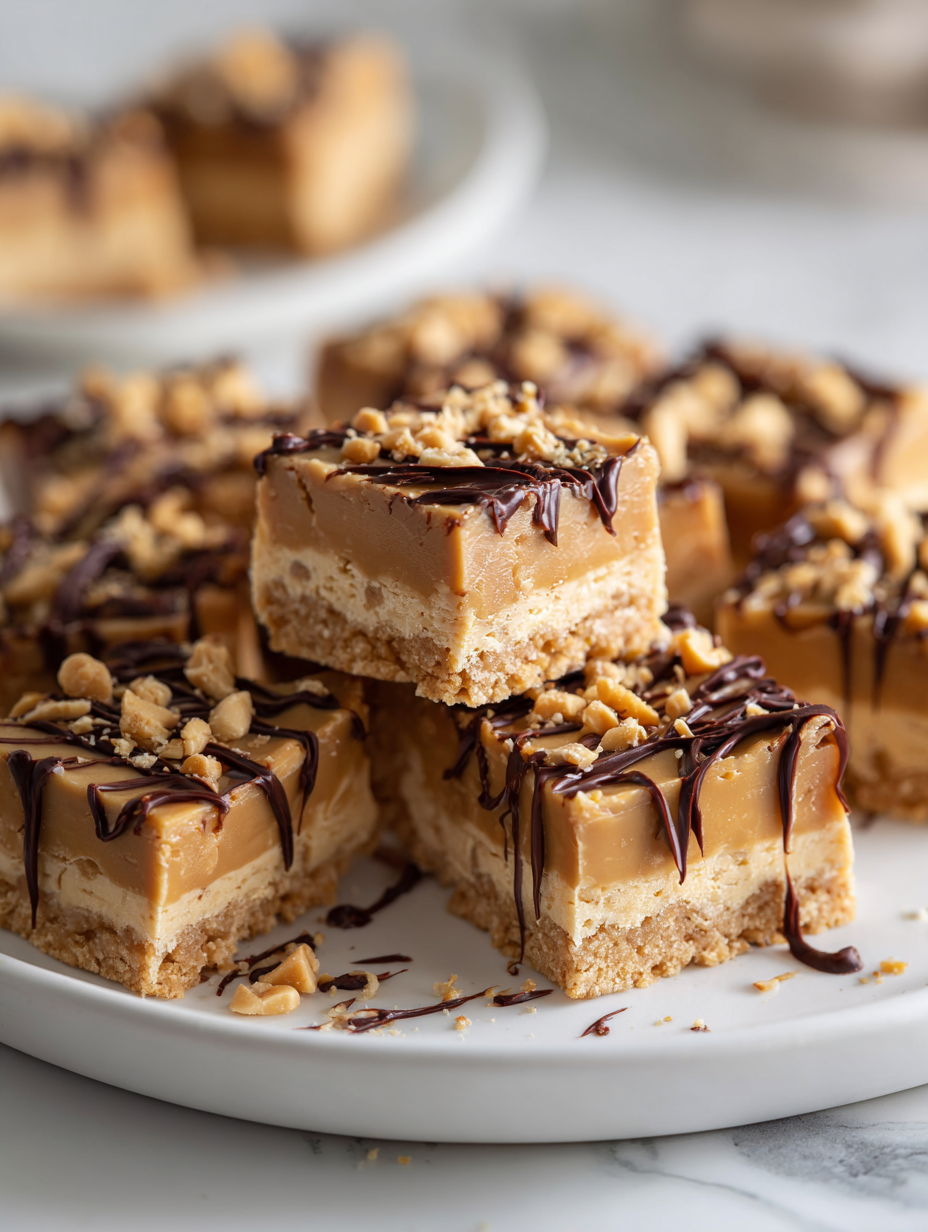
These no-bake peanut butter bars are a little slice of childhood nostalgia, but with a twist that makes them feel more grown-up. The secret is in layering rich, smooth peanut butter with just enough crunch from the graham cracker crust, all without ever turning on the oven. They’re perfect for when you want something sweet but don’t want to mess around with complicated steps or heating up the kitchen.
What I love most is how versatile they are—think of them as blank canvases. You can add a sprinkle of sea salt, a drizzle of dark chocolate, or even a handful of chopped nuts for texture. They come together fast, taste like a treat you’d buy at a bakery, but with a homemade touch that’s honestly more satisfying.
These bars are my go-to for busy afternoons or unexpected guests. They’re a reminder that sometimes, simple ingredients and a little bit of patience can turn into something unexpectedly special. Plus, they keep well in the fridge, so you can make them ahead and enjoy that crunchy, peanutty goodness whenever the craving hits.
Focusing on the surprisingly sophisticated flavor layering achievable in these no-bake bars, despite their simple ingredients and quick assembly, shows how even the most humble treats can be elevated with just a touch of technique and good-quality components.
The overlooked elegance of simple ingredients
- Making these bars takes me back to lazy weekend afternoons in my childhood kitchen, where the smell of peanut butter filled the air and the moment felt slow and sweet.
- I love how quick and forgiving this recipe is—no oven, no fuss—yet every bite feels rich and indulgent, like a small, perfect rebellion.
- There’s a quiet pride in turning simple pantry staples into something that disappears so fast, I barely get a chance to savor it myself.
- Sometimes, I add a pinch of flaky sea salt on top just before chilling, and it transforms the flavor in a way that makes me smile every time.
- These bars remind me that you don’t need fancy ingredients to make something genuinely comforting—just good peanut butter and a little patience.
The story behind this recipe
- This recipe actually started as a desperate snack fix after a particularly chaotic weekend. I needed something quick, no fuss, that still felt special enough to share. The peanut butter bars became my little secret—comfort food with a touch of elegance, despite their humble roots.
- What keeps me coming back to this recipe is how it’s a reminder that simplicity can be surprisingly sophisticated. It’s like capturing a moment of calm in a busy day, turning pantry staples into something that feels indulgent without the fuss of baking or complicated steps.
- I remember the first time I layered the peanut butter and chocolate—smelled like childhood, but tasted like a grown-up treat. It’s a recipe that’s evolved over years, always quick, always satisfying, and a little bit nostalgic. Sometimes, I add a sprinkle of sea salt or a drizzle of dark chocolate, just to elevate that familiar flavor into something more memorable.
Contextual origin, trivia, or history
- These bars likely originated in mid-20th-century America, where convenience foods gained popularity during post-war economic growth.
- The concept of no-bake treats surged during the 1950s, as home cooks sought quick, no-fuss dessert options that didn’t require an oven.
- Peanut butter became a pantry staple in the US during the early 1900s, thanks to its long shelf life and nutritional appeal, fueling countless recipes like these.
- Interestingly, similar no-bake peanut butter bar recipes have appeared in vintage community cookbooks, often as budget-friendly, kid-friendly snacks.
- The combination of peanut butter and chocolate in these bars aligns with classic American flavor pairings, loved since the early days of candy-making.
Key ingredients in these bars
- Peanut butter: I prefer a smooth, natural kind that’s oozy and rich—makes the bars feel indulgent. If you want more texture, try crunchy, but the smooth melts better in your mouth.
- Graham cracker crumbs: I crush mine finely until almost powdery—adds a buttery crunch that holds everything together. Swap with digestive biscuits if you want a slightly different sweetness and texture.
- Honey or maple syrup: I use honey for that sticky, floral note that helps everything set. If you prefer a less sweet bar, reduce the syrup slightly or skip it altogether.
- Butter: I melt unsalted butter until it’s just starting to shimmer—this gives the crust a tender, cohesive bite. For dairy-free, coconut oil works, but it’ll add a subtle coconut aroma.
- Chocolate (optional topping): I like dark chocolate melted until glossy—smells like roasted cacao. You can swap with white chocolate for a sweeter finish or a drizzle of caramel for a different layer of richness.
- Sea salt (finishing touch): I sprinkle a tiny pinch on top just before chilling—brings out the peanut butter flavor and adds a subtle crunch. Skip if you prefer sweeter bars, but it’s a game changer.
- Optional add-ins: Chopped nuts, crushed pretzels, or a handful of dried fruit can add crunch and surprise—just fold them in with the peanut butter mixture for extra texture.
Spotlight on key ingredients
Peanut Butter:
- I prefer a smooth, natural kind that’s oozy and rich—makes the bars feel indulgent. If you want more texture, try crunchy, but the smooth melts better in your mouth.
- Graham cracker crumbs: I crush mine finely until almost powdery—adds a buttery crunch that holds everything together. Swap with digestive biscuits if you want a slightly different sweetness and texture.
Sweeteners & Chocolate:
- Honey or maple syrup: I use honey for that sticky, floral note that helps everything set. If you prefer a less sweet bar, reduce the syrup slightly or skip it altogether.
- Chocolate (optional topping): I like dark chocolate melted until glossy—smells like roasted cacao. You can swap with white chocolate for a sweeter finish or a drizzle of caramel for a different layer of richness.
Notes for ingredient swaps
- Dairy-Free: Swap butter for coconut oil. It will add a subtle coconut aroma and slightly change the texture, but the bars will still set nicely.
- Natural Sweetener: Use honey or agave syrup instead of corn syrup. Honey adds floral notes, while agave keeps it neutral and smooth.
- Peanut Butter: Choose crunchy if you want more texture, or natural, unsweetened peanut butter for a less sweet, more intense nut flavor.
- Chocolate Topping: Use white chocolate or carob chips if you prefer a different sweetness profile or dairy-free options. Melting times may vary slightly.
- Crunch Add-ins: Incorporate chopped nuts, toasted coconut, or crushed pretzels to add more crunch and flavor variety.
- Cracker Base: Replace graham cracker crumbs with digestive biscuits or cookie crumbs for a different sweetness and buttery profile.
- Sweetener: Reduce syrup or honey if you prefer less sweetness, or add a pinch of sea salt to enhance flavor contrast.
Equipment & Tools
- 20x20cm (8×8 inch) baking dish: Holds the layers and shapes the bars
- Spatula: Spreads and presses ingredients evenly
- Microwave-safe bowl: Melts peanut butter, honey, and chocolate
- Small saucepan: Gently melts butter for the crust
- Parchment paper: Prevents sticking and makes removal easier
- Sharp knife: Cuts clean, even squares
Step-by-step guide to no-bake bars
- Gather your equipment: a 20x20cm (8×8 inch) baking dish, a spatula, a microwave-safe bowl, a small saucepan, and parchment paper. Line the dish with parchment for easy cleanup.
- In the microwave-safe bowl, melt 1 cup (240g) of peanut butter and 1/2 cup (120ml) honey or maple syrup. Microwave in 20-second bursts, stirring in between, until smooth and oozy (about 1 minute total).
- In the saucepan, gently melt 1/4 cup (60g) of unsalted butter over low heat. Once melted, stir in 1 1/2 cups (150g) graham cracker crumbs until evenly coated and fragrant (about 2-3 minutes).
- Pour the graham cracker mixture into the prepared dish. Use the spatula to press it evenly into the bottom, creating a firm crust. Chill in the fridge for 10-15 minutes to set slightly.
- Add the melted peanut butter and honey mixture over the crust. Spread it evenly with the spatula, smoothing the top. Chill in the fridge for 30 minutes to firm up.
- Meanwhile, melt 1/2 cup (90g) of dark chocolate in the microwave in 15-second bursts, stirring until glossy. Drizzle or spread the melted chocolate over the peanut butter layer.
- Sprinkle a tiny pinch of flaky sea salt on top for contrast. Return to the fridge and let the bars set completely, about 1 hour.
- Once firm, lift the bars out of the dish using the parchment paper. Cut into squares with a sharp knife. Serve immediately or store for later.
Chill the bars in the fridge until fully set, at least 1 hour. Keep them refrigerated until serving. Slice into squares and plate directly from the dish for a rustic look.
How to Know It’s Done
- The crust should be firm but crumbly when pressed; it shouldn’t crumble apart.
- The peanut butter layer should be set and slightly glossy, no sticky residue when touched.
- Chocolate topping should be shiny, smooth, and slightly firm but not hard.
No-Bake Peanut Butter Bars
Ingredients
Equipment
Method
- Line your baking dish with parchment paper, leaving some overhang for easy removal.
- In a microwave-safe bowl, melt the peanut butter and honey together in 20-second bursts, stirring in between, until smooth and glossy.
- Gently melt the butter in a small saucepan over low heat until just shimmering, then stir in the graham cracker crumbs until evenly coated and fragrant, about 2-3 minutes.
- Press the graham cracker mixture firmly into the prepared dish using a spatula, creating an even crust. Chill in the fridge for 10-15 minutes to set slightly.
- Pour the melted peanut butter and honey mixture over the crust, spreading it smoothly with the spatula. Return the dish to the fridge and chill for about 30 minutes until set and firm.
- Meanwhile, melt the dark chocolate in 15-second bursts in the microwave, stirring until glossy and smooth.
- Drizzle or spread the melted chocolate over the peanut butter layer, using a spatula for an even finish. Sprinkle a tiny pinch of sea salt on top if desired.
- Return the entire dish to the fridge and let the bars chill for at least an hour until fully firm and glossy.
- Once set, lift the bars out of the dish using the parchment overhang. Use a sharp knife warmed in hot water to cut into clean squares.
- Serve immediately, or store in an airtight container in the fridge for up to 3 days. Enjoy that perfect blend of crunch, creaminess, and chocolate gloss.
Notes
Pro tips for perfect no-bake bars
- Bolded tip: Use room temperature peanut butter for easier mixing and smoother texture.
- Bolded tip: Chill the crust briefly before adding the filling to prevent sliding and ensure clean slices.
- Bolded tip: Pour melted chocolate in a thin, even layer to avoid cracking and create a glossy finish.
- Bolded tip: Use a sharp knife warmed slightly in hot water for cleaner cuts through firm layers.
- Bolded tip: Incorporate a pinch of sea salt on top to enhance the peanut butter flavor and add crunch.
- Bolded tip: When melting chocolate, stir frequently and stop before fully smooth to prevent overheating and separation.
Common mistakes and how to fix them
- FORGOT to chill the crust before adding peanut butter layer → Chill crust for 10 minutes to prevent sliding.
- DUMPED the melted chocolate on hot peanut butter → Let chocolate cool slightly before drizzling to avoid melting the layer.
- OVER-TORCHED the butter → Melt butter gently over low heat to prevent browning and burnt flavor.
- MISSED the parchment lining → Always line your dish for easy removal and clean slices.
Quick fixes and pantry swaps
- If the chocolate shimmers, it’s perfectly melted—don’t overheat or it’ll seize.
- When the bars crack when slicing, briefly warm your knife for clean cuts.
- Splash a few drops of hot water on your knife for a smoother, neater cut.
- Patch a crumbly crust by pressing it firmly back into the dish and chilling again.
- Shield melting chocolate with a paper towel if it starts to seize or burn in the microwave.
Prep, store, and reheat tips
- Prepare and press the crust in advance; it firms up in the fridge, making assembly easier later.
- Bars can be made up to 3 days ahead; store covered in an airtight container in the fridge to keep them fresh and chewy.
- For longer storage, freeze the bars for up to 1 month; wrap tightly to prevent freezer burn and preserve flavor.
- Refrigerate chilled bars until ready to serve; for best texture, let sit at room temperature for 5-10 minutes before slicing, as the chocolate becomes glossy and the peanut butter slightly softer.
Top questions about no-bake peanut butter bars
1. Can I use natural peanut butter?
Yes, using natural peanut butter with oil separation can make the mixture a bit runnier, so warm it slightly to blend smoothly.
2. Can I make these vegan?
Absolutely. Just warm it up a little so it’s easier to mix with the honey and other ingredients.
3. Are these bars vegan?
Yes, swap honey for maple syrup or agave nectar for a vegan-friendly version that still binds well.
4. Why does my chocolate look dull or crack?
If the chocolate topping isn’t glossy or cracks when you cut, it might be overcooked or cooled too quickly. Re-melt and drizzle again for a shiny finish.
5. How long should I chill the bars?
Chilling the bars for at least an hour helps them set firmly. For a firmer texture, leave them in the fridge overnight.
6. How do I get clean slices?
Use a sharp, warm knife to get clean cuts. Warm the blade in hot water, wipe dry, then slice.
7. Can I add mix-ins?
Yes, adding chopped nuts or pretzels can give extra crunch and flavor. Fold them into the peanut butter mixture before pressing into the pan.
8. How should I store leftovers?
Store these bars in an airtight container in the fridge for up to 3 days, or freeze for longer storage.
9. Why are my bars too soft?
If the bars are too soft, extend chilling time or add a little more crushed graham crackers to firm them up.
10. How do I handle melted chocolate?
To prevent melting or cracking, keep the chocolate at room temperature before spreading, and work quickly once melted.
These bars are my go-to when I need a quick sweet fix that still feels special. They’re simple, satisfying, and remind me that good things often come from just a few pantry staples.
Sharing them with friends or family always sparks that familiar, warm feeling—like a little piece of comfort that’s easy to make and even easier to enjoy. Sometimes, the best recipes are the simplest ones, turned into something memorable with just a little love.