Growing up, chocolate peanut butter treats were the ultimate reward after school—creamy, sweet, and just a little bit salty. Turning that nostalgic combo into these truffles feels like capturing a childhood secret and making it a bit more special. It’s not just about the taste, but the way they melt on your tongue, quick and rich, with that perfect peanut butter punch.
These truffles are surprisingly simple to whip up, but they hold a kind of magic. The process turns humble ingredients into tiny bites of luxury that feel fancy enough for a dinner party, yet cozy enough for a quiet night in. They remind me that comfort food doesn’t have to be sloppy or messy—sometimes, it’s all about balance and a good pinch of indulgence.
Focusing on the nostalgic comfort of childhood treats, but elevating them with a sophisticated balance of rich chocolate and creamy peanut butter, turned into elegant, bite-sized truffles that are both familiar and indulgent.
A childhood favorite, reimagined
- Making these truffles always makes me feel like a kid sneaking seconds—pure joy and a little rebellious.
- There’s a quiet pride in transforming simple pantry staples into something so decadently rich.
- The first bite always takes me back to lazy afternoons, with the smell of peanut butter and melting chocolate filling the air.
- I love how these tiny treats manage to balance nostalgia with a touch of elegance, perfect for sharing or sneaking one more.
- Every time I make them, I remember how comforting and surprisingly sophisticated childhood favorites can be.
A childhood favorite, reimagined
- This recipe was born out of a late-night craving after a long week. I wanted something quick, satisfying, but not just your average sweet. I started playing with ingredients I had—peanut butter, chocolate, a few pantry staples—and realized how well they came together in this little bite. It’s funny how simple ingredients can remind you of childhood, yet feel so indulgent when combined thoughtfully.
- Every batch feels like a small victory—an easy way to bring a little joy to the day. I love that these truffles are fuss-free but still feel special, almost like a secret reward for surviving the week. They’re the kind of treat I keep coming back to, especially when I need a quick boost of comfort that’s both familiar and a tiny bit fancy.
- heading: ‘A childhood favorite, reimagined’
Chocolate Peanut Butter Truffles Trivia
- Chocolate and peanut butter pairing gained popularity in the U.S. during the 20th century, becoming a classic combo in candies and desserts.
- The first commercially available peanut butter was introduced in the late 1800s, which helped popularize peanut butter in sweet treats.
- Truffles as a chocolate confections originated in France in the late 19th or early 20th century, named after their resemblance to the fungus of the same name.
- Peanut butter was initially marketed as a health food, but its rich, indulgent pairing with chocolate turned it into a dessert staple.
- The concept of bite-sized, handheld confections like these truffles became popular in the mid-20th century, emphasizing ease and elegance.
Ingredient breakdown
- Chocolate: I prefer a good quality dark chocolate — it melts smoothly and gives a rich, slightly bitter counterpoint to the sweetness. If you want a milder flavor, try semi-sweet chips, but skip the baking chocolate for better texture.
- Peanut Butter: Creamy, natural peanut butter is my go-to—peanutty aroma and a velvety texture. For a more intense flavor, opt for chunky, but remember it might alter the bite’s smoothness.
- Butter: Unsalted butter adds richness and helps everything meld together beautifully. If you’re out, a neutral oil can work, but it won’t have quite the same depth of flavor.
- Sweetener: I stick with a splash of honey or a sprinkle of powdered sugar—depends if I want a softer or more structured truffle. Honey adds a fragrant sweetness with a hint of floral complexity.
- Cocoa Powder: Sifted, it gives that final dark, matte finish. For a nuttier twist, toss in some crushed nuts or a dash of cinnamon along with it for added aroma and texture.
- Optional Add-ins: A pinch of sea salt or a splash of vanilla extract can elevate the flavor but don’t overdo—sometimes less is more. I love a tiny sprinkle of flaky salt on top before chilling.
Spotlight on key ingredients
Chocolate:
- I prefer a good quality dark chocolate — it melts smoothly and gives a rich, slightly bitter counterpoint to the sweetness. If you want a milder flavor, try semi-sweet chips, but skip the baking chocolate for better texture.
- Peanut Butter: Creamy, natural peanut butter is my go-to—peanutty aroma and a velvety texture. For a more intense flavor, opt for chunky, but remember it might alter the bite’s smoothness.
Peanut Butter:
- Creamy, natural peanut butter is my go-to—peanutty aroma and a velvety texture. For a more intense flavor, opt for chunky, but remember it might alter the bite’s smoothness.
- Chocolate: I prefer a good quality dark chocolate — it melts smoothly and gives a rich, slightly bitter counterpoint to the sweetness. If you want a milder flavor, try semi-sweet chips, but skip the baking chocolate for better texture.
Notes for ingredient swaps
- Dairy-Free: Swap regular butter with coconut oil or vegan butter. The texture remains rich, but the flavor gets a subtle coconut note.
- Peanut Butter: Use almond or cashew butter for a nuttier, less salty flavor. Natural peanut butter gives a more intense peanut aroma.
- Chocolate: Dark chocolate can be replaced with semi-sweet or milk chocolate for a sweeter, milder taste. Look for high-quality chips for better melt.
- Sweetener: Maple syrup or agave nectar can replace honey for a different floral or neutral sweetness. Adjust slightly for texture.
- Cocoa Powder: Use Dutch-processed for a smoother, less bitter finish. For a nuttier twist, stir in crushed nuts or cinnamon with the powder.
- Add-ins: Sea salt or crushed pretzels can be substituted with chopped toasted nuts or crushed cookies for varied texture and flavor.
Equipment & Tools
- Mixing bowl: to combine ingredients smoothly.
- Microwave-safe bowl: for melting chocolate evenly.
- Spatula: to fold and mix ingredients thoroughly.
- Baking sheet with parchment: to hold formed truffles without sticking.
- Cooling rack: for even cooling and setting.
Step-by-step guide to making truffles
- Equipment ready: a small mixing bowl, a microwave-safe bowl for melting, a spatula, a baking sheet lined with parchment, and a cooling rack. Purpose: to streamline the process and keep things tidy.
- Melt the chocolate: chop 200g of dark chocolate into small pieces. Microwave in 30-second bursts, stirring between each, until smooth and shiny. Aim for about 45 seconds total. Check for a silky texture; if grainy, microwave a few more seconds.
- Combine ingredients: in the mixing bowl, fold together 1/2 cup creamy peanut butter, 2 tablespoons unsalted butter (melted), and 1 tablespoon honey. Mix until uniform and glossy. This is your filling base.
- Add melted chocolate: pour the cooled, melted chocolate into the peanut butter mixture. Stir thoroughly to create a smooth, thick batter. If it feels too stiff, add a tiny splash of warm milk or cream, just enough to loosen it.
- Chill the mixture: cover the bowl and refrigerate for about 30 minutes, or until firm enough to scoop. It should be scoopable but not frozen solid; test by pressing with your finger.
- Form the truffles: using a small cookie scoop or teaspoon, portion out the chilled mixture. Roll each into a ball with your hands, about 1 inch in diameter. Place on the prepared baking sheet. If the mixture cracks, let it warm slightly or briefly knead it.
- Chill again: refrigerate the formed truffles for at least 30 minutes. They need to firm up to hold their shape during coating.
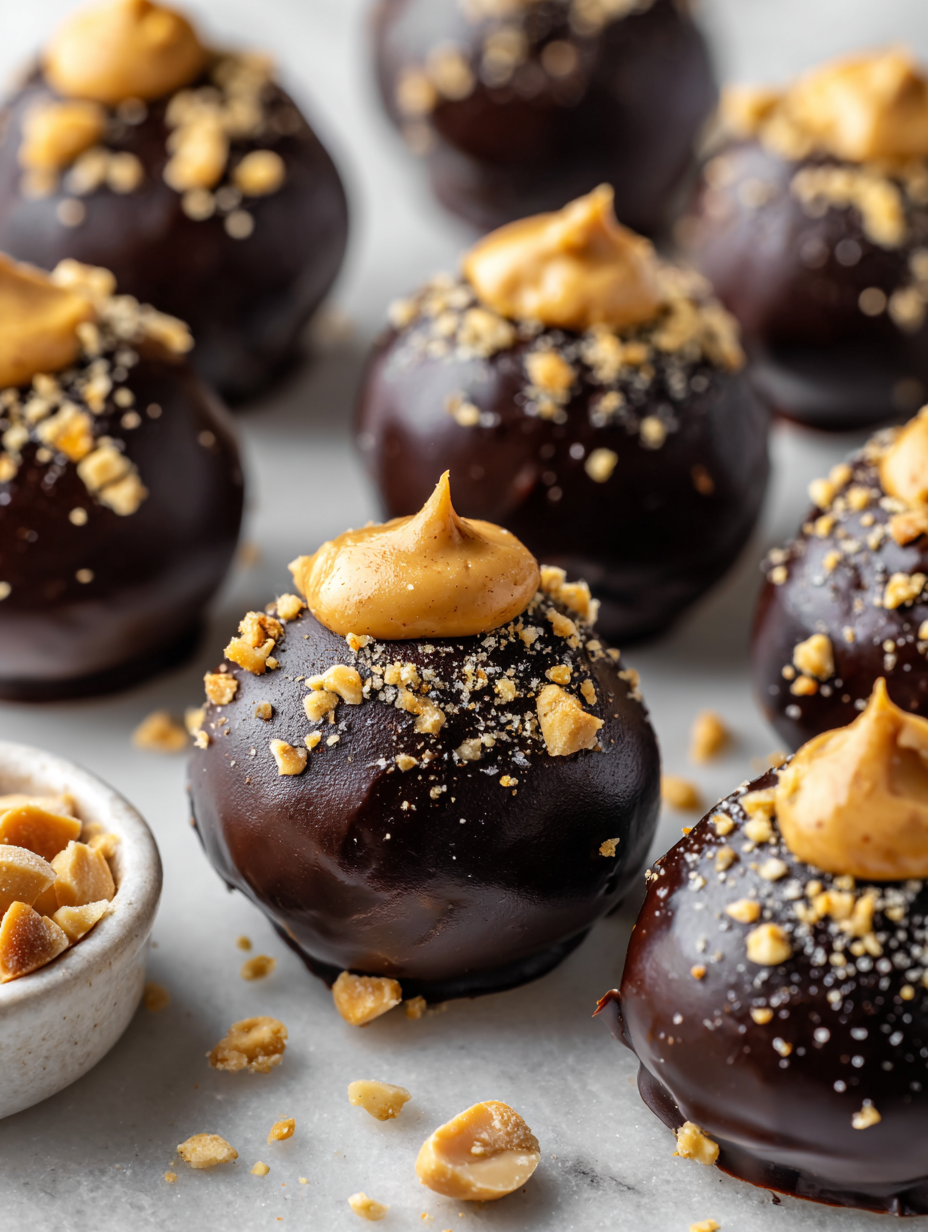
- Coat with cocoa: place 1/2 cup unsweetened cocoa powder in a shallow dish. Roll each truffle in the cocoa until fully coated. Tap off excess and set aside on a clean plate.
- Optional toppings: before the final chill, sprinkle flaky sea salt or crushed peanuts on top for extra flavor and texture. Gently press them in so they stay put.
- Final chilling: refrigerate the coated truffles for at least 15 minutes. They should be firm, shiny, and slightly crackly on the surface.
Let the truffles rest in the fridge for at least 15 minutes after coating. Serve straight from the fridge for a firm, cool bite, or let sit at room temperature for 10 minutes for a softer experience. Arrange on a plate or box for presentation.
How to Know It’s Done
- Chocolate coating is shiny and smooth after coating.
- Truffles feel firm but not hard when gently pressed.
- The surface develops a slight crackle when chilled and handled.
Chocolate Peanut Butter Truffles
Ingredients
Equipment
Method
- Chop the dark chocolate into small, even pieces and place it in a microwave-safe bowl. Microwave in 30-second bursts, stirring between each, until smooth and glossy, about 45 seconds total.
- In a mixing bowl, combine the creamy peanut butter, melted butter, and honey. Stir until the mixture is smooth, creamy, and well blended, with a slight sheen.
- Pour the melted chocolate into the peanut butter mixture and fold together thoroughly until you have a thick, uniform batter that’s glossy and smooth.
- Cover the bowl and refrigerate for about 30 minutes, or until the mixture is firm enough to scoop but still pliable. You’ll want it cold but not frozen solid.
- Using a small cookie scoop or teaspoon, portion out the chilled mixture and roll each into a 1-inch ball with your hands. Place each ball on a parchment-lined baking sheet.
- Refrigerate the formed truffles for another 30 minutes to help them set and hold their shape.
- Place the sifted cocoa powder in a shallow dish. Roll each chilled truffle in the cocoa until fully coated, then gently tap off any excess.
- If desired, sprinkle a tiny pinch of flaky sea salt or crushed nuts on top of each truffle before refrigerating to add extra flavor and texture. Gently press them in so they stick.
- Refrigerate the coated truffles for at least 15 minutes to set the cocoa coating and ensure they are firm and shiny.
- Serve the truffles straight from the fridge for a firm, cool bite, or let them sit at room temperature for about 10 minutes for a softer, melty experience. Enjoy these indulgent treats!
Pro tips for perfect truffles
- Use high-quality chocolate for a glossy, smooth finish that melts beautifully in your mouth.
- Chill the mixture thoroughly—cold hands make for easier, cleaner rolling of the truffles.
- When melting chocolate, stir constantly and keep the heat low—avoid scorching that dulls the shine.
- For a velvety texture, sift cocoa powder before coating—lumps are the enemy of smoothness.
- If the mixture feels too stiff, gently warm it with a quick 10-second microwave burst—don’t overdo it.
- Rest the finished truffles in the fridge for at least 15 minutes—this sets the coating and prevents melting on touch.
- Handle truffles with a toothpick or fork when coating to keep your fingers clean and prevent smudges.
Common mistakes and how to fix them
- FORGOT to pre-chill ingredients → Chill all ingredients before starting for easier handling.
- DUMPED hot chocolate into peanut butter → Let melted chocolate cool slightly before mixing.
- OVER-TORCHED the chocolate → Melt chocolate gently, stirring often to prevent burning.
- MISSED the final chill step → Ensure truffles are firm and set before coating or serving.
Quick fixes and pantry swaps
- If the mixture is too sticky, splash a tiny bit of milk and knead until smooth.
- When chocolate cracks during melting, patch with a gentle stir over low heat.
- Splash hot melted chocolate with a few drops of oil to restore gloss if dull.
- DUMPED the mixture too thin? Chill it longer or add more cocoa powder to thicken.
- When cocoa coating shimmers unevenly, shield truffles from drafts during setting.
Prep, store, and reheat tips
- Prepare and scoop the mixture ahead: Once the truffle filling is firm, portion and shape the bites. Keep them on a tray lined with parchment paper to prevent sticking, and store in an airtight container. They’ll stay fresh for up to 3 days in the fridge, maintaining their creamy interior and rich aroma.
- Chill before coating: After shaping, refrigerate the truffles for at least 30 minutes to ensure they hold their shape during cocoa coating. The cold makes handling easier and prevents melting on contact.
- Storage: Keep the finished, coated truffles in an airtight container in the fridge for up to 1 week. For longer storage, freeze them for up to 1 month. Wrap individually in parchment if stacking to avoid sticking.
- Reheating and serving: Serve straight from the fridge for a firm bite, or let sit at room temperature for 10 minutes for a softer, more melting experience. Reheat briefly in the microwave at low power if needed, just until slightly warm to boost aroma and softness.
Top questions about truffles
1. Can I use milk chocolate instead?
Use high-quality dark chocolate for the best melt and flavor. It makes a noticeable difference in texture and richness.
2. Can I substitute semi-sweet chips?
Yes, but expect a sweeter, less intense chocolate flavor. Adjust the amount of sweetener if needed.
3. What type of chocolate chips work best?
Absolutely. Semi-sweet chips melt well and balance sweetness with a touch of bitterness, perfect for this recipe.
4. Can I use chunky peanut butter?
Creamy peanut butter is best for smoothness. Natural, unsweetened peanut butter adds a more intense peanut flavor.
5. Is chunky peanut butter okay?
Yes, but keep in mind it will add texture and might make rolling a bit messier.
6. How cold should the mixture be before shaping?
Chill the mixture until firm enough to scoop, about 30 minutes. It should be cold but still pliable.
7. How long do they stay fresh?
Refrigerate the finished truffles for at least 15 minutes before serving. They keep well in an airtight container for up to a week.
8. Can I freeze these truffles?
Yes, freeze uncoated or coated truffles for up to a month. Wrap individually to prevent freezer burn.
9. What if the chocolate cracks?
If the coating cracks or cracks appear on the surface, gently rewarm the coating or let the truffles sit at room temp for a few minutes.
10. How do I melt chocolate without burning it?
Use a gentle, low heat melt and stir constantly to prevent burning or seizing the chocolate.
These truffles are a little piece of childhood wrapped in elegance, perfect for sharing or keeping close. The rich chocolate and nutty punch of peanut butter make each bite feel familiar yet special, especially when chilled just right. They’re a reminder that sometimes, the simplest ingredients create the most satisfying treats.
In a world that moves fast, these little bites bring a pause—an indulgence rooted in nostalgia but crafted with a bit of care. They’re easy to whip up, yet feel indulgent enough to serve at any occasion. Whether for a quiet night or a spontaneous celebration, they’re a tiny, irresistible luxury.