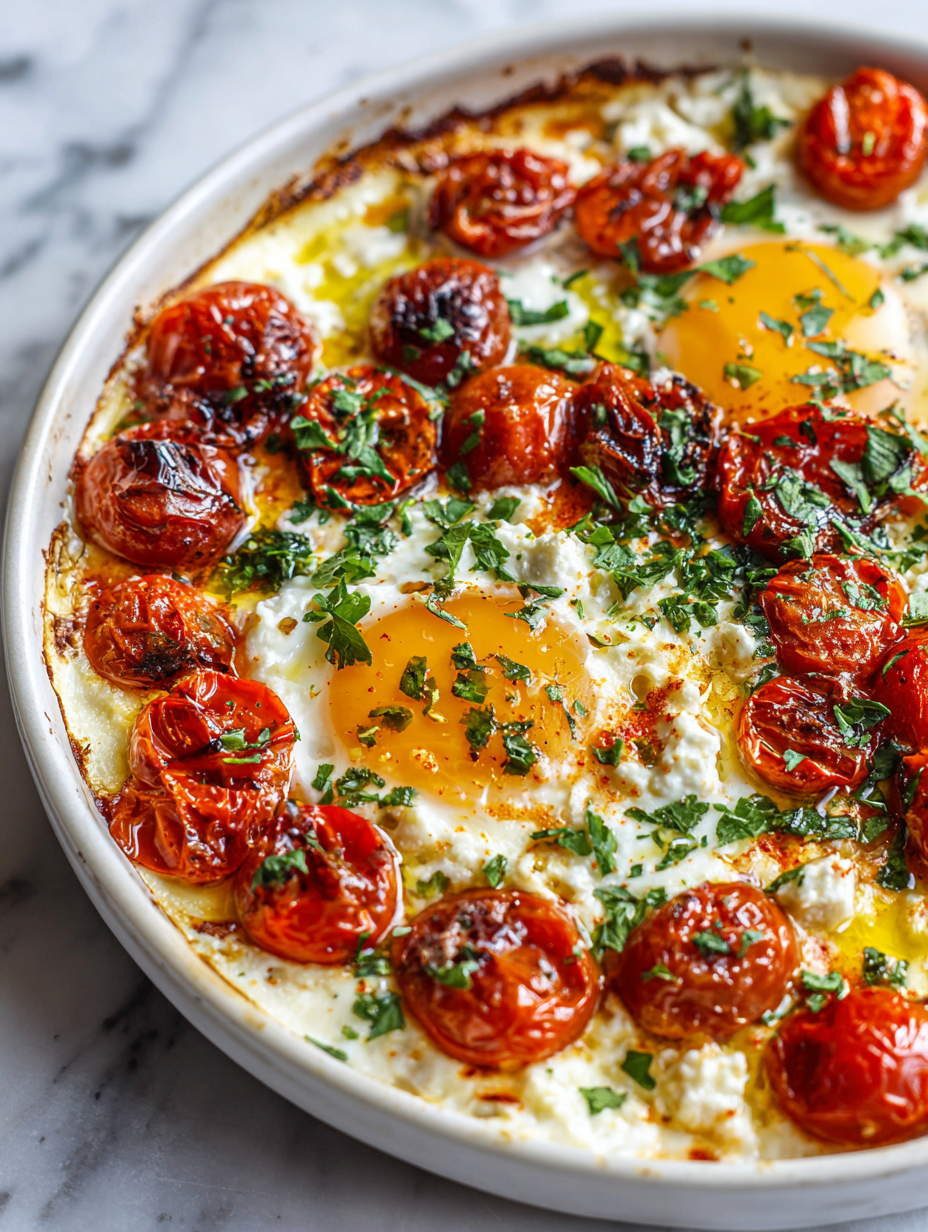
Category: Main Course

  • Bat-Shaped Calzones: A Spooky Twist for Your Kitchen

    Bat-Shaped Calzones: A Spooky Twist for Your Kitchen

    Baking with a theme isn’t just for holidays. Sometimes, a simple shape—like a bat—can turn an ordinary snack into a conversation starter. This recipe grew from a desire to add a bit of playful chaos to my kitchen routine, especially around spooky season. Plus, making these with kids or friends adds a layer of fun I can’t resist.

    Why these calzones keep calling me back

    They’re a blank canvas for creativity, a fun project with a payoff. I love how the shape sparks a conversation. Plus, the aroma of baked bread mixed with savory fillings is irresistible. Making these never gets old—they’re a cozy, playful escape from plain snacks.

    Inside the ingredients: what makes these calzones special

    • Mozzarella cheese: Oozy, melty, the heart of every calzone. Use good-quality mozz for stretch and flavor.
    • Ham or cooked bacon: Adds smoky richness. Swap for sautéed mushrooms or sun-dried tomatoes if you want veg.
    • Spinach: Fresh leaves wilt inside, adding a slight earthy crunch. Frozen works in a pinch, just thaw and squeeze out moisture.
    • Dough (basic pizza dough): Crisp on the outside, chewy inside. Whole wheat adds nuttiness, but all-purpose is classic.
    • Egg wash: Gives a shiny, golden finish. Mix with a splash of water or milk for variation.
    • Seasonings: Salt, pepper, maybe a pinch of garlic powder—simple but essential.

    Tools of the trade for spooky calzones

    • Rolling pin: To flatten dough evenly.
    • Scissors: Cutting bat wings and ears from the dough.
    • Baking sheet: To hold the calzones as they bake.
    • Parchment paper: Prevent sticking and easy cleanup.
    • Pastry brush: Lightly brushing with egg wash for golden color.

    Step-by-step for a spooky, tasty treat

    Step 1: Mix warm water, yeast, a pinch of sugar in a bowl. Let sit until foamy, about 5 minutes.

    Step 2: Add flour, salt, olive oil. Knead until smooth, about 8 minutes by hand or 5 in a mixer.

    Step 3: Cover and let rise until doubled, roughly 1 hour.

    Step 4: Divide dough into four pieces. Roll each into a thin circle, about 20 cm diameter.

    Step 5: Place fillings in the center (cheese, ham, spinach). Fold into a half-moon, seal edges.

    Step 6: Use scissors to cut out bat wings and ears from the dough. Attach with a little water.

    Step 7: Bake on a preheated 220°C/430°F oven, on a baking sheet lined with parchment, for 15-20 mins.

    Cooking checkpoints to keep you on track

    • Dough should be elastic and pass the windowpane test.
    • Fillings should be warm and not spilling out.
    • Calzones should be golden and crispy on the outside, with bubbling cheese inside.

    Common mistakes and how to fix them

    • Dough sticking excessively to hands or surface.? Dough is too sticky?→ Add a little more flour and knead gently.
    • Overfilled calzones that burst open.? Filling is spilling out?→ Seal edges firmly and don’t overfill.
    • Uneven or dull surface after baking.? Calzones are pale?→ Brush with beaten egg before baking.
    • Over-torched edges while baking.? Burned edges?→ Cover with foil after 10 mins or lower oven temperature.

    Spooky Bat-Shaped Calzones

    These playful calzones are made with basic pizza dough filled with melty mozzarella, savory ham, and fresh spinach. Shaped into bats with cut-out wings and ears, they bake to a golden crisp, offering a fun, satisfying snack with a cozy, chewy interior and a crispy exterior. Perfect for spooky season or any playful gathering, they’re a delightful mix of creativity and comfort.
    Prep Time 20 minutes
    Cook Time 20 minutes
    Total Time 1 hour 20 minutes
    Servings: 4
    Course: Main Course
    Cuisine: American
    Calories: 350

    Ingredients
      

    • 1 packet Active dry yeast about 2 1/4 teaspoons
    • 1 1/2 cups warm water about 110°F/45°C
    • 1 teaspoon sugar to activate yeast
    • 3 cups all-purpose flour or whole wheat flour for nuttiness
    • 1 teaspoon salt
    • 2 tablespoons olive oil
    • 1 cup mozzarella cheese shredded
    • 1 cup fresh spinach roughly chopped
    • 1 egg egg beaten for wash
    • 1 teaspoon garlic powder optional, for seasoning

    Equipment

    • Mixing bowl
    • Rolling pin
    • Scissors
    • Baking sheet
    • Parchment paper
    • Pastry brush

    Method
     

    1. Mix warm water, yeast, and sugar in a bowl. Let sit for about 5 minutes until foamy, signaling the yeast is activated.
    2. Add flour, salt, and olive oil to the yeast mixture. Knead until the dough is smooth and elastic, about 8 minutes by hand or 5 minutes in a stand mixer with a dough hook.
    3. Cover the dough with a clean towel and let it rise in a warm place until doubled in size, approximately 1 hour.
    4. Divide the risen dough into four equal portions. Roll each piece into a thin circle, about 20 cm in diameter, on a floured surface.
    5. Spread a handful of shredded mozzarella and chopped ham over half of each circle, leaving a small border around the edge. Add some chopped spinach on top of the fillings.
    6. Fold each dough circle in half over the fillings to form a semi-circle, then pinch and seal the edges firmly to prevent spilling during baking.
    7. Use scissors to carefully cut out bat wings and ears from the top of each calzone. Attach them with a little water if needed to secure them.
    8. Arrange the shaped calzones on a parchment-lined baking sheet. Brush the tops with beaten egg for a shiny, golden finish.
    9. Bake the calzones in a preheated oven at 220°C (430°F) for about 15-20 minutes, until they are golden brown and crispy.
    10. Remove from oven, let cool slightly, then serve warm. Enjoy your spooky, playful calzones with friends or family!

    Notes

    Ensure the dough is elastic and not sticky during kneading. Don’t overfill to prevent bursting. Brushing with egg enhances the golden color and shine.
    These bat-shaped calzones aren’t just a fun project, but a chance to play with shapes and flavors. They work perfectly for a party or a cozy night in when you want something a bit different. Feel free to customize the fillings—think smoky peppers or spicy sausage—to make them your own. Once out of the oven, they should be golden, with crispy edges and gooey centers that invite you to dig in.

  • Pumpkin Alfredo Pasta: A Cozy Twist with a Rustic Heart

    Pumpkin Alfredo pasta is one of those recipes that sneaks up on you with its simplicity and depth. It’s a seasonal embrace, perfect for those chilly fall evenings when you want something warm and hearty but still fresh and vibrant. The pumpkin’s natural sweetness balances beautifully with the richness of Parmesan and butter, creating a comforting yet bright dish.

    Why I Keep Coming Back to This Pumpkin Alfredo

    It’s a dish that warms the soul with familiar flavors but surprises with seasonal charm. The process of roasting pumpkin transforms it into a smoky, oozy delight that makes every bowl feel special. It’s the kind of meal that feels like a gentle hug, especially on a quiet autumn night when comfort is everything.

    Breaking Down the Key Ingredients

    • Sugar Pumpkin: Rich in natural sweetness, perfect for roasting and blending into a velvety sauce.
    • Parmesan Cheese: Adds umami and saltiness, balancing the pumpkin’s sweetness with a nutty aroma.
    • Garlic: Brings a sharp, fragrant punch—be careful not to burn it, or it turns bitter.
    • Butter: Creates a smooth, luscious base, elevating the sauce’s richness.
    • Cream: Adds body and a silky texture; can substitute with milk for a lighter version.
    • Chili Flakes: A pinch adds a subtle heat, contrasting the sweetness.
    • Olive Oil: Drizzle for finishing, adds shine and depth.

    Tools & Equipment for Pumpkin Alfredo Pasta

    • Oven: Roasts the pumpkin to develop deep flavor.
    • Blender or immersion blender: Purees the roasted pumpkin into a smooth sauce.
    • Large skillet or frying pan: Cooks the garlic and combines the sauce with pasta.
    • Large pot: Boils the pasta to al dente.
    • Measuring cups and spoons: Ensures accurate ingredient quantities.

    Step-by-step to Pumpkin Alfredo Perfection

    Step 1: Start by roasting a small sugar pumpkin at 200°C (390°F) for about 45 minutes until the flesh is soft and caramelized.

    Step 2: While the pumpkin roasts, cook 400g of fettuccine in boiling salted water until al dente, about 10 minutes.

    Step 3: Puree the roasted pumpkin flesh in a blender with a splash of cream, a pinch of nutmeg, and a little salt until smooth.

    Step 4: In a large skillet, melt 2 tablespoons of butter over medium heat, then add minced garlic and cook until fragrant, about 1 minute.

    Step 5: Pour in the pumpkin puree, warm it through, then stir in 1/2 cup of grated Parmesan cheese until melted and creamy.

    Step 6: Drain the pasta, reserving a cup of pasta water. Toss the pasta into the sauce, adding a splash of reserved water to loosen if needed.

    Step 7: Finish with a drizzle of olive oil, more Parmesan, and a pinch of chili flakes for heat. Serve immediately.

    Cooking Checks for Pumpkin Alfredo Pasta

    • Pumpkin should be deeply caramelized and oozy when roasted.
    • Pasta must be just tender but still have a slight bite—no mush.
    • Sauce should coat the pasta smoothly, not be gloopy or runny.
    • A fragrant garlic aroma signals it’s time to combine everything.

    Common Mistakes and How to Fix Them

    • Sauce is gloopy or clumpy.? If the sauce is too thick, add reserved pasta water to loosen it.
    • Pumpkin flesh isn’t sweet enough.? If the pumpkin isn’t caramelized enough, roast it a bit longer.
    • Pasta is overdone.? Don’t overcook the pasta, or it turns mushy—test a strand early.
    • Garlic is burnt and bitter.? If garlic burns, reduce heat immediately and add a splash of water.

    Pumpkin Alfredo Pasta

    Pumpkin Alfredo pasta blends roasted pumpkin with creamy Parmesan and butter to create a velvety, vibrant sauce. The dish is finished with garlic, chili flakes, and olive oil, resulting in a comforting yet bright fall-inspired meal with a smooth, coat-your-pasta texture.
    Prep Time 15 minutes
    Cook Time 50 minutes
    Total Time 1 hour 5 minutes
    Servings: 4
    Course: Main Course
    Cuisine: American
    Calories: 620

    Ingredients
      

    • 1 small sugar pumpkin about 2 pounds
    • 400 g fettuccine or your preferred pasta
    • 2 tbsp butter
    • 3 cloves garlic minced
    • 0.5 cup Parmesan cheese grated
    • 0.5 cup cream
    • a pinch nutmeg
    • 1/4 tsp chili flakes
    • 2 tbsp olive oil for finishing
    • salt to taste

    Equipment

    • Oven
    • Blender or immersion blender
    • Large skillet or frying pan
    • Large pot
    • Measuring cups and spoons

    Method
     

    1. Preheat your oven to 200°C (390°F). Cut the sugar pumpkin in half, scoop out the seeds, and place it cut side down on a baking sheet lined with parchment paper. Roast for about 45 minutes until the flesh is soft and caramelized.
    2. While the pumpkin roasts, bring a large pot of salted water to a boil. Add the pasta and cook until just al dente, about 10 minutes. Drain and set aside.
    3. Once the pumpkin is cool enough to handle, scoop out the flesh into a blender. Add a splash of cream, a pinch of nutmeg, and a pinch of salt. Blend until smooth and velvety, adjusting with more cream if needed.
    4. Heat the large skillet over medium heat and melt the butter. Add the minced garlic and cook for about 1 minute until fragrant, stirring constantly to avoid burning.
    5. Pour the pumpkin puree into the skillet with garlic. Warm gently, stirring occasionally, until the mixture is hot and slightly thickened, about 3-5 minutes.
    6. Stir in the grated Parmesan cheese until melted and the sauce is smooth. Taste and adjust seasoning with a little salt if needed.
    7. Add the cooked pasta to the skillet, tossing gently to coat the noodles with the sauce. If the sauce seems too thick, add a splash of reserved pasta water to loosen it up.
    8. Sprinkle chili flakes over the pasta for a hint of heat, then drizzle with olive oil for shine and extra flavor. Toss again to combine everything evenly.
    9. Serve immediately, garnished with additional Parmesan or chili flakes if desired. Enjoy the velvety, seasonal comfort of this pumpkin Alfredo pasta!
    This dish is a gentle reminder that comfort food doesn’t have to be ordinary. The roasted pumpkin adds a sweet, smoky depth that turns a simple Alfredo into something special and seasonal. Feel free to swap in different cheeses or add toasted sage for extra aroma. Cooking should always be a little forgiving—enjoy the process, and taste as you go.

  • Halloween Quesadillas: Spooky Snacks with a Twist

    Halloween Quesadillas: Spooky Snacks with a Twist

    Halloween is a time for playful food, and quesadillas offer the perfect canvas for spooky creativity. I love how they can be both simple and surprisingly charming, especially when shaped into ghosts or pumpkins. It’s a chance to get a little messy and inventive in the kitchen, no matter your skill level.

    Why I Keep Coming Back to This Halloween Snack

    They’re quick, forgiving, and endlessly customizable. Plus, every batch turns into a little creative chaos, which is half the fun. When I want a festive snack that’s easy to share, these quesadillas always come through.

    Halloween Quesadilla Ingredients Breakdown

    • Shredded cheese: Melty, gooey cheese makes every bite satisfying—try a mix of mozzarella and cheddar for flavor and stretch.
    • Tortillas: Soft flour tortillas that crisp up beautifully—whole wheat works if you want a richer flavor.
    • Fillings (peppers, beans, etc.): Colorful, crunchy, and vibrant—choose fillings that add texture and pop.
    • Spooky shapes (cookie cutters): Transform ordinary quesadillas into Halloween treats with fun shapes—pumpkins, ghosts, bats.
    • Oil or butter: Helps crisp the tortillas and adds a buttery sheen—use sparingly to avoid greasiness.

    Tools & Equipment for Spooky Quesadillas

    • Skillet or non-stick frying pan: To crisp up the quesadillas evenly.
    • Cookie cutters: To cut fun Halloween shapes into the quesadillas.
    • Spatula: To flip and handle the quesadillas safely.
    • Knife: To cut shapes and clean up edges for a neat presentation.

    Step-by-Step to Spooky, Crispy Goodness

    Step 1: Preheat your skillet to medium (about 160°C/320°F).

    Step 2: Lay out your tortillas and spread a thin layer of shredded cheese on half of each.

    Step 3: Add your spooky fillings—think black beans or orange peppers—on top of the cheese.

    Step 4: Fold the tortillas over and press lightly. Cook for 2-3 minutes until the bottom is golden.

    Step 5: Flip carefully, cook the other side for another 2-3 minutes, until cheese is melty and tortillas are crispy.

    Step 6: Remove from pan and let rest for a minute to avoid burning your mouth.

    Step 7: Cut into ghost or pumpkin shapes with cookie cutters for extra Halloween fun.

    Cooking Tips & Tricks for Perfect Halloween Quesadillas

    • Ensure the pan isn’t too hot; cheese burns quickly at high heat.
    • Press down gently on quesadillas during cooking to prevent air pockets.
    • Look for a golden-brown crust and bubbling cheese as signs it’s ready.
    • If cheese isn’t melting, cover the pan for 30 seconds to create steam.

    Common Halloween Quesadilla Mistakes & How to Fix Them

    • Pan too hot.? Use medium heat; high heat burns the cheese before crisping the tortilla.
    • Uneven cooking or puffed-up tortillas.? Press down slightly during cooking; prevents air pockets and ensures even crispness.
    • Cold cheese.? Cover the pan briefly if cheese isn’t melting fast enough.
    • Overcrowding leads to soggy, uneven quesadillas.? Don’t overcrowd the pan; cook in batches if needed for even heat.

    Halloween Quesadillas

    These Halloween-themed quesadillas are made by layering melty cheese and colorful fillings between tortillas, then crisped on a skillet to golden perfection. Once cooked, they are cut into spooky shapes like ghosts and pumpkins using cookie cutters, resulting in crispy, cheesy treats with fun, festive appearances.
    Prep Time 10 minutes
    Cook Time 10 minutes
    Total Time 20 minutes
    Servings: 4
    Course: Main Course
    Cuisine: Halloween
    Calories: 250

    Ingredients
      

    • 4 pieces flour tortillas soft and pliable
    • 1 1/2 cups shredded cheese cheddar and mozzarella mix recommended
    • 1/2 cup black beans drained and rinsed
    • 1/2 cup orange bell peppers finely chopped
    • 1 tablespoon oil or butter for crisping

    Equipment

    • Skillet or non-stick frying pan
    • Cookie cutters
    • Spatula
    • Knife

    Method
     

    1. Preheat your skillet over medium heat until warm, and prepare your fillings and cookie cutters nearby.
    2. Lay a tortilla flat on a clean surface, then spread a thin layer of shredded cheese over half of it. Sprinkle some black beans and chopped orange peppers on top of the cheese for vibrant color and texture.
    3. Fold the tortilla in half over the fillings, pressing gently to seal the edges and encourage melting.
    4. Place the folded tortilla into the preheated skillet. Cook for about 2-3 minutes, until the bottom is golden brown and crispy, and you hear a gentle sizzling sound.
    5. Carefully flip the quesadilla using a spatula to cook the other side for another 2-3 minutes, until it’s golden and the cheese inside is melted and bubbly.
    6. Remove the quesadilla from the skillet and let it rest for a minute to avoid burning your mouth and to let the cheese set slightly.
    7. Using cookie cutters, cut fun Halloween shapes like ghosts or pumpkins into the quesadilla. Carefully press the cutter down and lift to reveal festive shapes.
    8. Arrange the shaped quesadillas on a plate and serve warm, enjoying the crispy, cheesy, and colorful bites that are perfect for Halloween celebrations.

    Notes

    For extra fun, use different cookie cutter shapes or add more fillings like black olives or shredded carrots. Keep an eye on the heat to prevent burning and ensure even crisping.
    These quesadillas are a fun way to get everyone involved in Halloween kitchen chaos. They’re simple, forgiving, and perfect for a quick spooky snack that looks just as good as it tastes. Keep it playful—swap fillings or shapes to match your spooky theme. Enjoy turning your kitchen into a little haunted house with cheesy, crispy bites.

  • Halloween Lasagna: A Spooky Twist on a Comfort Classic

    I’ve always loved the idea of turning something familiar into a festive centerpiece. Lasagna feels like a cozy hug, but for Halloween, it gets a mischievous makeover. Think blackened edges, perhaps a few creepy eyes peeking from the layers, and a smoky aroma that beckons everyone to the table.

    Why I keep making this spooky lasagna

    Because it’s a perfect blend of familiarity and festivity, always sparks conversation, and tastes even better than it looks—if that’s possible.

    Ingredients that bring the magic to your Halloween lasagna

    • Ground beef: : Juicy and rich, adds smoky depth; substitute turkey for a leaner, milder flavor.
    • Lasagna noodles: : Al dente and sturdy, but you can swap with gluten-free sheets if needed.
    • Ricotta cheese: : Creamy and mild, a must for the layer; try cottage cheese as a quick alternative.
    • Mozzarella: : Melts beautifully and stretches, giving that gooey texture; smoked mozzarella adds an extra smoky punch.
    • Marinara sauce: : Bright and tangy, enhances all flavors; use your favorite jarred or homemade.
    • Parmesan: : Sharp and nutty, finishes the top; Pecorino works well for a saltier kick.
    • Herbs & spices: : Parsley, nutmeg, and garlic bring warmth and freshness; fresh herbs make a bigger impact.

    Tools of the spooky trade

    • Large skillet: For browning the beef and sautéing aromatics.
    • Boiling pot: Cooking the noodles evenly and efficiently.
    • 9×13 inch baking dish: Layering and baking the lasagna.
    • Mixing bowls: Combining cheeses, eggs, and herbs.
    • Aluminum foil: Covering the dish during baking to retain moisture.

    Step-by-step: Crafting your Halloween lasagna

    Step 1: Preheat your oven to 180°C (350°F).

    Step 2: Cook the lasagna noodles in salted boiling water until al dente, about 8 minutes.

    Step 3: Sauté diced onions and garlic until translucent and fragrant, about 5 minutes.

    Step 4: Brown ground beef in a hot skillet until no longer pink, about 7 minutes.

    Step 5: Mix marinara sauce with a splash of red wine and simmer for 10 minutes.

    Step 6: In a separate bowl, blend ricotta cheese with beaten egg, chopped parsley, and a pinch of nutmeg.

    Step 7: Layer the lasagna: start with sauce, then noodles, cheese mixture, and shredded mozzarella.

    Step 8: Repeat layers until your dish is full, finishing with a generous topping of mozzarella and a sprinkle of Parmesan.

    Step 9: Cover with foil and bake for 40 minutes.

    Step 10: Remove foil, crank up the heat to 200°C (390°F), and bake for another 10 minutes until bubbly and golden.

    Step 11: Let sit for at least 15 minutes before slicing to firm up.

    Cooking checkpoints and tips

    • Ensure the sauce is thick enough to hold layers without sliding.
    • Noodles should be just al dente; overcooked and they’ll fall apart.
    • Cheese should be bubbly and slightly browned on top.
    • Rest the lasagna at least 15 minutes so it slices neatly—no gooey mess.

    Avoid these common Halloween lasagna slip-ups

    • Sauce leaks out during baking.? If the sauce is too runny, simmer longer until thickened.
    • Noodles clumping and tearing.? If noodles stick together, rinse with cold water after boiling.
    • Cheese topping stays pale and unmelted.? If cheese isn’t bubbling, increase oven temperature slightly.
    • Soggy slices due to excess moisture.? If lasagna is watery, let it rest longer before slicing.

    Spooky Halloween Lasagna

    This festive lasagna transforms classic layers of beef, cheese, and marinara into a spooky centerpiece with blackened edges and peek-a-boo eyes. It’s baked to bubbly perfection, with a golden top and smoky aroma, offering a cozy yet eerie presentation for Halloween. The dish combines rich flavors and a hearty texture that’s both comforting and visually striking.
    Prep Time 30 minutes
    Cook Time 50 minutes
    Total Time 1 hour 20 minutes
    Servings: 8
    Course: Main Course
    Cuisine: American
    Calories: 550

    Ingredients
      

    • 1 pound ground beef or turkey for a leaner option
    • 12 pieces lasagna noodles preferably no-boil or traditional
    • 15 ounces ricotta cheese or cottage cheese as a quick alternative
    • 16 ounces mozzarella cheese shredded, can add smoked mozzarella for extra smoky flavor
    • 24 ounces marinara sauce your favorite jarred or homemade
    • 1/2 cup Parmesan cheese freshly grated
    • 2 cloves garlic minced
    • 1 small onion diced
    • 2 tablespoons olive oil for sautéing
    • 1 pinch nutmeg adds warmth to cheese mixture
    • 1 cup chopped fresh parsley for cheese mixture and garnish

    Equipment

    • Large skillet
    • Boiling pot
    • 9×13 inch baking dish
    • Mixing bowls
    • Aluminum foil

    Method
     

    1. Preheat your oven to 180°C (350°F).
    2. Cook the lasagna noodles in salted boiling water until just al dente, about 8 minutes. Drain and set aside.
    3. In a large skillet, heat olive oil over medium heat and sauté diced onion and minced garlic until fragrant and translucent, about 5 minutes. The kitchen fills with a rich aroma.
    4. Add ground beef to the skillet and cook until browned and no pink remains, about 7 minutes. Break it apart with a spatula as it cooks.
    5. Stir in marinara sauce and simmer for 10 minutes, letting the flavors meld and the sauce thicken slightly.
    6. Meanwhile, in a mixing bowl, combine ricotta cheese with beaten egg, chopped parsley, a pinch of nutmeg, and some grated Parmesan. Mix until smooth and creamy.
    7. Begin layering your lasagna in the baking dish: spread a layer of meat sauce on the bottom, then lay down noodles, followed by dollops of ricotta mixture, and a generous sprinkle of shredded mozzarella. Repeat these layers until all ingredients are used, finishing with a top layer of sauce, mozzarella, and Parmesan.
    8. Cover the assembled lasagna tightly with aluminum foil and bake for 40 minutes. The smell of rich tomato and melted cheese will fill your kitchen.
    9. Remove the foil and increase oven temperature to 200°C (390°F). Bake uncovered for an additional 10 minutes until the top is bubbly and golden brown, with slightly blackened edges for that spooky look.
    10. Let the lasagna rest for at least 15 minutes to set up, making it easier to slice cleanly and preventing gooey messes.
    11. Slice into portions, revealing the gooey, cheesy layers with darkened edges that look like a Halloween spell. Garnish with extra parsley for a fresh pop of green.

    Notes

    For a more spooky effect, you can add small edible eyes made from olives or cherry tomatoes peeking out from the layers before baking. For extra smoky flavor, use smoked mozzarella or add a dash of smoked paprika to the sauce.
    This Halloween lasagna isn’t just about the looks—though those are pretty fun—it’s about the flavors that come alive with each bite. The smoky richness of the beef, the gooey cheese, and that hint of festive spice make it a real crowd-pleaser. It’s messy, it’s hearty, and it’s a little bit spooky—perfect for late October nights filled with stories and cider.

  • Halloween Pizza: A Spookily Fun Pie with a Ghoulish Twist

    Halloween is just around the corner, and I love turning my kitchen into a haunted house of flavors and fun. This pizza is a little bit silly, a little bit spooky, and totally customizable for your favorite creepy toppings. It’s a reminder that cooking can be playful, especially when you get to make edible monsters.

    Why This Haunted Pie Won’t Fade

    Making this pizza is a ritual I look forward to each October. Watching it transform into a spooky masterpiece makes me feel like a kid again, sneaking extra cheese or candy. It’s chaotic, creative, and always a little messy—just like Halloween itself, and that’s what makes it special.

    A Potion of Perfect Ingredients

    • Pizza dough: The base—use store-bought for a quick fix or homemade if you’re feeling crafty.
    • Tomato sauce: Brings that rich, tangy flavor; go for a smooth, bright variety or make your own.
    • Cheese: Mozzarella melts into gooey clouds, but try provolone for a sharper bite.
    • Olives and pepperoni: Perfect for creepy eyes and mouths—sliced thin for better placement.
    • Toppings of choice: Bell peppers, mushrooms, or even pineapple—whatever adds to your spooky scene.
    • Seasonings: Oregano, chili flakes, and garlic powder—bring all the flavors alive.
    • Olive oil: A light brush before baking for a golden, crispy crust.

    Tools of the Trick-or-Treat Trade

    • Rolling pin: Help stretch the dough evenly.
    • Baking sheet: Provide a sturdy surface for baking.
    • Parchment paper: Prevent sticking and make cleanup easier.
    • Pizza cutter or sharp knife: Slice through toppings cleanly.

    Crafting Your Haunted Pie: Step-by-Step

    Step 1: Preheat your oven to 220°C (425°F).

    Step 2: Stretch your pizza dough onto a baking sheet lined with parchment paper.

    Step 3: Spread a thin layer of tomato sauce, leaving a small border.

    Step 4: Arrange toppings in a spooky pattern—think olive eyes, pepperoni mouths, and cheese ghosts.

    Step 5: Bake for 12-15 minutes until the crust is golden and bubbly.

    Step 6: Let cool for 5 minutes before slicing and serving.

    Key Tricks for a Spooky Success

    • Ensure the oven is fully preheated before baking.
    • Toppings should be evenly spaced for a balanced bite.
    • Watch the edges of the crust for a golden hue—don’t let it burn.
    • If cheese is too runny, bake a few minutes longer or refrigerate briefly to set.

    Haunted Hiccups: Common Mistakes & How to Vanish Them

    • Undercooked crust.? If the crust is soggy, bake a few minutes longer or pre-bake for 5 minutes.
    • Toppings sliding during baking.? If toppings slide off, press them down gently or add a touch more cheese to glue.
    • Over-browning cheese.? If cheese burns, cover the edges with foil halfway through baking.
    • Runny sauce.? If the sauce is too watery, simmer it to thicken or use less.

    Spooky Halloween Pizza

    This playful Halloween-themed pizza features a crispy crust topped with vibrant tomato sauce, gooey melted cheese, and creepy decorations made from olives, pepperoni, and colorful toppings. It’s baked until golden and bubbly, with fun, spooky patterns that make it perfect for celebrating the holiday with family and friends.
    Prep Time 15 minutes
    Cook Time 15 minutes
    Total Time 30 minutes
    Servings: 4
    Course: Main Course
    Cuisine: American
    Calories: 350

    Ingredients
      

    • 1 package store-bought pizza dough or homemade dough if preferred
    • 1/2 cup tomato sauce smooth and bright flavor
    • 1 cup shredded mozzarella cheese for gooey melting
    • 1/4 cup sliced black olives for eyes and decorations
    • 50 grams pepperoni slices for creepy mouths and accents
    • 1 bell pepper colorful bell pepper for additional spooky decorations
    • 1 clove garlic powder for flavor
    • 1 teaspoon oregano dried
    • 1 tablespoon olive oil for brushing crust

    Equipment

    • Rolling pin
    • Baking sheet
    • Parchment paper
    • Pizza cutter or sharp knife

    Method
     

    1. Preheat your oven to 220°C (425°F) and line a baking sheet with parchment paper.
    2. Unroll the pizza dough onto the prepared baking sheet, using a rolling pin to gently stretch it out into an even circle or rectangle, aiming for about 12 inches in diameter.
    3. Spread a thin layer of tomato sauce over the dough, leaving a small border around the edges for the crust.
    4. Sprinkle the shredded mozzarella evenly over the sauce, covering the surface generously for a gooey cheese layer.
    5. Use sliced olives to create spooky eyes—place two small circles on the pizza, and add tiny olive slices inside for pupils.
    6. Arrange slices of pepperoni to form creepy mouths or fanged grins, spreading them out in fun, irregular patterns.
    7. Add slices of colorful bell pepper or other toppings to create extra spooky details, like hair or scarier decorations.
    8. Brush the exposed crust edges lightly with olive oil and sprinkle with garlic powder and oregano for extra flavor and color.
    9. Bake the pizza in the preheated oven for 12-15 minutes, until the crust is golden and the cheese is bubbling and slightly browned.
    10. Remove the pizza from the oven and let it cool for about 5 minutes—this helps the toppings set slightly and makes slicing easier.
    11. Use a pizza cutter or sharp knife to slice into pieces, revealing the cheesy, spooky layers inside.
    12. Serve your spooky Halloween pizza warm, and enjoy the playful, delicious feast with everyone!

    Notes

    Feel free to get creative with decorations—use additional vegetables, cheese shapes, or candies for extra spooky effects!
    This Halloween pizza isn’t just about the look; it’s about the joy of creating something playful and delicious. Use your favorite toppings and get creative with the designs—think of it as edible art. It’s a perfect way to bring a little spooky mischief to the dinner table, especially if you’re feeding a crew of little monsters or just want to surprise your grown-ups with something fun.

  • Mummy Hot Dogs: A Nostalgic Twist on a Classic Snack

    One of the quirkiest treats I grew up loving was my mom’s version of mummy hot dogs. It’s a simple idea but with a little twist — the dough isn’t just wrapped, it’s shaped into tiny, spooky mummies that look as fun as they taste. This dish sneaks in a bit of childhood chaos and a lot of comfort.

    Why These Mummy Hot Dogs Keep Coming Back

    They’re unpredictable — you never know if they’ll look perfect or hilariously lopsided. The smell of baked dough and sizzling hot dogs always sparks a little childhood excitement. Plus, they’re an easy way to turn a simple snack into a party centerpiece, no matter the season.

    Inside the Mummy Hot Dogs: Ingredients and Notes

    • Hot dogs: Juicy, salty, and the star of the show. Swap for veggie dogs if you prefer plant-based.
    • Crescent roll dough: Flaky, buttery, and perfect for wrapping. You could try puff pastry in a pinch.
    • Egg (for brushing): Gives a shiny, golden finish. For a vegan twist, use plant-based milk.
    • Mustard or ketchup: Optional for eyes or dipping, adds a tangy kick.
    • Sesame seeds or bits of olive: For eyes or decoration, adds a fun, spooky detail.

    Tools of the Trade for Mummy Hot Dogs

    • Baking sheet: To hold the wrapped hot dogs during baking.
    • Parchment paper: Prevents sticking and makes cleanup easier.
    • Pastry brush: To brush beaten egg for a shiny golden finish.
    • Sharp knife: To score small eyes or decorative features.

    Crafting the Perfect Mummy Hot Dogs: Step-by-Step

    Step 1: Preheat your oven to 200°C (390°F).

    Step 2: Line a baking sheet with parchment paper.

    Step 3: Wrap each hot dog with a strip of crescent roll dough, tucking the ends under.

    Step 4: Place the wrapped hot dogs seam-side down on the baking sheet.

    Step 5: Brush the tops with beaten egg for a golden finish.

    Step 6: Bake for 15-20 minutes or until the dough is puffed and golden.

    Step 7: Remove from oven and let cool for 5 minutes before serving.

    Tips and Tricks for Mummy Hot Dogs

    • Ensure the dough is sealed well to prevent filling from leaking during baking.
    • Watch the oven closely after 15 minutes to avoid over-browning.
    • Use a sharp knife to score small eyes before baking for a cute, authentic look.
    • If the dough browns too quickly, cover loosely with foil and continue baking.
    • Test the hot dogs with a thermometer if unsure — should reach 60°C (140°F).

    Common Mistakes and How to Fix Them

    • Dough separates from hot dogs in oven.? Seams split open during baking? Seal edges tightly with a bit of water or beaten egg.
    • Uneven color or burnt spots.? Dough browns unevenly? Rotate baking sheet halfway through baking.
    • Hot dogs dried out or shrank.? Hot dogs are overcooked or dry? Reduce baking time or lower oven temp slightly.
    • Lack of visual detail.? Eyes look dull? Use a small amount of mustard or ketchup to make cute faces after baking.

    Mummy Hot Dogs

    Mummy hot dogs are a fun, spooky snack made by wrapping juicy hot dogs in flaky crescent roll dough, shaping them into tiny mummies. Baked until golden and crispy, they feature a playful appearance with crispy dough and savory hot dog insides, perfect for parties or kids’ gatherings.
    Prep Time 10 minutes
    Cook Time 15 minutes
    Total Time 25 minutes
    Servings: 4
    Course: Main Course
    Cuisine: American
    Calories: 350

    Ingredients
      

    • 4 pieces hot dogs juicy, salty
    • 1 can crescent roll dough flaky and buttery
    • 1 egg egg for brushing, beaten
    • optional mustard or ketchup for eyes or dipping
    • to taste sesame seeds or bits of olive for eyes or decoration

    Equipment

    • Baking sheet
    • Parchment paper
    • Pastry brush
    • Sharp knife

    Method
     

    1. Preheat your oven to 200°C (390°F) and line a baking sheet with parchment paper to keep things tidy.
    2. Unroll the crescent roll dough and cut it into thin strips, about half an inch wide, to create the mummy wrappings.
    3. Place each hot dog on a cutting board and start wrapping it with the dough strips, overlapping slightly and leaving some space for the ‘eyes’.
    4. Once wrapped, place each hot dog seam-side down on the prepared baking sheet, ensuring the dough is sealed well to prevent leaks.
    5. Whisk the beaten egg and brush it generously over the dough to give the mummy a shiny, golden finish.
    6. Bake in the preheated oven for about 15-20 minutes, or until the dough is puffed up and golden brown, filling your kitchen with a warm, baked aroma.
    7. Remove the mummies from the oven and let them cool for about 5 minutes—this helps the dough set and makes them easier to handle.
    8. Using a sharp knife or your fingers, score tiny eyes on each mummy, then add small dots of mustard, ketchup, or bits of olive for a spooky, fun face.
    9. Arrange the finished mummy hot dogs on a platter and serve immediately for a fun, crowd-pleasing snack.

    Notes

    Ensure dough is sealed tightly around hot dogs to prevent leakage during baking. For extra fun, use different decorations for eyes and faces. You can also try puff pastry for a flakier texture.
    These mummy hot dogs are a fun, messy, and totally satisfying snack. The crispy, flaky dough cloaks juicy hot dogs in a way that’s both nostalgic and spooky — perfect for a casual gathering or a quick weeknight treat. Feel free to personalize the wrapping with different dough shapes or add a dash of spicy mustard for extra zing.

  • Black Bean Burgers: A Hidden Gem for Lazy Weekends

    Black bean burgers often get a bad rap as being a bit dull or rubbery, but with a few tweaks, they turn into something surprisingly satisfying. I’ve been making these for years, tweaking the spice blends and textures until they felt just right. They’re a great way to use up that can of beans lurking in the back of your pantry during lazy weekends.

    Why I Keep Coming Back to This Recipe

    Because it’s honest, flexible, and forgiving. It’s a recipe I can tweak based on what’s in the fridge or my mood. Plus, the smell of toasted spices and sizzling patties makes it feel like home, no matter how hectic the day. It’s my go-to for a quick, satisfying lunch or dinner that always reminds me I can make something hearty without much fuss.

    Ingredient Breakdown & Substitutions

    • Black beans: Main binder, creamy interior, slightly oozy. Swap with chickpeas for a nuttier flavor.
    • Onion: Adds crunch and sweetness. Shallots work if you want a milder note.
    • Garlic: Brings a pungent, aromatic punch. Roasted garlic gives a smoky depth.
    • Cumin: Earthy, warm spice. Paprika lends a smoky aroma, but chili powder can add heat.
    • Lime juice: Brightens everything. Lemon juice is a fine substitute.
    • Breadcrumbs: Gives structure. Use crushed oats for a gluten-free tweak.
    • Egg: Acts as a binder. Flaxseed meal with water can be vegan.

    Tools & Equipment for Perfect Burgers

    • Can opener: Open and drain the black beans.
    • Potato masher or fork: Mash the beans to the right consistency.
    • Mixing bowl: Combine all ingredients evenly.
    • Skillet or non-stick pan: Cook the patties evenly with a good sear.
    • Spatula: Flip the patties without breaking them.

    Step-by-Step Guide to Perfect Black Bean Burgers

    Step 1: Start by draining and rinsing a can of black beans. Mash them with a fork or potato masher until mostly smooth, leaving some chunky bits for texture.

    Step 2: In a mixing bowl, combine the mashed beans with chopped onion, garlic, cumin, smoked paprika, and a splash of lime juice. Mix well.

    Step 3: Add an egg and a handful of panko breadcrumbs to help bind everything together. Season with salt and pepper.

    Step 4: Form the mixture into 4-6 patties, about 1.5 cm thick. Chill for 15 minutes to help them firm up.

    Step 5: Heat a non-stick skillet over medium heat, about 160°C (320°F). Cook the patties for 4-5 minutes per side, until golden brown and slightly crispy.

    Step 6: Serve on toasted buns with your favorite toppings — I like avocado and a dollop of spicy mayo.

    Cooking Checkpoints & Tips for Success

    • The mixture should be sticky but not overly wet. If it’s too loose, add more breadcrumbs.
    • Cook the patties until they’re golden brown and crispy on the outside. If they’re still soft, give them more time.
    • Ensure the skillet isn’t too hot to prevent burning the outside while the inside remains raw. Medium heat works best.

    Common Mistakes & How to Fix Them

    • Mixture too loose, falling apart.? Add a little more breadcrumbs if the mixture is too sticky or wet.
    • Over-torched patties.? Reduce heat if patties are burning on the outside before cooking through.
    • Soft, fragile patties.? Chill the patties longer if they’re difficult to shape or keep falling apart.
    • Blah, dull taste.? Use fresh spices for more vibrant flavor.

    Black Bean Burgers

    Black bean burgers are hearty, vegetarian patties made from mashed black beans combined with spices, vegetables, and a binder. They develop a crispy exterior when cooked in a skillet, with a tender, slightly chunky interior that’s full of flavor and texture. Perfect for a quick, satisfying meal, these burgers are easily customizable with toppings and sauces.
    Prep Time 15 minutes
    Cook Time 10 minutes
    Total Time 25 minutes
    Servings: 4
    Course: Main Course
    Cuisine: Vegetarian
    Calories: 250

    Ingredients
      

    • 1 can black beans drained and rinsed
    • 1/2 small onion finely chopped
    • 2 cloves garlic minced
    • 1 teaspoon cumin ground
    • 1/2 teaspoon smoked paprika
    • 1 tablespoon lime juice
    • 1/2 cup breadcrumbs or crushed oats for gluten-free
    • 1 egg beaten, or vegan substitute like flaxseed meal with water
    • Salt and pepper to taste

    Equipment

    • Can opener
    • Potato masher or fork
    • Mixing bowl
    • Skillet or non-stick pan
    • Spatula

    Method
     

    1. Drain and rinse the black beans, then mash them with a fork or potato masher until mostly smooth with some chunky bits remaining.
    2. Combine the mashed beans in a mixing bowl with the finely chopped onion, minced garlic, cumin, smoked paprika, and lime juice. Mix everything thoroughly until well integrated.
    3. Add the beaten egg and breadcrumbs to the bowl, stirring until the mixture becomes sticky and holds together. Season with salt and pepper.
    4. Divide the mixture into 4 to 6 portions and gently shape each into a patty about 1.5 centimeters thick. Place the formed patties on a tray and chill for 15 minutes to help them set.
    5. Heat a skillet over medium heat until hot and add a little oil. Carefully place the chilled patties into the skillet, cooking for about 4-5 minutes on each side until they turn golden brown and develop a crispy crust.
    6. Once cooked, transfer the patties to a plate. Serve them on toasted buns with your favorite toppings like avocado, lettuce, or spicy mayo for a satisfying meal.

    Notes

    Chilling the patties before cooking helps them hold together better. Feel free to customize with different spices or toppings to suit your taste.
    These black bean burgers aren’t just a quick fix — they carry a quiet satisfaction that sneaks up on you. There’s something about mashing those beans, mixing in the spices, and shaping them into patties that feels like reclaiming a little kitchen magic. You can customize toppings or spice levels, making each batch uniquely yours. Enjoy them with a side of crispy sweet potato fries or just a simple salad, and relish the simplicity of good, honest food.

  • Monster Meatloaf: A Hearty, Unexpected Twist on Classic Comfort Food

    When I first made this monster meatloaf, I was craving something wildly satisfying, a bit rebellious even. It’s not your tidy, perfect loaf—think rugged, with rough edges and bold flavors. That rustic charm makes every bite feel like a small victory, a little messy but full of soul. It’s the kind of dish that feels like a warm hug, but with a little wild side.

    Why I Keep Coming Back to This Recipe

    Because it’s honest, no-frills comfort that adapts easily. The smoky crust, the juicy bite—each time, I tweak a spice or add a splash of hot sauce. It’s imperfect, loud, and real, just like a good meal should be. I keep returning because it’s forgiving and satisfying in ways that make kitchen messes worth it.

    Monster Meatloaf: The Key Players

    • Ground beef: The backbone—juicy, rich, needs a bit of fat for moisture.
    • Onions: Adds sweetness and depth; sauté if you want softer flavor.
    • Bread crumbs: Bind the loaf; panko gives crunch, regular fine crumbs stay tender.
    • Egg: Helps hold everything together; skip if you prefer a veggie version.
    • Worcestershire sauce: Brings umami and a smoky punch—don’t skip this.
    • Milk: Keeps the mixture moist; use cream if you want extra richness.
    • Seasonings: Salt, pepper, maybe a dash of paprika—season boldly, it shows.

    Tools of the Monster Meatloaf Trade

    • Large mixing bowl: For combining all the ingredients without making a mess.
    • Roasting pan or baking sheet: To hold the loaf during baking, ensuring even heat.
    • Meat thermometer: To check when the internal temp is just right.
    • Kitchen spatula or large spoon: For mixing and shaping the loaf.

    Step-by-step: Crafting a Monster Meatloaf

    Step 1: Preheat your oven to 180°C (350°F).

    Step 2: In a large bowl, combine ground beef, chopped onions, minced garlic, and bread crumbs.

    Step 3: Add an egg, Worcestershire sauce, and a splash of milk. Mix until just combined.

    Step 4: Shape the mixture into a large, irregular loaf—think monster-sized, with a rugged, rustic look.

    Step 5: Place on a baking sheet lined with parchment paper or a lightly greased roasting pan.

    Step 6: Bake for about 50-60 minutes. Look for a dark, caramelized crust.

    Step 7: Check the internal temperature—should reach 70°C (160°F).

    Step 8: Let it rest for 10 minutes before slicing.

    Crisp, Juicy, and Done: Meatloaf Checks

    • Crust should be deep golden and slightly crispy.
    • Center should be firm but still juicy when pressed.
    • Internal temperature hits 70°C (160°F).

    Oops Moments: Common Meatloaf Mishaps

    • Tough, dense loaf.? OVER-MIXED THE MEAT → Stop mixing as soon as ingredients are just combined to keep it tender.
    • Dry, crumbly slices.? LOAF TOO DRY → Add a splash more milk or a beaten egg to keep it moist.
    • Flattened, sad-looking loaf.? LOAF COLLAPSES → Don’t handle it too much when shaping, and ensure even baking.
    • Flat flavor.? UNDERSALTED → Taste the mixture before baking and add a pinch more salt if needed.

    Monster Meatloaf

    This rustic, rugged meatloaf combines juicy ground beef with sautéed onions, breadcrumbs, and bold seasonings, baked until its dark, caramelized crust is crispy and inviting. The mixture is shaped into a large, uneven loaf that exudes charm and personality, with a juicy interior that offers a satisfying bite. Its imperfect appearance and hearty flavor make it a comforting, rebellious twist on a classic dish.
    Prep Time 15 minutes
    Cook Time 1 hour
    Total Time 1 hour 15 minutes
    Servings: 6
    Course: Main Course
    Cuisine: American
    Calories: 550

    Ingredients
      

    • 1.5 pounds ground beef preferably with some fat for juiciness
    • 1 medium onion finely chopped or sautéed for softer flavor
    • 1/2 cup bread crumbs panko or regular fine crumbs
    • 1 large egg helps bind the mixture
    • 2 tablespoons Worcestershire sauce adds umami and smoky depth
    • 1/4 cup milk keeps the loaf moist
    • to taste salt season boldly
    • to taste pepper add for flavor

    Equipment

    • Large mixing bowl
    • Baking sheet or roasting pan
    • Kitchen spatula or large spoon
    • Meat thermometer

    Method
     

    1. Preheat your oven to 180°C (350°F) and gather all your ingredients.
    2. In a large bowl, combine the ground beef, finely chopped onion, bread crumbs, Worcestershire sauce, and milk.
    3. Add the egg, season generously with salt and pepper, then mix everything together until just combined. Avoid over-mixing to keep the meat tender.
    4. Shape the mixture into a large, irregular loaf on a baking sheet lined with parchment paper or lightly greased, giving it a rugged, rustic appearance.
    5. Bake the loaf in the preheated oven for about 50-60 minutes, until it develops a deep golden, slightly crispy crust and the top looks caramelized.
    6. Use a meat thermometer to check the internal temperature; it should reach 70°C (160°F) to ensure it’s fully cooked and juicy inside.
    7. Once cooked, remove the meatloaf from the oven and let it rest for 10 minutes. This helps the juices settle and makes slicing easier.
    8. Slice the monster meatloaf into thick, rustic pieces, revealing its juicy interior and crispy crust.
    9. Serve hot, enjoying the bold flavors and rugged texture that make this dish a comforting, rebellious favorite.

    Notes

    Feel free to tweak the seasonings or add hot sauce for extra flair. The key is embracing the rustic, imperfect charm of this meatloaf.
    This monster meatloaf isn’t just about feeding a crowd or leftovers—it’s about embracing the chaos of a big, imperfect loaf that’s packed with flavor. Each slice crackles with a smoky crust and juicy, spicy interior. Feel free to add your own twists—maybe a dash of hot sauce or a sprinkle of cheese—whatever makes it feel like yours. It’s a messy, satisfying dish that keeps you coming back, slice after slice.

  • Jack O’ Lantern Burgers: A Playful Autumn Twist

    Autumn is the perfect time to turn the kitchen into a playground. These Jack O’ Lantern Burgers aren’t just about the look—they’re about the thrill of playing with flavors and textures. I love how the smoky, spicy notes contrast with the sweet, tender bun, making each bite a surprise.

    Why these burgers stick in my mind

    Because they’re a snapshot of childhood Halloween spirit, turned savory and grown-up. The smoky heat, the cheesy stretch, the playful carving—each bite sparks a memory of crisp air and flickering lights. Plus, they’re just messy enough to feel like a small rebellion in the kitchen, a reminder to keep things fun and spontaneous.

    What makes these burgers special — ingredient insights

    • Ground beef: Juicy, rich flavor—preferably 80/20 for the best balance of fat and meat.
    • Caramelized onions: Sweet, sticky, with a smoky undertone—skip if you’re in a rush.
    • Smoky chipotle sauce: Adds depth and a gentle heat—swap with smoked paprika for milder heat.
    • Cheddar cheese: Melted and gooey, it’s the glue holding everything together.
    • Buns: Soft but sturdy—consider brioche for extra indulgence.
    • Lettuce, tomato, pickles: Fresh, crunchy, and tangy—your classic burger toppings.
    • Spicy mayo: Creamy with a kick—mix mayo with hot sauce or sriracha.

    Tools of the trade for spooky, tasty burgers

    • Cast-iron skillet: Provides even heat and a perfect crust.
    • Spatula: Helps flip the patties with control.
    • Chef’s knife: For carving the pumpkin face and prepping toppings.
    • Basting brush: For melting cheese and glazing the buns.
    • Wooden board: Chopping and assembling.

    Step-by-step guide to your spooky, tasty creation

    Step 1: Start by gathering all your ingredients and prepping your station. It’s chaos but kind of cozy.

    Step 2: Mix the ground beef with chopped caramelized onions, a splash of smoky chipotle sauce, and salt. Don’t overwork the meat.

    Step 3: Shape into patties, about 2 cm thick. Keep your hands light—no dense burgers!

    Step 4: Heat a cast-iron skillet over medium-high heat, about 200°C (390°F).

    Step 5: Cook the patties for 4 minutes per side. Look for a deep caramel crust and a little sizzle.

    Step 6: During the last minute, add slices of cheddar and cover to melt. The aroma should be rich and gooey.

    Step 7: While the burgers rest for 5 minutes, toast your buns lightly in the same pan.

    Step 8: Assemble with lettuce, tomato, pickles, and a generous dollop of spicy mayo. Finish with a fun, carved jack-o’-lantern face on the bun.

    Cooking checkpoints to keep you on track

    • Look for a deep, golden crust on the burger; it’s a sign of proper caramelization.
    • Check the internal temperature—aim for 70°C (160°F)—that’s the sweet spot for juicy, cooked-through patties.
    • The cheese should be gooey, bubbling, and slightly browned at the edges, signaling it’s melt-ready.

    Common mistakes and how to fix them

    • Over-salting the beef.? Use too much salt? Rinse and pat dry, then adjust salt in the next batch.
    • Sticking to the skillet.? Burger sticking? Oil the pan a little more or let the patties rest before flipping.
    • Undermelting the cheese.? Cheese not melting? Cover the pan or lower heat for a minute.
    • Overcooking the patties.? Burger too dry? Add a slice of butter on top or serve immediately.

    Jack O’ Lantern Burgers

    These playful burgers feature juicy ground beef patties infused with caramelized onions and smoky chipotle sauce, topped with melted cheddar cheese and nestled in soft buns. The buns are carved with fun jack-o’-lantern faces for a festive Halloween touch. The combination of smoky, spicy, and cheesy flavors creates a savory, satisfying bite with a fun, spooky presentation.
    Prep Time 20 minutes
    Cook Time 15 minutes
    Total Time 35 minutes
    Servings: 4
    Course: Main Course
    Cuisine: American
    Calories: 650

    Ingredients
      

    • 500 g ground beef (80/20) preferably
    • 1 cup caramelized onions finely chopped
    • 2 tbsp smoky chipotle sauce
    • 4 slices cheddar cheese preferably sliced
    • 4 buns soft burger buns brioche or similar
    • 1 leaf lettuce washed and dried
    • 1 slice tomato sliced
    • 4 pickles pickles sliced
    • 1/2 cup mayonnaise for spicy mayo
    • 1 tbsp hot sauce or sriracha to mix with mayo

    Equipment

    • Cast-iron skillet
    • Spatula
    • Chef’s knife
    • Basting brush
    • Wooden board

    Method
     

    1. Gather all your ingredients and set up your station for efficient assembly. The kitchen should smell warm and savory as the onions caramelize.
    2. Mix the ground beef with the chopped caramelized onions, smoky chipotle sauce, and a pinch of salt. Handle the meat gently to keep the patties juicy and avoid overworking it.
    3. Divide the mixture into four equal portions and shape each into a patty about 2 cm thick. Keep your hands light to prevent dense burgers.
    4. Preheat your cast-iron skillet over medium-high heat until it’s hot and slightly shimmering. You should hear a gentle sizzle when the patties hit the pan.
    5. Place the patties in the skillet and cook for about 4 minutes per side, until they develop a deep caramel-colored crust and sizzle invitingly.
    6. During the last minute of cooking, lay a slice of cheddar cheese on each patty and cover the pan to melt the cheese thoroughly—look for bubbling and slight browning at the edges.
    7. While the cheese melts, slice your buns and lightly toast them in the same pan until golden brown and slightly crispy, about 1-2 minutes.
    8. Prepare the spicy mayo by mixing mayonnaise with hot sauce or sriracha until well combined and creamy with a bit of kick.
    9. Assemble each burger by layering lettuce, tomato slices, pickles, and a generous dollop of spicy mayo on the bottom bun. Top with the cheesy beef patty and cap with the top bun.
    10. Using a chef’s knife, carve fun jack-o’-lantern faces into the top buns for a spooky, festive look. The carving should be precise but playful.
    11. Serve the burgers immediately, with the carved buns sitting proudly on top. Enjoy the savory, smoky flavors and fun Halloween presentation.
    These Jack O’ Lantern Burgers aren’t just for Halloween—they’re a reminder to embrace fun in the kitchen. Feel free to swap ingredients, add your favorite toppings, or make them vegetarian with hearty mushrooms or lentils. The goal is to enjoy the process and serve up a meal that sparks joy and a little nostalgia. So, get creative, and don’t forget—sometimes the messiest attempts turn out the best.

  • Pumpkin Mac and Cheese: A Cozy Twist for Chilly Days

    Pumpkin Mac and Cheese: A Cozy Twist for Chilly Days

    Pumpkin mac and cheese might sound like a holiday special, but it’s actually a quiet hero for any fall weeknight. The pumpkin adds a subtle sweetness and velvety texture that elevates the usual cheesy bowl. It’s a dish that feels familiar but with a cozy twist that’s worth the extra step.

    Why I keep coming back to this dish

    It’s a perfect comfort food with a seasonal twist that feels both nostalgic and fresh. The pumpkin’s sweetness balances the richness of cheese, and it’s forgiving to tweak with leftovers or pantry staples. Plus, roasting pumpkin fills the kitchen with a warm, sweet aroma that makes everything feel right.

    Breaking down the key ingredients

    • Pumpkin: Sweet, earthy, and velvety when roasted, it’s the soul of this dish.
    • Cheddar cheese: Sharp and gooey, it melts beautifully, giving that classic cheesy pull.
    • Nutmeg: A pinch adds warmth and depth, balancing the pumpkin’s sweetness.
    • Pasta: Choose a sturdy shape like cavatappi or shells that hold sauce well.
    • Milk: Creamy base; full-fat makes it richer, but you can use a lower-fat version.
    • Butter & Flour: Form the roux; start here for a smooth, luscious sauce.
    • Olive oil: Used for roasting pumpkin; look for a bright, fruity aroma.

    Tools and equipment you’ll need

    • Large pot: For boiling pasta.
    • Baking sheet: To roast the pumpkin.
    • Saucepan: To make the cheese sauce.
    • Whisk: To mix the sauce smoothly.
    • Baking dish: To bake the assembled mac and cheese.

    Step-by-step for a creamy, pumpkin-infused mac and cheese

    Step 1: Preheat your oven to 180°C (350°F).

    Step 2: Boil a large pot of salted water, cook pasta until just al dente, about 8 minutes.

    Step 3: While pasta cooks, roast pumpkin: toss chunks with olive oil, salt, and pepper. Roast on a baking sheet at 200°C (400°F) for 25-30 minutes until tender and caramelized.

    Step 4: In a saucepan, melt butter over medium heat. Add flour, whisk for 1 minute to make a roux.

    Step 5: Gradually pour in milk, whisk constantly until the sauce thickens, about 5 minutes.

    Step 6: Stir in grated cheese, pumpkin puree, and season with nutmeg, salt, and pepper.

    Step 7: Combine cooked pasta with cheese sauce, transfer to a baking dish.

    Step 8: Bake uncovered for 15 minutes until bubbly and golden.

    Cooking checkpoints to get it just right

    • Pasta should be cooked al dente — tender but with a slight bite.
    • Cheese sauce needs to be smooth and creamy, not grainy or split.
    • Pumpkin should be roasted until caramelized for added sweetness and depth.

    Common mistakes and how to fix them

    • Lumpy cheese sauce? Use too much flour in roux → Thin out with a splash of milk and whisk again.
    • Underdeveloped flavor? Pumpkin isn’t roasted enough → Roast longer until deeply caramelized.
    • Dry or burnt top? Overbaking the dish → Keep an eye on it, bake just until bubbly and golden.
    • Soggy noodles? Pasta overcooked → Drain and toss with a bit of olive oil to stop cooking.

    Pumpkin Mac and Cheese

    This pumpkin mac and cheese combines creamy cheese sauce with roasted pumpkin for a seasonal twist on a comfort classic. The dish features tender pasta coated in a velvety, cheesy sauce infused with sweet roasted pumpkin and a touch of nutmeg, finished with a golden bubbly top. It’s a cozy, visually appealing dish that balances richness with a subtle sweetness and warm spices.
    Prep Time 15 minutes
    Cook Time 45 minutes
    Total Time 1 hour
    Servings: 4
    Course: Main Course
    Cuisine: American
    Calories: 450

    Ingredients
      

    • 1 pound pasta (cavatappi or shells) uncooked
    • 2 cups pumpkin chunks peeled and cubed
    • 2 tablespoons olive oil for roasting
    • 2 cups milk full-fat or lower-fat
    • 2 tablespoons butter
    • 2 tablespoons flour
    • 1.5 cups sharp cheddar cheese grated
    • 1/4 teaspoon nutmeg ground
    • Salt and pepper to taste

    Equipment

    • Large pot
    • Baking sheet
    • Saucepan
    • Whisk
    • Baking dish

    Method
     

    1. Preheat your oven to 200°C (400°F). Toss pumpkin chunks with olive oil, salt, and pepper, then spread them evenly on a baking sheet. Roast for 25-30 minutes until caramelized and tender, filling your kitchen with a warm, sweet aroma.
    2. While the pumpkin roasts, bring a large pot of salted water to a boil. Cook the pasta until just al dente, about 8 minutes, then drain and set aside.
    3. In a saucepan, melt the butter over medium heat. Add the flour and whisk constantly for about 1 minute until the mixture turns a light golden color and smells slightly nutty.
    4. Gradually pour in the milk, whisking continuously to prevent lumps. Keep whisking until the sauce thickens and begins to bubble gently, about 5 minutes.
    5. Stir in the grated cheddar cheese, roasted pumpkin puree, ground nutmeg, and season with salt and pepper. Continue whisking until the cheese melts and the sauce is smooth, with a velvety texture.
    6. Combine the cooked pasta with the cheese and pumpkin sauce, folding gently to coat all the noodles evenly.
    7. Transfer the pasta mixture to a baking dish and spread it out evenly. Bake uncovered for 15 minutes until bubbly and the top turns golden brown.
    8. Remove from the oven and let it rest for a few minutes. The dish should be bubbling, with a slightly crispy top and creamy interior.
    This dish is a testament to how seasonal ingredients can transform comfort food. The sweet, earthy pumpkin melds perfectly with cheesy richness, making every bite a little celebration. Feel free to tweak the spices or cheese to match your mood. It’s a good one to have in your back pocket for chilly nights or when you want a bowl of something warm and familiar.