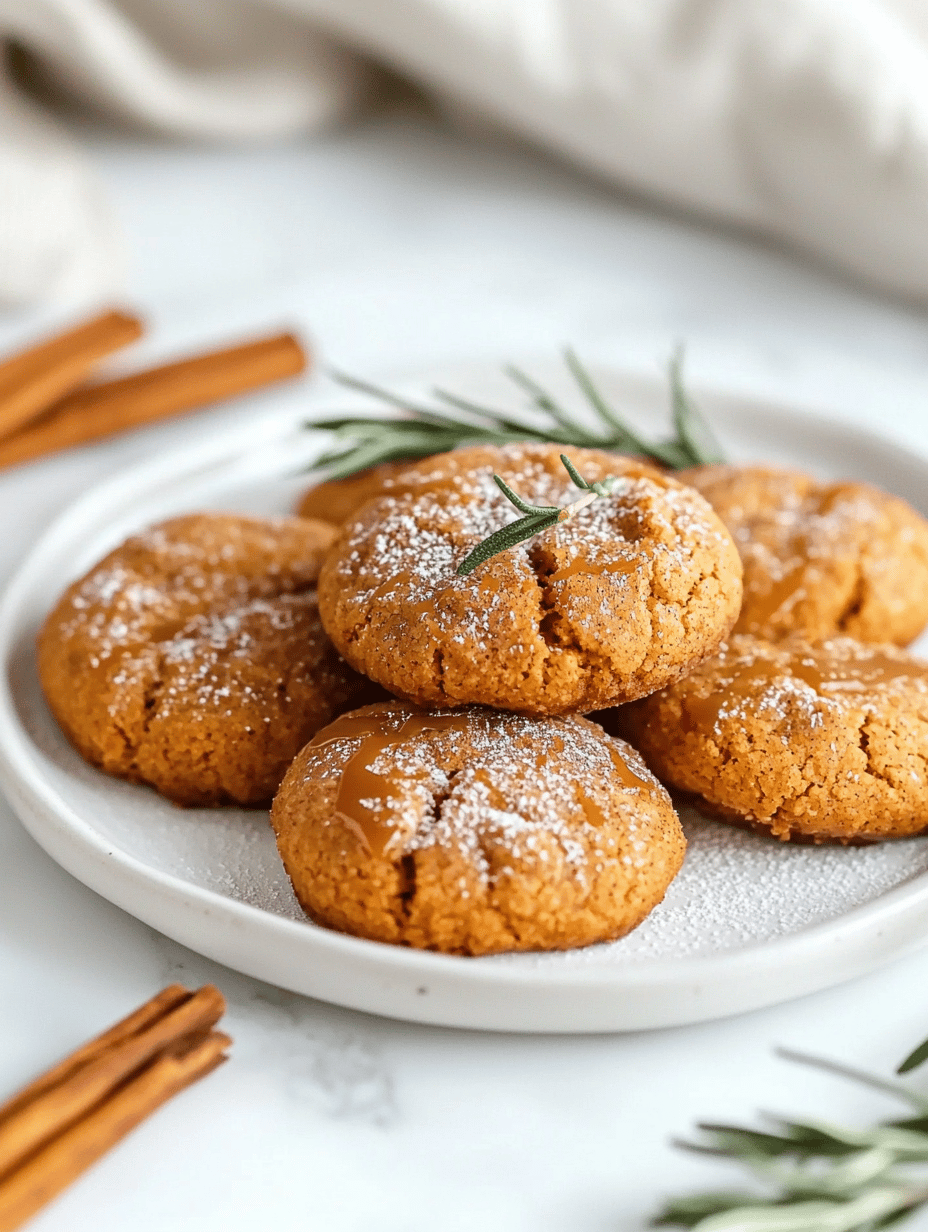
Category: Desserts

  • Spooky Good: Halloween Pumpkin Rice Krispie Treats

    Spooky Good: Halloween Pumpkin Rice Krispie Treats

    Imagine biting into a soft, gooey Halloween treat that captures the haunting essence of autumn. These pumpkin Rice Krispie treats aren’t just festive—they’re a nostalgic throwback to childhood, infused with the warm scent of cinnamon and pumpkin pie spices. Each bite delivers a crunch that’s balanced perfectly by sweet, melted marshmallow magic, making it impossible to stop at just one.

    This year, I decided to elevate the classic square by shaping them into mini pumpkins. That little twist adds a charming, spooky touch to any Halloween spread and sparks joy for both kids and adults alike. Plus, they’re incredibly easy to make, giving you more time to plan costumes and spooky decorations.

    Pumpkin Halloween Rice Krispie Treats

    These pumpkin-shaped Rice Krispie treats are made by melting marshmallows and butter, then mixing in pumpkin puree and warm spices to create a festive, seasonal snack. Once combined, the mixture is stirred with crispy rice cereal, pressed into shapes, and decorated to resemble small pumpkins, resulting in a soft, crunchy, and sweet final texture with a charming autumnal appearance.
    Prep Time 15 minutes
    Cook Time 10 minutes
    Total Time 25 minutes
    Servings: 12
    Course: Main Course
    Cuisine: American
    Calories: 150

    Ingredients
      

    • 10 cups rice cereal Cheerios or Rice Krispies
    • 4 cups marshmallows mini or standard
    • 1/2 cup unsalted butter
    • 1 cup canned pumpkin puree unsweetened
    • 1 teaspoon ground cinnamon
    • 1/2 teaspoon ground nutmeg
    • Optional decorative mini chocolate chips or candy eyes for pumpkin faces

    Equipment

    • Large saucepan
    • Rubber Spatula
    • Measuring cups and spoons
    • Silicone mold or parchment paper for shaping
    • Small knife or toothpick for decorating

    Method
     

    1. Grease a silicone mold or line a baking sheet with parchment paper to shape the treats.
    2. In a large saucepan, melt the butter over low heat, producing a gentle bubbling sound. Add the marshmallows and stir constantly until completely melted and smooth, creating a sticky, marshmallowy mixture.
    3. Stir in the pumpkin puree along with ground cinnamon and nutmeg, mixing well until the mixture is fragrant and evenly combined, with a creamy orange hue.
    4. Remove the saucepan from heat and gradually fold in the rice cereal, stirring until the cereal is well coated with the pumpkin-spiced marshmallow mixture and looks glossy.
    5. Quickly scoop the mixture into the prepared mold or onto the parchment-lined sheet, pressing down gently with a spatula or your fingers to create an even layer or shape into small mounds.
    6. While still warm, shape the mixture into small pumpkin-like rounds or press into a mold to give the treats a rounded form. Let them cool and set at room temperature for about 15 minutes.
    7. Once cooled, use a small knife or toothpick to decorate the tops of each treat with mini chocolate chips or candy eyes to resemble pumpkin faces or add charming details.
    8. Serve the pumpkin Rice Krispie treats at room temperature, enjoying their crunchy exterior and soft, sweet inside with a festive appearance.

    These pumpkin Rice Krispie treats are more than just a sweet bite—they bring a dash of seasonal spirit to your table. Their rustic, homemade charm pairs beautifully with the chilly fall air and the flickering glow of jack-o’-lanterns. Whether you’re handing them out to trick-or-treaters or sneaking a handful after carving pumpkins, they’re sure to delight.

    Embrace the chaos of Halloween baking with this simple recipe, and enjoy the warm, spiced aroma that fills your home. No matter how you celebrate, these treats add a cozy, festive touch. Here’s to many more spooky, sweet moments with loved ones around the table.

  • Spooky Goodness: Haunted Pumpkin Cheesecake Bars

    Spooky Goodness: Haunted Pumpkin Cheesecake Bars

    Halloween is the perfect time to embrace the eerie with a touch of sweet comfort. These Pumpkin Cheesecake Bars are more than just a festive dessert; they’re a nostalgic swirl of pumpkin spice and creamy richness, topped with a hint of graham cracker crumble. As you prep them, the warm aroma of cinnamon and ginger will fill the air, setting the scene for a cozy Halloween gathering.

    What makes this recipe truly special is its unassuming sophistication. Inspired by the quiet thrill of carving pumpkins, each bite offers a delicate balance of smooth cheesecake and spicy pumpkin tones. It’s a dessert that whispers tales of haunted nights and pumpkin patches, perfect for serving up spooky delight with every slice.

    Pumpkin Cheesecake Bars

    Pumpkin Cheesecake Bars are a layered dessert featuring a graham cracker crust topped with a creamy pumpkin-spiced cheesecake filling. The bars are baked until set and have a smooth, velvety texture, often garnished with a graham cracker crumble for added crunch and flavor.
    Prep Time 20 minutes
    Cook Time 40 minutes
    Total Time 1 hour
    Servings: 12
    Course: Main Course
    Cuisine: American
    Calories: 350

    Ingredients
      

    • 1 1/2 cups graham cracker crumbs about 10 full crackers crushed finely
    • 1/4 cup granulated sugar
    • 1/2 cup unsalted butter melted
    • 3 8 oz packages cream cheese softened
    • 1/2 cup granulated sugar
    • 1 cup canned pumpkin puree not pumpkin pie filling
    • 3 large eggs
    • 1 1/2 teaspoons ground cinnamon
    • 1/2 teaspoon ground ginger
    • 1/4 teaspoon ground nutmeg
    • 1/4 teaspoon ground cloves
    • 1/2 cup heavy cream optional, for a richer texture

    Equipment

    • 9×13 inch baking pan
    • Mixing bowls

    Method
     

    1. Preheat your oven to 350°F (175°C). Mix graham cracker crumbs with sugar and melted butter until the crumbs are evenly coated and hold together when pressed.
    2. Press this mixture firmly into the bottom of your baking pan, creating an even crust layer. Bake for about 10 minutes until lightly golden, then remove and set aside to cool.
    3. In a large mixing bowl, beat softened cream cheese with sugar until smooth and fluffy, about 2-3 minutes, breaking up any lumps.
    4. Add pumpkin puree, eggs, cinnamon, ginger, nutmeg, and cloves to the cream cheese mixture. Whisk until all ingredients are well incorporated and the mixture is smooth.
    5. Pour the pumpkin cheesecake filling over the cooled crust, spreading it evenly with a spatula for a flat surface.
    6. Bake the cheesecake for 35-40 minutes, or until the edges are lightly set and the center slightly jiggles when shaken. The top may turn a light golden color.
    7. Let the bars cool completely in the pan on a wire rack, then refrigerate for at least 2 hours or until chilled and firm.
    8. Once cooled and chilled, slice into squares. Optional: dust with a sprinkle of graham cracker crumbs or whipped cream before serving.

    Notes

    For best flavor, let the cheesecake chill overnight. You can also add a dollop of whipped cream or a sprinkle of cinnamon on top for extra presentation.

    This Halloween treat is a heartfelt reminder of the simple joys of seasonal baking. Every bite conjures a flickering jack-o’-lantern and that comforting scent of cinnamon and pumpkin. It’s not just a dessert; it’s part of the spooky season’s charm.

    Whether you’re hosting a haunted dinner or just craving a cozy evening at home, these Pumpkin Cheesecake Bars will add a touch of festive magic. The combination of flavors and textures makes them stand out among typical holiday sweets. It’s a small batch of spooky delights worth every bite, year after year.

  • Unexpected Pumpkin Bread Hacks for Cozy Fall Mornings

    Unexpected Pumpkin Bread Hacks for Cozy Fall Mornings

    As the leaves turn and Halloween decorations start to fade, I find myself craving something that must be both nostalgic and novel. This isn’t just any pumpkin bread; it’s a recipe that invites you to customize with unexpected spices and textures, turning an ordinary loaf into a cozy culinary adventure.

    Today I’ll share how I’ve infused my pumpkin bread with a hint of cardamom and a swirl of maple syrup, creating layers of warmth and surprise in every bite. Whether you’re an experienced baker or just starting out, this recipe offers a perfect blend of simplicity and experimentation. The aroma alone can make your kitchen feel like a fall festival.

    Let’s dive into what makes this pumpkin bread so special. Plus, I’ll share some tips to handle common baking mishaps, making your baking experience stress-free and deliciously successful.

    Spiced Pumpkin Bread with Maple Swirl

    This pumpkin bread uses a moist batter infused with warm spices and pumpkin puree, baked until golden and tender. A swirl of maple syrup adds an extra layer of sweetness and depth, resulting in a loaf with a beautiful crackled top and soft, rich interior.
    Prep Time 15 minutes
    Cook Time 1 hour
    Total Time 1 hour 15 minutes
    Servings: 8
    Course: Main Course
    Cuisine: American
    Calories: 250

    Ingredients
      

    • 1 3/4 cup all-purpose flour
    • 1 tsp baking soda
    • 1/2 tsp ground cinnamon
    • 1/4 tsp ground cardamom
    • 1/2 tsp salt
    • 1/2 cup granulated sugar
    • 1/2 cup brown sugar
    • 1/2 cup vegetable oil
    • 2 large eggs
    • 1 cup pumpkin puree preferably canned
    • 1/4 cup maple syrup
    • 1 tsp vanilla extract

    Equipment

    • Mixing bowls
    • Whisk or spatula
    • Loaf pan
    • Parchment paper
    • Cooling Rack

    Method
     

    1. Preheat your oven to 350°F (175°C). Line a loaf pan with parchment paper or lightly grease it to prevent sticking.
    2. In a large mixing bowl, whisk together the flour, baking soda, cinnamon, cardamom, and salt until well combined. This ensures an even distribution of the spices and leavening agents.
    3. In a separate bowl, beat the sugars with the oil until the mixture looks smooth and slightly airy—about 2 minutes. This helps incorporate air for a lighter crumb.
    4. Add eggs one at a time to the sugar mixture, whisking well after each addition. You’ll notice the mixture becomes shiny and thickens slightly.
    5. Fold in the pumpkin puree, vanilla extract, and maple syrup until the batter is smooth and uniform. The batter will be thick and fragrant.
    6. Gently fold the dry ingredients into the wet mixture until just combined, being careful not to overmix to keep the bread tender.
    7. Pour half of the batter into the prepared loaf pan, then drizzle the maple syrup over it. Top with the remaining batter, smoothing the surface gently.
    8. Place the loaf pan in the oven and bake for about 60 minutes, or until the top is golden and a toothpick inserted in the center comes out clean.
    9. Remove the bread from the oven and let it cool in the pan for 10 minutes before transferring it to a cooling rack. This helps set the structure and prevents cracking.
    10. Slice the pumpkin bread once it’s completely cooled to reveal the rich, moist interior with marbled maple swirls on top.
    11. Enjoy slices of this cozy pumpkin bread with butter or on their own—perfect for autumn mornings or as a sweet treat.

    This pumpkin bread isn’t just a treat for fall; it’s a celebration of cozy mornings and the magic of homemade baking. I love how the house fills with the sweet, spicy scent of cinnamon and pumpkin, turning simple ingredients into cherished memories.

    Every slice reminds me that baking is as much about the process as the result. When you have a loaf this fragrant and comforting, it becomes the centerpiece of quiet mornings or lively brunches alike. Just slice, spread your favorite butter, and enjoy the comforting sweetness that lingers on your palate.

  • Peach Crisp Reinvented: A Hidden Gem for Summer Desserts

    Peach Crisp Reinvented: A Hidden Gem for Summer Desserts

    Imagine a dessert that captures the essence of summer’s warm embrace—fragrant peaches and a crispy topping in every bite. This peach crisp isn’t just your average fruit crumble; it has a secret ingredient that makes it unexpectedly delightful. I’ve crafted this recipe to highlight a twist I discovered while experimenting in my kitchen during last year’s peach season.

    Many peach recipes focus on simplicity, but I believe the magic lies in unexpected textures and flavors intertwining beautifully. This version is perfect for lazy afternoons or breezy gatherings, where the aroma alone invites smiles. Let’s dive into a dessert that’s comfort, chaos, and nostalgia all wrapped into one bowl.

    Peach Crisp with a Secret Twist

    This peach crisp features tender, baked peaches topped with a crispy, buttery oat mixture. The dish combines the natural sweetness of ripe peaches with a crunchy topping that develops a golden-brown crust during baking, resulting in a warm, inviting dessert with contrasting textures.
    Prep Time 15 minutes
    Cook Time 40 minutes
    Total Time 55 minutes
    Servings: 6
    Course: Main Course
    Cuisine: American
    Calories: 250

    Ingredients
      

    • 4 cups peach slices pitted and sliced
    • 1/4 cup granulated sugar for peaches
    • 1/2 teaspoon ground cinnamon optional but recommended
    • 1 cup old-fashioned rolled oats
    • 1/2 cup all-purpose flour
    • 1/2 cup brown sugar
    • 1/2 cup unsalted butter cold, cut into small cubes
    • 1/4 teaspoon salt
    • 1 secrets ingredient a dash of vanilla extract adds depth to the topping

    Equipment

    • 13×9 inch baking dish
    • Mixing bowls
    • Knife
    • peeler
    • Measuring cups and spoons
    • Whisk
    • fork

    Method
     

    1. Preheat your oven to 350°F (175°C). Slice the peaches and place them in a mixing bowl. Sprinkle with granulated sugar and cinnamon, then gently toss to coat the fruit evenly.
    2. Transfer the coated peach slices into a buttered baking dish, spreading them out in an even layer.
    3. In a separate bowl, combine the oats, flour, brown sugar, and salt. Mix until evenly distributed.
    4. Add the cold, cubed butter to the dry mixture. Use a fork or your fingers to cut in the butter until the mixture resembles coarse crumbs, with some pea-sized pieces remaining.
    5. Drizzle a dash of vanilla extract over the crumb mixture and mix gently to incorporate.
    6. Spoon the crumb mixture evenly over the peaches, covering them completely.
    7. Place the dish in the preheated oven and bake for about 40 minutes, or until the topping is golden brown and bubbling around the edges.
    8. Remove from the oven and let it rest for a few minutes. The aroma should be inviting, with crispy topping and fragrant peaches.
    9. Serve warm, perhaps with a scoop of vanilla ice cream or a dollop of whipped cream if desired.
    As the oven wraps up this warm peach sensation, I find myself soaking in the lingering scent of caramelized fruit and toasted oats. This recipe is a reminder that sometimes, the simplest ingredients—peaches, a touch of sugar, and butter—can create a moment worth savoring.

    Whether it’s for a cozy family dinner or a spontaneous summer celebration, this peach crisp reminds us to enjoy the little joys. It’s a dish that sparks memories and makes new ones, all with a crispy, juicy, and irresistibly fragrant bite.

  • Spooky Delight: Halloween Monster Eyeball Cake Pops

    Spooky Delight: Halloween Monster Eyeball Cake Pops

    Every October, I find myself gravitating towards themes that blend nostalgia and a dash of chaos. This year, I decided to craft something that combines the spooky allure of Halloween with a playful twist—Monster Eyeball Cake Pops. The moment you unwrap the packaging, you’re hit with a burst of vanilla-sweet aroma, instantly transporting you to childhood candy bowls.

    What makes these cake pops special isn’t just their eerie appearance but also how surprisingly easy they are to make. With a few simple ingredients and a dash of creativity, you can turn humble cake scraps into creepy, edible art. Plus, they’re perfect for parties—they’ll have your guests squealing in delight or giggling at the sight of the googly eyes.

    Monster Eyeball Cake Pops

    Monster Eyeball Cake Pops are bite-sized treats made by shaping cake and frosting into spheres, then coating them with candy melts to create a smooth, glossy exterior. Decorated with edible googly eyes, they resemble eerie, creepy eyeballs perfect for Halloween parties, with a moist interior and a firm outer shell.
    Prep Time 30 minutes
    Cook Time 10 minutes
    Total Time 40 minutes
    Servings: 12
    Course: Main Course
    Cuisine: Halloween, Party Snacks
    Calories: 150

    Ingredients
      

    • 1 box store-bought vanilla cake mix (or homemade cake) baked and cooled
    • 1 cup buttercream frosting store-bought or homemade frosting to bind the cake crumbs
    • 12 oz candy melts white chocolate or candy coating for coating
    • 12 pieces eyeball googly candies or edible eyes for decoration
    • optional black icing or edible marker to add veins or pupils if desired

    Equipment

    • Mixing bowls
    • Cake Pans
    • Cooling Rack
    • Food Processor or Crumble Tool
    • Hand Mixer or Spoon
    • Lollipop Sticks or Skewers
    • Baking sheet
    • Microwave-safe Bowl or Double Boiler
    • Spoons or Dipping Tools
    • Small Wedges or Toothpicks

    Method
     

    1. Crumble the cooled cake into fine crumbs using your hands or a food processor until it resembles lose soil.
    2. Add the frosting gradually to the crumbs and mix thoroughly with a spoon or your hands until the mixture sticks together when pressed. It should feel moldable but not sticky.
    3. Roll the mixture into approximately 1.5-inch diameter spheres, smoothing them into uniform rounds. Place them on a parchment-lined baking sheet.
    4. Insert a lollipop stick or skewer into each cake ball, then refrigerate for about 30 minutes to firm up.
    5. Prepare the candy melts by melting in a microwave-safe bowl or double boiler until smooth and fluid, about 1-2 minutes, stirring to combine.
    6. Dip each chilled cake pop into the melted candy, turn to coat evenly, then gently tap off excess coating. Place them back on a clean parchment sheet to set.
    7. Once the coating has hardened, carefully insert the googly eye candies onto each cake pop to resemble eyeballs, pressing gently so they stay in place.
    8. If desired, use black icing or edible marker to draw veins or pupils to add extra creepy detail.
    9. Allow the decorated cake pops to sit until fully set, then they are ready to serve and enjoy as spooky treats!

    Notes

    For best results, keep the cake pops refrigerated until serving. Handle delicately to avoid damaging the coating.

    Putting together these Monster Eyeball Cake Pops offers a nostalgic yet creative outlet for this Halloween. They’re a small treat with a big impact, perfect for any spooky soirée or a playful family gathering. Watching the little ones’ faces light up at the sight of these gooey, eye-like treats is worth every effort.

    With their creepy charm and delightful flavor, these cake pops remind us that Halloween is about celebrating the weird and wonderful. So, embrace the chaos, and let your imagination run wild—sometimes the best memories are made with a little bit of sugar and a lot of fun.

  • Spooky Sweetness: Halloween Graveyard Pudding Cups

    Spooky Sweetness: Halloween Graveyard Pudding Cups

    As the leaves turn orange and the air gets a crisp edge, I find myself craving treats that evoke both nostalgia and a bit of eerie fun. The Halloween Graveyard Pudding Cups do just that—they turn a simple dessert into a spooky landscape straight out of a haunted story. Each spoonful is a mix of chocolatey darkness and cheeky creepy charm.

    This recipe is a playful way to bring everyone together for a festive moment, especially when chaos reigns in the kitchen. Kids and adults alike love digging into a mini graveyard of crumbly cookies, gummy worms, and whipped ghosts. It’s a little spooky, a lot delicious, and totally Instagram-worthy.

    Halloween Graveyard Pudding Cups

    This dessert consists of layered chocolate pudding and crushed cookies to resemble a dark, earthy landscape. Decorated with gummy worms, cookie crumbs, and whipped ghosts, it offers a playful and spooky presentation with a creamy texture and crunchy toppings. The final look mimics a haunted graveyard scene in individual cups.
    Prep Time 15 minutes
    Cook Time 10 minutes
    Total Time 25 minutes
    Servings: 4
    Course: Main Course
    Cuisine: Halloween
    Calories: 350

    Ingredients
      

    • 1 pack chocolate pudding (prepared) store-bought or homemade
    • 1 cup cookie crumbs Oreo cookies crushed finely
    • 8 gummy worms gummy worms for decorations
    • 1/2 cup whipped cream for ghosts and topping
    • 4 large marshmallows to make ghost shapes

    Equipment

    • Mixing bowls
    • Whisk
    • Measuring cups and spoons
    • Small serving cups or jars
    • Spoon or spatula
    • Plastic bag or rolling pin for crushing cookies
    • Piping bag or spoon for whipped topping

    Method
     

    1. Begin by crushing Oreo cookies into fine crumbs using a plastic bag and rolling pin or a food processor; set aside.
    2. Spoon the prepared chocolate pudding evenly into each small serving cup or jar, filling about halfway to create the ground layer.
    3. Sprinkle a generous layer of cookie crumbs over the pudding, mimicking dirt and creating a textured surface.
    4. Place gummy worms on top of the cookie crumbs, partially buried to look like they’re writhing through the dirt landscape.
    5. Use a piping bag or spoon to add small dollops of whipped cream on top of the marshmallows, shaping them into ghost figures with tiny details if desired.
    6. Break the marshmallows into smaller pieces or cut them into ghost shapes and place them atop the whipped cream to create spooky ghost décor.
    7. Once assembled, serve immediately for a fun, spooky effect or chill briefly to firm up the toppings before serving.

    Notes

    You can customize the decorations with more candies or edible eyes for extra spookiness. For best presentation, prepare just before serving to keep whipped ghosts fluffy and gummy worms fresh.
    Watching the pudding cups disappear quickly often feels like a tiny victory for chaos in the best way. The smell of rich chocolate mingling with the sweet crunch of crumbled cookies makes every bite a special Halloween memory.

    These graveyard pudding cups remind us that a little spooky can bring a lot of joy. They’re perfect for parties, after-school treats, or a quiet night of tricks and treats at home. Whatever the occasion, they turn simple ingredients into a memorable frightfully fun dessert.

  • Spiced Pumpkin Cheesecake with a Twist

    Spiced Pumpkin Cheesecake with a Twist

    As autumn paints the trees in fiery hues, I find myself craving a dessert that captures the season’s essence. This pumpkin cheesecake isn9t just your average pumpkin pie in a crust; it’s a rich, velvety experience, infused with unexpected spices like cardamom and a hint of bourbon. The creamy texture melts in your mouth, leaving behind a warm spice aroma.

    What makes this recipe different is the secret ingredient: a swirl of browned butter caramel on top, adding depth and crunch. It’s perfect for those chilly evenings when you want cozy and elegant at the same time. Each slice tells a story of fall flavors, with a sophisticated twist to impress any guest.

    Pumpkin Bourbon Cheesecake with Browned Butter Caramel Swirl

    This pumpkin cheesecake features a smooth, creamy filling infused with warm spices, including cardamom and a hint of bourbon. The tangy, velvety texture is complemented by a crunchy browned butter caramel swirl on top, creating a rich and visually appealing dessert with autumnal flavors.
    Prep Time 30 minutes
    Cook Time 1 hour 10 minutes
    Total Time 1 hour 40 minutes
    Servings: 8
    Course: Main Course
    Cuisine: American
    Calories: 520

    Ingredients
      

    • 1 1/2 cups graham cracker crumbs for crust
    • 1/4 cup granulated sugar for crust
    • 1/2 cup unsalted butter melted, for crust
    • 24 oz cream cheese softened
    • 1 cup brown sugar packed
    • 3 large eggs at room temperature
    • 1 cup canned pumpkin pureed
    • 1/4 cup bourbon adds depth
    • 2 tsp ground cinnamon spice
    • 1 tsp ground ginger spice
    • 1/2 tsp ground cardamom spice
    • 1/2 tsp ground cloves spice
    • 1/4 cup sour cream for richness
    • 1/2 cup unsalted butter for caramel
    • 1/2 cup dark brown sugar for caramel
    • 1/4 cup heavy cream for caramel

    Equipment

    • Springform Pan
    • Mixing bowls
    • Electric Mixer
    • Saucepan
    • Rubber Spatula
    • Measuring cups and spoons
    • Oven

    Method
     

    1. Preheat the oven to 350°F (175°C). Mix graham cracker crumbs and granulated sugar in a bowl, then stir in melted butter until the mixture resembles wet sand. Press this mixture firmly into the bottom of a springform pan to form an even crust. Bake for 10 minutes to set the crust, then set aside to cool.
    2. In a large mixing bowl, beat softened cream cheese and brown sugar together with an electric mixer until smooth and creamy, about 3–4 minutes. Add eggs one at a time, mixing well after each addition, until fully incorporated.
    3. Mix in canned pumpkin, bourbon, cinnamon, ginger, cardamom, and cloves until well combined. Fold in sour cream to add extra creaminess. Scrape down the sides of the bowl to ensure even mixing.
    4. Pour the pumpkin filling over the cooled crust, spreading it evenly with a spatula. Tap the pan gently on the counter to settle the filling and remove air bubbles.
    5. Bake the cheesecake in the preheated oven for 60–70 minutes, or until the edges are set and the center slightly jiggles when gently shaken. The top should be lightly golden. Turn off the oven and let the cheesecake cool inside for an hour to prevent cracking.
    6. Meanwhile, prepare the browned butter caramel: melt butter in a saucepan over medium heat, cooking until golden brown and fragrant, about 3–4 minutes. Add dark brown sugar and heavy cream, stirring constantly until the mixture bubbles and thickens slightly, about 4–5 minutes. Remove from heat and let cool slightly.
    7. Pour the caramel over the cooled cheesecake, using a spoon or spatula to create swirls on the surface. Allow the caramel to set at room temperature for about 30 minutes, or refrigerate for easier slicing.
    8. Slice the cheesecake with a sharp knife, wiping the blade clean between cuts for neat slices. Serve chilled, enjoying the creamy filling complemented by crunchy caramel topping and aromatic spices.

    Notes

    Ensure the cheesecake is fully cooled before adding the caramel swirl for clean cuts. For an extra festive touch, garnish with whipped cream and a sprinkle of cinnamon before serving.

    This cheesecake is a celebration of fall’s bounty, ready to bring comfort to the table. Its balance of sweet, spice, and creaminess makes it a versatile dessert for holidays or quiet nights in. Enjoy the delightful contrast of textures and flavors with every forkful.

    Plus, the process of making this cheesecake is almost meditative, with the comforting smell of pumpkin and warm spices filling your kitchen. It’s a reminder to slow down and savor the little joys in baking. Whatever the occasion, this pumpkin cheesecake will leave everyone asking for seconds, smiles included.

  • Hidden Twist: The Cinnamon-Caramel Apple Cake You Never Knew You Needed

    Hidden Twist: The Cinnamon-Caramel Apple Cake You Never Knew You Needed

    Many apple cake recipes stay safe with straightforward ingredients. But today, we’re shaking things up with a hint of toasted sesame in the batter, adding a nutty complexity that counterbalances the sweetness. It’s a small secret that turns an ordinary apple cake into a layered experience.

    Plus, I’reventuring into a season of apple abundance with a technique for caramelizing apple slices beforehand, intensifying their flavor. The aroma of cinnamon, caramelized apples, and toasted sesame fills the kitchen, inviting eager anticipation. You’ll soon be baking something comfy, yet provocative enough to impress the most seasoned palate.

    Ready to rethink your apple cake? Let’s dive into a recipe that’s both familiar and intriguingly different, combining textures and flavors in every bite.

    Apple Sesame Cake

    This apple sesame cake combines tender, moist layers infused with toasted sesame seeds and caramelized apple slices. The batter is enriched with toasted sesame for a nutty flavor, while the apples are pre-cooked to deepen sweetness and add a soft, caramelized texture. The finished cake has a golden crust with a moist crumb and beautifully browned apple topping.
    Prep Time 20 minutes
    Cook Time 40 minutes
    Total Time 1 hour
    Servings: 8
    Course: Main Course
    Cuisine: Fusion
    Calories: 350

    Ingredients
      

    • 2 cups all-purpose flour sifted
    • 1 cup granulated sugar
    • 1/2 cup unsalted butter melted
    • 3 large eggs at room temperature
    • 1 tsp vanilla extract
    • 1 1/2 cups toasted sesame seeds
    • 3 medium apples preferably tart variety
    • 2 tbsp brown sugar for caramelizing apples
    • 1 tbsp cinnamon

    Equipment

    • Mixing bowls
    • Wooden spoon or spatula
    • Knife
    • Cutting board
    • Baking dish or cake pan
    • Oven
    • Saucepan
    • Measuring cups and spoons

    Method
     

    1. Preheat your oven to 350°F (175°C). Grease your baking pan and set aside.
    2. Peel, core, and thinly slice the apples. Place them in a saucepan with brown sugar and cinnamon, then cook over medium heat until they become tender and caramelized, about 8-10 minutes. Stir occasionally and watch for a golden, sticky syrup coating the slices.
    3. In a large mixing bowl, whisk together the eggs, sugar, vanilla extract, and melted butter until smooth and slightly frothy.
    4. Gradually add the sifted flour and toasted sesame seeds to the wet mixture, folding gently until just combined. Be careful not to overmix to keep the batter light.
    5. Pour the batter into the prepared baking dish and spread evenly with a spatula.
    6. Arrange the caramelized apple slices on top of the batter in an appealing pattern, slightly pressing them down so they embed into the batter.
    7. Bake the cake in the oven for about 40 minutes, or until the top is golden brown and a toothpick inserted into the center comes out clean.
    8. Remove the cake from the oven and let it cool in the pan for 10 minutes, then transfer to a wire rack or serve directly from the pan to enjoy the warm, caramelized aroma.
    9. Slice the cake to reveal the tender apple slices nestled within the moist, sesame-infused crumb. The caramelized apples top the cake with a glossy finish.

    This apple cake isn’t just a dessert; it’s a story in layers, perfect for cozy fall mornings or a casual gathering. The homey smell of baked apples and toasted sesame is a silent welcome, making every slice feel like a small celebration.

    As seasons change, so do our tastes. This recipe’s balance of nostalgic apple warmth and a surprising twist might just become your new favorite. Whatever the occasion, it’s a simple joy to have this comforting cake on hand, ready to serve with a cup of tea or a splash of cream.