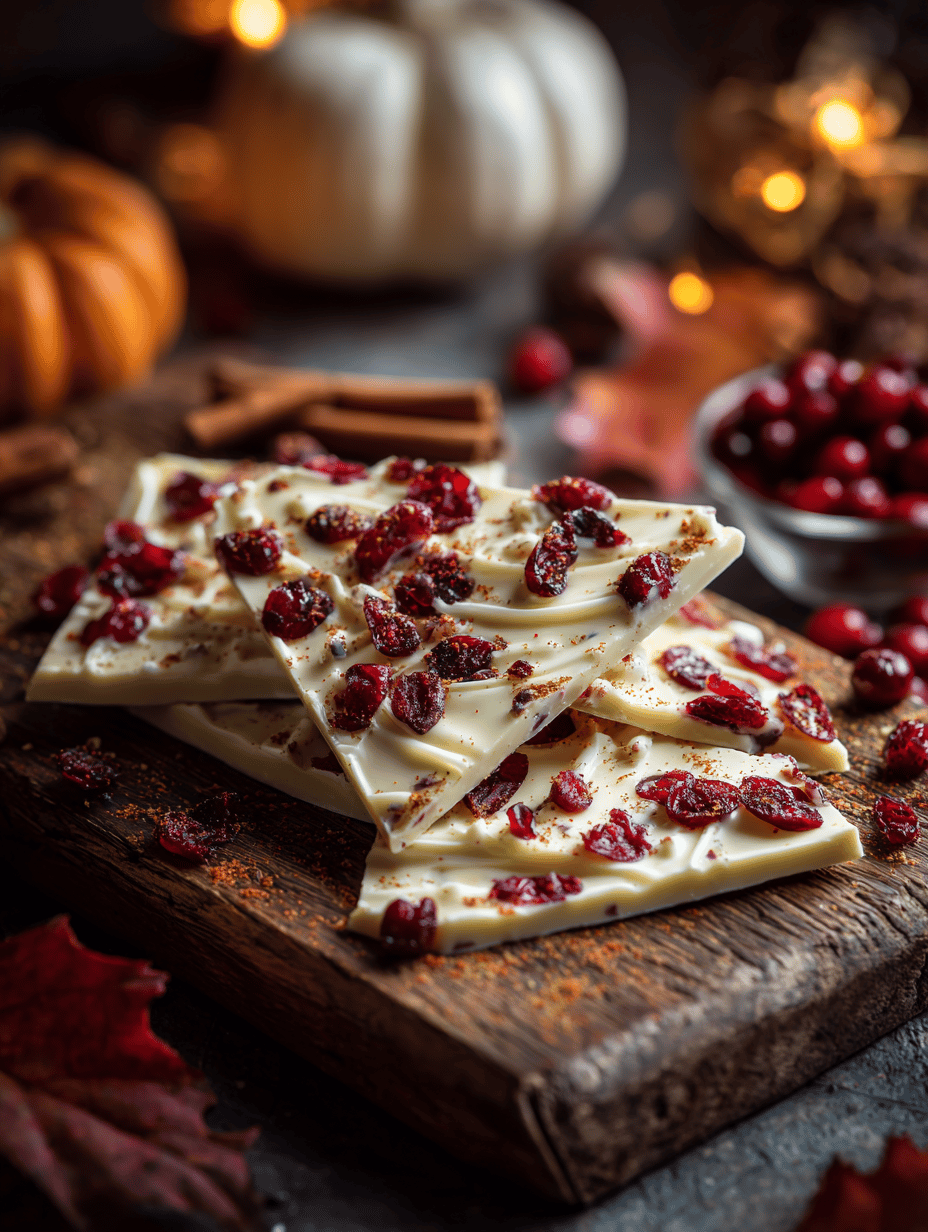
Category: Desserts

  • Monster Pretzel Bites: A Chewy, Salty, and Surprisingly Playful Snack

    Pretzel bites are not just a snack, they’re a small act of rebellion against the perfectly uniform. There’s something about shaping and boiling that transforms simple dough into a chewy, salty treat. I like to make them when I want something warm, a little messy, and utterly satisfying. They bring back memories of fairgrounds and street fairs, but with a homemade twist that feels just right.

    Why I keep returning to this recipe

    The process is oddly satisfying, from mixing to boiling, with that final golden glow. Plus, the smell of baking dough, salty and warm, is addictive. These bites are imperfectly perfect, a little rough around the edges, but always delicious. They remind me that simple ingredients, handled with care, can turn into something memorable. That’s why they’re my go-to when I need a quick, joyful bake.

    Inside the pretzel magic, ingredient by ingredient

    • Warm water: I keep it just above hand-temperature, around 38°C (100°F), for yeast activation. Skip hot water, or yeast dies.: Acts as the base for the dough, helps yeast activate.
    • Yeast: Instant or active dry, I like the quick fizz of fresh yeast. Use less if you want a denser bite.: Leavens the dough, gives it that airy, chewy crumb.
    • Flour: Bread flour is best, for chew. All-purpose works in a pinch but less chewy.: Creates the structure, the backbone of your pretzel.
    • Baking soda: The secret to that shiny, pretzel crust. It makes the water alkaline—think of it as a pretzel bath.: Gives pretzels their characteristic color and flavor.
    • Coarse sea salt: For sprinkling on top. It’s the finishing touch that makes every bite salty and crunchy.: Adds flavor and texture contrast.
    • Egg: Beaten, for that glossy, golden finish. Skip if you’re vegan—use plant-based milk or oil.: Creates a shiny, attractive crust.

    Tools of the pretzel trade

    • Large pot: For boiling the pretzel bites in baking soda water.
    • Baking sheet: To bake the pretzel bites on, lined with parchment.
    • Slotted spoon: To remove the pretzels from boiling water gently.
    • Pastry brush: To brush the pretzels with egg wash for a shiny finish.
    • Measuring cups and spoons: To measure ingredients precisely.

    Step-by-step to chewy, salty bites, with a twist

    Step 1: Mix warm water, sugar, and yeast in a bowl. Let sit until frothy, about 5 minutes.

    Step 2: Add flour and salt, knead until smooth and elastic, about 8 minutes.

    Step 3: Divide dough into small balls, about the size of a golf ball.

    Step 4: Bring water to a boil with baking soda in a large pot.

    Step 5: Shape each dough ball into a pretzel shape or just a bite-sized knot.

    Step 6: Boil each piece for 30 seconds, then remove with a slotted spoon.

    Step 7: Brush with beaten egg, sprinkle with coarse salt.

    Step 8: Bake at 220°C (430°F) for 12-15 minutes until golden and puffy.

    Cooking checkpoints to keep you on track

    • Dough should be smooth, elastic, and just a little sticky.
    • Boiling for 30 seconds gives that classic pretzel chew and shiny crust.
    • Salt sprinkle should be generous but not overwhelming.
    • Baking until golden brown means they’re cooked through and crisp on the outside.

    Common pitfalls and how to fix them

    • Dough is too sticky or crumbly.? DIDN’T knead enough? Knead for an extra minute to develop gluten.
    • Pretzels are dense or tough.? BOILING too long? 30 seconds is enough, or pretzels get too dense.
    • Pretzels taste bland.? FORGOT to salt the water? Add salt to enhance flavor.
    • Pretzels burn on top.? OVEN too hot? Keep it at 220°C (430°F) to avoid burning.

    Homemade Pretzel Bites

    Pretzel bites are small, chewy snacks with a shiny, golden crust, achieved through boiling in baking soda water before baking. Made from simple dough ingredients, they transform into salty, slightly dense treats with a satisfying bite and crunchy exterior. Their rustic appearance and warm aroma make them an irresistible snack for any gathering.
    Prep Time 15 minutes
    Cook Time 15 minutes
    Total Time 30 minutes
    Servings: 8
    Course: Main Course
    Cuisine: American
    Calories: 150

    Ingredients
      

    • 1 packet instant yeast or active dry yeast
    • 1.5 cups warm water around 38°C (100°F)
    • 1 tbsp sugar
    • 4 cups bread flour
    • 1 tsp salt
    • 2 tbsp baking soda for the boiling water
    • coarse sea salt for sprinkling
    • 1 egg beaten egg for brushing

    Equipment

    • Large pot
    • Baking sheet
    • Slotted spoon
    • Pastry brush
    • Measuring cups and spoons

    Method
     

    1. Mix the warm water, sugar, and yeast in a large bowl. Let sit until frothy and bubbly, about 5 minutes, which indicates the yeast is active.
    2. Add the bread flour and salt to the yeast mixture. Knead with your hands or a dough hook until the dough becomes smooth, elastic, and just slightly sticky, about 8 minutes. This develops gluten for that chewy texture.
    3. Divide the dough into small golf ball-sized pieces and roll each into a smooth ball. Cover and let rest for 10 minutes to relax the gluten.
    4. Preheat your oven to 220°C (430°F). Bring a large pot of water to a boil, then stir in the baking soda. This alkaline solution gives the pretzels their characteristic shiny, brown crust.
    5. Shape each dough ball into a pretzel shape or a small knot. Carefully drop each piece into the boiling baking soda water, boiling for 30 seconds to achieve that chewy, glossy exterior.
    6. Use a slotted spoon to remove the boiled pretzels and place them onto a parchment-lined baking sheet.
    7. Brush the pretzels generously with the beaten egg to give them a shiny, golden finish. Sprinkle coarse sea salt on top for that salty crunch.
    8. Bake in the preheated oven for 12-15 minutes, or until the pretzels are deep golden brown and puffy. The smell of warm dough and salty goodness will fill your kitchen.
    9. Remove from oven and let cool slightly. Serve warm, and enjoy the chewy, salty bites that are perfect for snacking or sharing!

    Notes

    For vegan options, skip the egg wash and brush with plant-based milk or oil before baking. Adjust baking time for larger or smaller bites as needed.
    These pretzel bites are a chaos of textures—chewy, crispy, and just a little bit salty. They’re perfect for spontaneous gatherings or when the craving for something warm and handheld hits hard. Feel free to toss in some shredded cheese or a dash of spice before baking for your own twist. Once out of the oven, they’re best enjoyed warm, with a cold drink and maybe a little mustard or cheese dip.

  • Blood Red Velvet Cake: A Deep Dive into Its Heart and Soul

    Blood red velvet cake isn’t just about its striking color; it’s about the story behind the hue and the moist, tender crumb. I’ve always been fascinated by how food can be both a visual and sensory experience. Baking this cake feels like creating something alive, a little bit daring with its vivid color and rich history.

    Why This Cake Calls Me Back

    Its bold color and moist crumb remind me of childhood parties. Every slice is a reminder of chaos and joy, a celebration of simple ingredients transformed into something striking. I keep coming back because it’s not just a cake; it’s an experience—vivid, nostalgic, and endlessly customizable.

    Breaking Down the Blood Red Velvet

    • All-purpose flour: The backbone of the cake, providing structure without heaviness.
    • Caster sugar: Sweet, with a clean, quick dissolve that balances the cocoa.
    • Cocoa powder: Adds depth; makes the red pop with its dark, smoky notes.
    • Buttermilk: Gives moisture and a slight tang that cuts through richness.
    • Red food coloring: Vivid, almost luminous—use good quality for the brightest hue.
    • Vegetable oil: Keeps the crumb moist and tender; a neutral fat.
    • Eggs: Bind everything together, adding richness and structure.
    • Baking soda: Leavens the batter, giving it a gentle rise and airy crumb.
    • Vinegar (white or apple cider): Reacting with baking soda, it boosts rise and enhances flavor.

    Tools of the Trade for a Perfect Blood Red Velvet Cake

    • Mixing bowls: To combine wet and dry ingredients separately.
    • Electric hand mixer: To achieve a smooth, lump-free batter.
    • Cake pan (20cm round): To give the cake its shape and structure.
    • Parchment paper: To prevent sticking and ensure easy removal.
    • Cooling rack: To cool the cake evenly and prevent sogginess.

    Crafting the Layers: From Batter to Beautiful Cake

    Step 1: Preheat your oven to 180°C (350°F). Grease and line your 20cm (8-inch) round cake pan with parchment.

    Step 2: In a large bowl, whisk together 2 ½ cups (310g) all-purpose flour, 1 ½ cups (300g) sugar, 1 teaspoon baking soda, 1 teaspoon cocoa powder, and a pinch of salt.

    Step 3: In another bowl, combine 1 cup (240ml) buttermilk, ½ cup (120ml) vegetable oil, 2 large eggs, 1 teaspoon vanilla extract, and 2 tablespoons (30ml) red food coloring. Mix until smooth.

    Cooking Checkpoints and Tips to Keep in Mind

    • The batter should be smooth and slightly thick, not runny.
    • The cake’s edges should pull away slightly from the pan after baking.
    • A skewer inserted in the center should come out clean or with just a few moist crumbs.
    • The top should be matte, not shiny, indicating proper baking.

    Common Mistakes and How to Avoid Them

    • Lumpy batter or dense crumb.? OVER-MIXING THE BATTER → Mix just until ingredients are combined to keep the cake tender.
    • Wet, sticky center.? UNDERSBAKING → Bake a few extra minutes, and check with a skewer for doneness.
    • Crumb collapsing or cracking.? NOT COOLING THE CAKE PROPERLY → Let it rest on a rack for at least an hour to set.
    • Uneven frosting or tears.? FROSTING TOO COLD → Bring frosting to room temp before applying for smooth finishing.

    Blood Red Velvet Cake

    This striking blood red velvet cake features a moist, tender crumb with a vibrant red hue that makes it visually captivating. The recipe involves mixing dry and wet ingredients separately, then folding them together before baking to achieve a soft, airy texture. Finished with a smooth frosting, it’s a bold dessert that combines rich cocoa flavor with a vivid, almost luminous appearance.
    Prep Time 20 minutes
    Cook Time 30 minutes
    Total Time 50 minutes
    Servings: 8
    Course: Main Course
    Cuisine: American
    Calories: 350

    Ingredients
      

    • 2 ½ cups all-purpose flour
    • 1 ½ cups caster sugar
    • 1 teaspoon baking soda
    • 1 teaspoon cocoa powder
    • Pinch salt
    • 1 cup buttermilk
    • ½ cup vegetable oil
    • 2 large eggs
    • 2 tablespoons red food coloring
    • 1 teaspoon vanilla extract

    Equipment

    • Mixing bowls
    • Electric hand mixer
    • Cake pan (20cm round)
    • Parchment paper
    • Cooling Rack

    Method
     

    1. Preheat your oven to 180°C (350°F). Grease your 20cm round cake pan and line the bottom with parchment paper to prevent sticking.
    2. In a large mixing bowl, whisk together the flour, sugar, baking soda, cocoa powder, and a pinch of salt until evenly combined. This creates a dry, crumbly mixture that forms the cake’s structure.
    3. In a separate bowl, combine the buttermilk, vegetable oil, eggs, vanilla extract, and red food coloring. Whisk until the mixture is smooth, vibrant, and slightly frothy, releasing a rich cocoa aroma.
    4. Pour the wet mixture into the bowl with the dry ingredients. Using an electric hand mixer, beat on medium speed for about 2-3 minutes until the batter is smooth, thick, and has no lumps. The color should be bright and uniform.
    5. Pour the batter into your prepared cake pan, smoothing the top with a spatula. Gently tap the pan on the counter to release any air bubbles and ensure even distribution.
    6. Bake in the preheated oven for 30-35 minutes. The cake is done when the edges start to pull away from the sides of the pan and a skewer inserted into the center comes out clean or with a few moist crumbs.
    7. Remove the cake from the oven and let it cool in the pan for 10 minutes. Then, transfer it to a cooling rack and allow it to cool completely, about an hour. This helps the crumb set and prevents cracking.
    8. Once cooled, carefully peel away the parchment paper and slice the cake into layers or serve as a whole. The moist crumb should be vibrant red and tender to the touch.

    Notes

    For an extra striking look, consider frosting with cream cheese frosting and decorating with red sprinkles or edible glitter.
    Once assembled, let your cake rest for at least an hour, allowing flavors to meld. A slice reveals a moist crumb with a vivid, blood-red hue that’s almost hypnotic. This cake isn’t just a dessert; it’s a conversation starter, a piece of art that’s surprisingly simple to make. Enjoy every bite, maybe with a smear of cream cheese frosting, and take pride in your creation.

  • Candy Corn Fudge: A Nostalgic Bite with a Twist

    Candy corn fudge is a strange little comfort in the universe of holiday treats. It’s a nostalgic throwback, but with a richness that makes it feel a bit more special. I love how the candy corn melts just enough to hold everything together in that chewy, sweet bite.

    Why I keep returning to this candy corn fudge

    It’s that perfect mix of childhood joy and holiday cheer. The way the candy corn melts into the creamy base is oddly satisfying. Making it always takes me back, and it’s a treat I don’t want to miss when fall winds turn cold.

    Inside the sweet, chewy world of candy corn fudge

    • Sweetened condensed milk: Rich, sweet, and creamy; the backbone that holds everything together.
    • White chocolate chips: Melts into a silky, smooth texture, adding sweetness and richness.
    • Candy corn: Vivid, colorful, and chewy; the star that gives this fudge its festive look.
    • Butter: Adds depth and helps set the fudge, making it chewy but tender.
    • Vanilla extract: A splash for depth, bringing out all those sweet, buttery notes.
    • Salt: A tiny pinch to enhance sweetness and balance flavors.
    • Optional add-ins like nuts or spices: Personal touches that can elevate your fudge.

    Tools of the trade for perfect fudge

    • Heavy-bottomed saucepan: Distributes heat evenly to prevent scorching.
    • Rubber spatula: Stirs and folds ingredients smoothly.
    • Parchment paper: Prevents sticking and makes cleanup easier.
    • Sharp knife: Cuts the fudge into neat squares.

    Step-by-step to sweet, chewy candy corn fudge

    Step 1: Line your baking pan with parchment paper, about 20×20 cm (8×8 inches).

    Step 2: In a heavy-bottomed saucepan, combine sweetened condensed milk and butter. Heat over medium, stirring constantly.

    Step 3: Once butter melts and mixture is hot (around 115°C / 240°F, soft ball stage), remove from heat.

    Step 4: Stir in white chocolate chips until smooth. Then add vanilla extract and a pinch of salt.

    Step 5: Quickly fold in candy corn, making sure they’re evenly coated and distributed.

    Step 6: Pour the mixture into the prepared pan, smoothing the top with a spatula.

    Step 7: Let it cool at room temperature for 30 minutes, then refrigerate for at least 2 hours.

    Step 8: Once firm, cut into squares. Let sit at room temperature for a few minutes before serving.

    Cooking checkpoints and tips to get it just right

    • Ensure your mixture reaches the soft ball stage (around 115°C / 240°F) for the right texture.
    • Stir constantly once you add the chocolate chips to avoid burning or clumping.
    • Watch for a glossy, smooth mixture before pouring—if it looks greasy, it might be overcooked.
    • Let the fudge cool completely before slicing to prevent crumbling.

    Common fudge pitfalls and how to fix them

    • Mixture looks greasy and separates.? If the mixture is greasy, cook it a bit longer to evaporate excess moisture.
    • Fudge is too hard after cooling.? If it’s too firm, add a splash of warm milk and stir gently.
    • Fudge becomes brittle or crumbly.? Overcooked the mixture? Reheat gently and stir in more condensed milk.
    • Fudge sticks to the pan.? Forgot to line the pan? Use foil or wax paper for easy removal.

    Candy Corn Fudge

    Candy corn fudge is a nostalgic holiday treat with a creamy, chewy texture and vibrant appearance. It combines sweetened condensed milk, white chocolate, and colorful candy corn into a rich, smooth fudge that sets to a tender bite. The result is a festive, indulgent dessert with a glossy finish and a delightful melt-in-your-mouth feel.
    Prep Time 15 minutes
    Cook Time 10 minutes
    Total Time 2 minutes
    Servings: 16
    Course: Main Course
    Cuisine: American
    Calories: 180

    Ingredients
      

    • 1 can 14 oz sweetened condensed milk rich and creamy, acts as the base
    • 1/2 cup butter adds depth and helps set the fudge
    • 1 1/2 cups white chocolate chips melts into a silky texture, sweet and rich
    • 1 teaspoon vanilla extract brings out sweetness and depth
    • a pinch salt enhances flavor
    • 1 cup candy corn vibrant and chewy, the star of the fudge

    Equipment

    • Heavy-bottomed saucepan
    • Rubber Spatula
    • Parchment paper
    • Sharp knife

    Method
     

    1. Line an 8×8 inch pan with parchment paper, leaving some overhang for easy removal.
    2. In a heavy-bottomed saucepan, combine the sweetened condensed milk and butter. Heat over medium heat, stirring constantly, until the butter melts and the mixture starts to bubble gently.
    3. Continue stirring until the mixture reaches around 115°C (soft ball stage) and is glossy and smooth, about 5-7 minutes. Remove from heat.
    4. Add the white chocolate chips to the hot mixture and stir continuously until fully melted and silky smooth.
    5. Stir in the vanilla extract and a pinch of salt, blending well into the mixture.
    6. Quickly fold in the candy corn, making sure they are evenly coated and distributed throughout the mixture.
    7. Pour the mixture into the prepared pan, smoothing the top with a spatula. The mixture will be thick and glossy.
    8. Let the fudge cool at room temperature for about 30 minutes, then refrigerate for at least 2 hours until firm.
    9. Once set, lift the fudge out of the pan using the parchment overhang and place on a cutting board.
    10. Using a sharp knife, cut the fudge into neat squares. Let sit at room temperature for a few minutes before serving.
    11. Enjoy your vibrant, chewy candy corn fudge, perfect for holiday gatherings or a festive treat!

    Notes

    Ensure your mixture reaches the soft ball stage for the ideal chewy texture. Stir constantly to prevent burning, and let the fudge cool completely before slicing for clean cuts.
    This fudge isn’t just a sweet treat; it’s a little piece of childhood wrapped in creamy, chewy goodness. It’s perfect for sharing or stashing away for moments that call for something familiar and joyful. Feel free to toss in some chopped nuts or a dash of cinnamon if you want to make it your own.

  • Pumpkin Cheesecake Bars: A Fall-Inspired Take on Creamy Comfort

    I love how pumpkin transforms from a simple vegetable to a creamy, spiced filling in these bars. It’s a recipe born from wanting something both festive and adaptable, perfect for a cozy afternoon or a casual gathering. The process is straightforward, but the result feels indulgent and just a little special.

    Why I keep coming back to this recipe

    It’s the perfect way to capture fall’s cozy essence in a portable treat. The combination of spices, pumpkin, and cream cheese is nostalgic yet fresh every time. I love how forgiving it is—small tweaks bring new flavors, but it always feels familiar and comforting.

    Breaking down the ingredients

    • Graham cracker crumbs: Gives the crust a buttery, crisp base—feel free to swap with digestive biscuits for a different crunch.
    • Cream cheese: Creates that rich, tangy layer—full-fat is best for smoothness and flavor.
    • Pumpkin puree: The star of the show—bright orange, sweet, and earthy, it’s what makes these bars fall-ready.
    • Spices (cinnamon, nutmeg, ginger): Warm, aromatic, and a little spicy—use fresh or ground, but fresh spices really pop.
    • Eggs: Bind everything together—don’t skip them, or the filling won’t set.
    • Sugar: Sweetens and balances the spices—brown sugar adds a caramel note.
    • Butter: For the crust’s richness—unsalted, melted, and mixed with crumbs.

    Tools you’ll need for pumpkin cheesecake bars

    • 9×13 inch baking pan: To hold the crust and filling, perfect for bars.
    • Food processor or plastic bag and rolling pin: Crush graham crackers into fine crumbs.
    • Electric mixer or whisk: Blend cream cheese, pumpkin, and spices smoothly.
    • Cooling rack: Cool the baked bars evenly without sogginess.
    • Rubber spatula: Scrape down sides and spread filling evenly.

    Step-by-step guide to crafting pumpkin cheesecake bars

    Step 1: Preheat your oven to 175°C (350°F).

    Step 2: Mix crushed graham crackers, sugar, and melted butter for the crust. Press into a 9×13 inch pan.

    Step 3: Bake crust for 10 minutes until golden. Cool slightly.

    Step 4: Beat softened cream cheese, sugar, and pumpkin puree until smooth.

    Step 5: Add eggs, vanilla, cinnamon, nutmeg, and ginger. Mix until combined.

    Step 6: Pour filling over crust. Bake for 45-50 minutes until edges are set but center jiggles slightly.

    Step 7: Let cool in the pan on a wire rack for an hour.

    Step 8: Chill in the fridge for at least 4 hours, preferably overnight.

    Step 9: Cut into squares. Serve chilled or at room temperature.

    Cooking checkpoints and tips to get it just right

    • The crust should be golden and firm before adding the filling.
    • The filling’s edges should be slightly puffed and set, with a gentle jiggle in the center.
    • The top may crack slightly, which is normal—don’t overbake.
    • Chill thoroughly to allow flavors to meld and texture to firm up.

    Common mistakes and how to fix them

    • Crust feels soft or soggy.? Undercooked crust? Bake a few minutes longer until golden.
    • Filling is too runny.? Center jiggling excessively? Cover with foil and bake 5-10 minutes more.
    • Top cracks during baking.? Cracks on top? Slightly lower oven temperature next time.
    • Overmixed filling feels heavy.? Bars too dense? Don’t overmix the filling.

    Pumpkin Cheesecake Bars

    These pumpkin cheesecake bars feature a buttery graham cracker crust topped with a smooth, spiced pumpkin and cream cheese filling. Baked until set with a slight jiggle in the center, they have a creamy texture and a festive flavor profile, perfect for fall gatherings or cozy afternoons. The bars are chilled to develop their full flavor and a firm, sliceable consistency.
    Prep Time 20 minutes
    Cook Time 55 minutes
    Total Time 3 minutes
    Servings: 12
    Course: Main Course
    Cuisine: American
    Calories: 350

    Ingredients
      

    • 1 1/2 cups graham cracker crumbs or digestive biscuits
    • 1/2 cup sugar
    • 1/2 cup unsalted butter melted
    • 16 oz cream cheese softened
    • 1 cup pumpkin puree bright orange, sweet, and earthy
    • 3 eggs large
    • 3/4 cup sugar brown sugar preferred
    • 1 1/2 teaspoons ground cinnamon or to taste
    • 1/2 teaspoon ground nutmeg
    • 1/2 teaspoon ground ginger
    • 1 teaspoon vanilla extract vanilla

    Equipment

    • 9×13 inch baking pan
    • Food processor or plastic bag and rolling pin
    • Electric mixer or whisk
    • Cooling Rack
    • Rubber Spatula

    Method
     

    1. Preheat your oven to 175°C (350°F) and line your 9×13 inch baking pan with parchment paper or lightly grease it.
    2. In a food processor or by using a plastic bag and rolling pin, crush the graham crackers into fine crumbs. Transfer to a bowl and mix in the sugar. Pour in the melted butter and stir until the mixture is evenly coated and resembles wet sand.
    3. Press the crumb mixture firmly into the bottom of your prepared pan, creating an even, compact crust. Bake for 10 minutes until lightly golden and fragrant. Remove from oven and let cool slightly.
    4. In a large mixing bowl, beat the softened cream cheese with an electric mixer until smooth and creamy—about 2 minutes. Add the pumpkin puree and continue to beat until well combined and smooth.
    5. Mix in the eggs one at a time, ensuring each is fully incorporated before adding the next. Then add the brown sugar, vanilla, cinnamon, nutmeg, and ginger, beating just until everything is evenly blended. The filling should be smooth and slightly fluffy.
    6. Pour the pumpkin filling over the cooled crust, spreading it out evenly with a rubber spatula. Tap the pan gently on the counter to remove any air bubbles and ensure a smooth surface.
    7. Bake the bars for 45-50 minutes, or until the edges are set and slightly puffed, while the center still jiggles gently when nudged. A toothpick inserted near the center should come out with a few moist crumbs.
    8. Once baked, remove the pan from the oven and let the bars cool on a wire rack for about an hour. The center will firm up as it cools.
    9. Transfer the pan to the fridge and chill the bars for at least 4 hours, or overnight if possible, to allow the flavors to meld and the texture to set fully.
    10. When ready to serve, cut the chilled bars into squares. Serve them chilled or at room temperature for the best flavor and texture.

    Notes

    For a more intense spice flavor, increase the amount of cinnamon and ginger. To add a finishing touch, dust with powdered sugar or drizzle caramel on top before serving.
    These bars are a quiet celebration of fall’s flavors—rich pumpkin, warm spices, and creamy texture all in one bite. They’re forgiving enough to tweak with your favorite spices or swap in your preferred crust. Once chilled, each square feels like an indulgent, portable dessert that’s perfect for sharing but hard to resist keeping to yourself.

  • Mummy Brownies: A Nostalgic Twist on a Classic Treat

    Mummy brownies are not your usual chocolate square. They’re inspired by a frantic, joyful bake session in my childhood kitchen, where everything was a little chaotic but delicious. This recipe is about embracing imperfection—cracks, uneven edges, and all—because that’s what makes them special.

    Why I Keep Coming Back to These Brownies

    They remind me of childhood chaos, of messy kitchens and loud laughter. Each batch is a little different—sometimes gooey, sometimes firm—and that unpredictability keeps it interesting. Plus, the smell of melting chocolate and baking batter is pure comfort. No matter what’s happening outside, these brownies are a small, sweet anchor.

    The Essential Ingredients & Their Secrets

    • Dark chocolate: Rich, slightly bitter, makes the brownies deeply chocolatey. Swap with milk chocolate for milder sweetness.
    • Butter: Creates that fudgy texture and shiny top. Use salted butter if you like a hint of salt.
    • Sugar: Sweetens and helps set the structure. Brown sugar adds warmth.
    • Eggs: Bind everything together. For extra fudginess, use large eggs.
    • Flour: Gives structure, keeps brownies from spreading too much. Whole wheat works in a pinch.
    • Vanilla extract: Enhances chocolate flavor with a bright note.
    • Sea salt: Sprinkle on top before baking for a salty contrast.

    Tools & Equipment for Mummy Brownies

    • 20cm (8-inch) square baking pan: To hold and bake the brownie batter evenly.
    • Parchment paper: Prevents sticking and makes lifting out the brownies easier.
    • Double boiler or microwave-safe bowl: Gently melts chocolate without burning.
    • Spatula: Mixes ingredients smoothly and spreads batter evenly.
    • Wire rack: Helps brownies cool evenly and prevents sogginess.

    The How-To of Making Mummy Brownies

    Step 1: Preheat your oven to 175°C (350°F).

    Step 2: Line a 20cm (8-inch) square baking pan with parchment paper, leaving an overhang.

    Step 3: In a double boiler or microwave, melt 200g (7oz) of dark chocolate and 100g (3.5oz) of butter until smooth.

    Step 4: Whisk in 200g (1 cup) of sugar and 3 eggs, one at a time, until shiny.

    Step 5: Fold in 1 teaspoon of vanilla extract and 100g (3/4 cup) of all-purpose flour.

    Step 6: Pour the batter into the prepared pan, smoothing the top with a spatula.

    Step 7: Bake for 20-25 minutes, until a toothpick inserted in the center comes out with moist crumbs.

    Step 8: Let the brownies cool in the pan for 15 minutes, then lift out using the parchment and cool completely on a wire rack.

    Step 9: Cut into squares and serve once fully cooled.

    Cooking Checkpoints & Tips for Mummy Brownies

    • Ensure your chocolate is fully melted for a smooth batter.
    • Don’t overbake; the center should be fudgy, not dry.
    • Use high-quality chocolate for a richer flavor.
    • Watch the edges; they should be just set, not burnt.
    • Let the brownies cool completely before slicing for clean cuts.

    Common Mistakes & How to Fix Them

    • Overbaking leading to dry brownies.? Use a timer to prevent overbaking. Moist crumbs are perfect.
    • Edges turning black before center is done.? Reduce oven temperature slightly if edges burn.
    • Chocolate not fully melted, causing streaks.? Stir melted chocolate thoroughly to avoid lumps.
    • Slicing warm brownies, causing crumbles.? Allow brownies to cool completely before slicing.

    Mummy Brownies

    Mummy brownies are rich, fudgy chocolate squares with a slightly cracked and uneven surface, inspired by a joyful, chaotic childhood bake session. Made with melted dark chocolate, butter, and eggs, they develop a glossy top and tender crumb. Their rustic appearance and gooey texture make them a comforting and nostalgic treat.
    Prep Time 15 minutes
    Cook Time 25 minutes
    Total Time 40 minutes
    Servings: 9
    Course: Main Course
    Cuisine: American
    Calories: 220

    Ingredients
      

    • 200 g dark chocolate chopped or in chunks
    • 100 g butter salted or unsalted
    • 200 g sugar granulated or brown sugar
    • 3 large eggs at room temperature
    • 1 tsp vanilla extract
    • 100 g all-purpose flour
    • Sea salt Sea salt for sprinkling on top

    Equipment

    • 20cm (8-inch) square baking pan
    • Parchment paper
    • Double boiler or microwave-safe bowl
    • Spatula
    • Wire rack

    Method
     

    1. Preheat your oven to 175°C (350°F) and line the baking pan with parchment paper, leaving an overhang on the sides for easy removal.
    2. Gently melt the dark chocolate and butter together in a double boiler or microwave, stirring until smooth and glossy, filling your kitchen with a rich chocolate aroma.
    3. Whisk in the sugar into the melted chocolate mixture until combined; it will feel thick and shiny.
    4. One at a time, beat in the eggs, mixing well after each addition until the batter becomes smooth and slightly thickens, with a silky texture.
    5. Stir in the vanilla extract for a fragrant touch, then fold in the flour gently until just combined, avoiding overmixing to keep the brownies tender.
    6. Pour the batter into the prepared pan, spreading it evenly with a spatula, and tap the pan gently on the counter to settle the batter and release air bubbles.
    7. Bake for 20-25 minutes, or until the edges are set and a toothpick inserted in the center comes out with moist crumbs—be careful not to overbake for that perfect fudginess.
    8. Remove from the oven and let the brownies cool in the pan for about 15 minutes, allowing the center to firm up slightly while maintaining that gooey interior.
    9. Using the parchment overhang, lift the brownies out of the pan and transfer them to a wire rack to cool completely—this prevents sogginess and makes slicing easier.
    10. Once cooled, cut into squares with a sharp knife, embracing the cracks and uneven edges—these imperfections give the brownies their charming, rustic look.
    11. Finish by sprinkling a pinch of sea salt on top of each brownie for a salty-sweet contrast, then serve and enjoy the rich, fudgy texture and joyful chaos of these homemade treats.

    Notes

    For extra fudginess, slightly underbake and let the brownies rest before cutting. Using high-quality chocolate enhances the flavor deeply.
    These brownies carry a bit of my childhood chaos—messy, rich, and a little nostalgic. They’re perfect for when you want something sweet but with a story behind it. Feel free to add a pinch of sea salt or a handful of walnuts for extra personality. Enjoy the imperfect, gooey slice of history that these brownies give you.

  • Spiderweb Donuts: A Tangled Twist on a Classic Sweet

    I stumbled on the idea of spiderweb donuts during a chaotic bakery shift. They feel like a small act of rebellion—messy, a little spooky, but undeniably fun. Baking these feels like threading a web of sugar and flour, each step a tiny act of patience and playfulness.

    Why These Donuts Keep Calling Me Back

    They’re a playful twist on a classic, perfect for messy, creative baking moments. The web pattern always sparks a smile, and the rich chocolate glaze makes each bite a little guilty pleasure. Baking them feels like a tiny rebellion—chaotic, charming, and utterly satisfying.

    What’s in the Web? Ingredient Insights

    • All-purpose flour: The backbone, gives structure and chew. Skip self-rising if you prefer a crisper finish.
    • Granulated sugar: Sweetens the dough, balances salt. Use honey or maple syrup for a different vibe.
    • Active dry yeast: Leavens the dough, brings a slight tang. Fresh yeast also works, just proof it first.
    • Milk: Adds moisture, keeps dough tender. Almond or soy milk can swap in here.
    • Butter: Richness and flavor. Margarine can be a quick substitute for a lighter touch.
    • Chocolate glaze: Creates the web pattern—dark, glossy, slightly bitter. Dark or milk chocolate, your call.

    Tools of the Trade for a Webby Wonder

    • Large mixing bowl: For combining and kneading the dough.
    • Rolling pin: To flatten the dough evenly.
    • Mini donut cutter: To cut out perfect donut shapes.
    • Deep frying pan or pot: To fry the donuts safely and evenly.
    • Slotted spoon: To turn and remove donuts from hot oil.
    • Cooling rack: To drain excess oil and cool the donuts.

    Step-by-step Guide to Crafting Your Spiderweb Donuts

    Step 1: Mix flour, sugar, salt, and yeast in a large bowl. Stir in warm milk and melted butter until a shaggy dough forms.

    Step 2: Knead the dough on a floured surface for about 8 minutes until smooth and elastic. Cover and let rise until doubled, about 1 hour.

    Step 3: Roll out the dough to about 1 cm thickness. Use a small round cutter to cut out donuts, then make a tiny hole in the center.

    Step 4: Heat oil in a deep pan to 180°C (350°F). Fry donuts in batches, turning occasionally, until golden and puffed, about 2-3 minutes per side.

    Step 5: Drain on paper towels. While still warm, dip in glaze and let set, creating a web-like pattern with chocolate or icing.

    Cooking Tips to Keep Your Webs Perfect

    • Dough should be soft but not sticky; add flour if it sticks excessively.
    • Oil temperature must stay steady around 180°C (350°F); too hot and donuts burn, too cool and they soak up oil.
    • Web pattern should be uneven—imperfections add charm, so don’t stress over symmetry.
    • Fry until donuts are golden and sound hollow when tapped; avoid overcooking for tender insides.

    Common Pitfalls and How to Dodge Them

    • Oil too hot or cold, leading to burnt or greasy donuts.? Keep oil at steady 180°C (350°F).
    • Under-kneaded dough, resulting in dense donuts.? Dough should be kneaded well.
    • Large or blunt cutter tearing dough.? Use a small, sharp cutter.
    • Greasy webs due to excess oil.? Let donuts drain fully.

    Spiderweb Donuts

    Spiderweb donuts are soft, fluffy fried treats with a playful web pattern on top, created by twisting chocolate glaze over freshly fried dough. Made with simple ingredients like flour, sugar, yeast, and milk, they boast a tender interior and a glossy, slightly crispy exterior. The web design adds a fun, spooky touch perfect for creative baking moments.
    Prep Time 15 minutes
    Cook Time 10 minutes
    Total Time 1 hour 25 minutes
    Servings: 8
    Course: Main Course
    Cuisine: Bakery
    Calories: 250

    Ingredients
      

    • 2 ½ cups all-purpose flour sifted
    • ¼ cup granulated sugar
    • 1 teaspoon active dry yeast proof if using fresh yeast
    • ¾ cup warm milk about 110°F (43°C), almond or soy milk works too
    • 2 tablespoons melted butter
    • ½ cup chocolate glaze dark or milk chocolate, melted

    Equipment

    • Large mixing bowl
    • Rolling pin
    • Mini donut cutter
    • Deep frying pan or pot
    • Slotted spoon
    • Cooling Rack

    Method
     

    1. Mix the flour, sugar, and yeast in a large bowl until well combined, creating a fluffy, slightly grainy mixture.
    2. Gradually pour in the warm milk and melted butter, stirring with a spoon or spatula until a shaggy dough starts to form.
    3. Knead the dough on a floured surface for about 8 minutes until it becomes smooth, elastic, and slightly tacky to the touch.
    4. Place the dough back in the bowl, cover with a damp cloth, and let rise in a warm spot for about 1 hour, or until it doubles in size.
    5. Once risen, punch down the dough gently, then roll it out on a floured surface to about 1 cm thickness.
    6. Use a small round cutter to cut out donut shapes, then punch a tiny hole in the center of each with your finger or a smaller cutter.
    7. Heat oil in a deep pan or pot to 180°C (350°F). Carefully slide in a few donuts at a time, frying until golden brown and puffed, about 2-3 minutes per side.
    8. Use a slotted spoon to remove the donuts from the oil, draining on a cooling rack or paper towels to remove excess oil.
    9. While the donuts are still warm, dip each one into the melted chocolate glaze, turning gently to coat completely.
    10. Create a web pattern by drizzling additional melted chocolate or icing over the glazed donuts in a circular, crisscross pattern, resembling a spiderweb.
    11. Allow the glaze to set for a few minutes until shiny and firm, then serve these playful, webbed donuts fresh for the best experience.
    These donuts aren’t just about the look—they taste like a sweet, slightly chewy cloud with a crisp shell. The web pattern adds a spooky charm, perfect for seasonal gatherings or just a fun bake on a lazy weekend. Don’t shy away from customizing the glaze or adding sprinkles—make it your own, tangled masterpiece.

  • A Hidden Twist on Pumpkin Whoopie Pies: The Unexpected Spice Balance

    A Hidden Twist on Pumpkin Whoopie Pies: The Unexpected Spice Balance

    Pumpkin whoopie pies carry a cozy, fall vibe, but I’ve always loved how they adapt beyond the season. There’s something about the soft, spiced cake paired with creamy filling that feels like a tiny celebration. I like to think of them as a sweet little canvas, waiting for a splash of something unexpected.

    Why I Keep Coming Back to This Recipe

    They’re forgiving, adaptable, and have that nostalgic charm — plus, the slight heat from chili makes each bite interesting. Sharing these friends-made treats sparks quick smiles, even in busy moments. They remind me that simple ingredients, combined thoughtfully, can surprise and comfort all at once.

    Breaking Down the Pumpkin & Spice

    • Canned pumpkin: Adds moistness and a gentle earthiness, like pumpkin bread in every bite. Substitute with sweet potato for a sweeter, denser flavor.
    • Brown sugar: Gives the cookies a rich, caramel-like sweetness that balances the spices. Honey or maple syrup can replace it, but adjust the moisture.
    • Cinnamon & nutmeg: Classic warm spices that evoke cozy fall days. For a punchier spice, add a pinch of allspice or clove.
    • Ancho chili powder: Unexpected but delightful; adds a smoky heat that plays against the sweetness. Swap with chipotle for a more intense smoky kick.
    • Cream cheese or mascarpone (for filling): Creates a tangy, creamy filling that cuts through the sweetness. Greek yogurt can be a lighter alternative.
    • Vanilla extract: Brightens all the flavors with a subtle floral note. Almond extract works for a different aroma.
    • Eggs: Bind everything together and give structure. Flax eggs work if you want to keep it vegan.

    Tools & Equipment You’ll Need

    • Mixing bowls: To combine wet and dry ingredients separately.
    • Electric mixer or whisk: To beat the butter and sugar until fluffy.
    • Baking sheet & parchment paper: To bake the cookies evenly without sticking.
    • Ice cream scoop or spoon: To portion the cookie dough uniformly.
    • Cooling rack: To cool cookies quickly and evenly.
    • Piping bag or spatula: To spread or pipe the filling neatly.

    Steps to Pumpkin Pie Bliss: From Mixing to Cooling

    Step 1: Preheat your oven to 180°C (350°F).

    Step 2: Line a baking sheet with parchment paper, ready for the cookies.

    Step 3: In a bowl, whisk together the flour, baking soda, cinnamon, and a pinch of nutmeg.

    Step 4: In a separate large bowl, beat the softened butter with brown sugar until fluffy, about 3 minutes.

    Step 5: Add the eggs one at a time, then stir in the pumpkin puree and vanilla extract.

    Step 6: Gradually mix in the dry ingredients until just combined; the dough should be moist but scoopable.

    Step 7: Drop spoonfuls onto the prepared sheet, spacing them about 5 cm apart.

    Step 8: Bake for 12-14 minutes, until they are just set around the edges but still soft in the center.

    Step 9: Let the cookies cool for 10 minutes on the sheet, then transfer to a wire rack.

    Cooking Checkpoints & Tips for Success

    • Cookies should be lightly golden at the edges but still soft in the middle.
    • The filling should be smooth, thick but spreadable, with a hint of warmth from the chili.
    • If the cookies crack when you lift them, they’re baked just right.
    • Ensure the filling is chilled before piping to prevent melting and mess.

    Common Mistakes & How to Fix Them

    • Over-mixing the batter.? Over-mixing the batter makes cookies dense. Fix: Mix just until ingredients are combined.
    • Skipping chilling the dough.? Cookies spread too much. Fix: Chill dough for 15 minutes before baking.
    • Adding too much liquid to the filling.? Filling is runny. Fix: Chill the filling for 10-15 minutes before piping.
    • Removing cookies too early from the sheet.? Cookies crack when cooling. Fix: Let cookies cool on the baking sheet for 10 minutes, then transfer.

    Spiced Pumpkin Whoopie Pies with Chili Cream Filling

    These pumpkin whoopie pies feature soft, spiced cakes made with pumpkin puree, cinnamon, nutmeg, and a touch of smoky chili powder. Paired with a tangy cream cheese filling, they have a tender, moist texture and a cozy, flavorful punch that makes each bite both comforting and unexpectedly exciting.
    Prep Time 20 minutes
    Cook Time 14 minutes
    Total Time 34 minutes
    Servings: 12
    Course: Main Course
    Cuisine: American
    Calories: 150

    Ingredients
      

    • 1 1/2 cups all-purpose flour
    • 1 teaspoon baking soda
    • 1 teaspoon cinnamon
    • 1/2 teaspoon nutmeg
    • 1/4 teaspoon ancho chili powder or substitute chipotle
    • 1/2 cup unsalted butter softened
    • 1/2 cup brown sugar
    • 1 large egg
    • 1/2 cup canned pumpkin or sweet potato puree
    • 1 teaspoon vanilla extract
    • 4 oz cream cheese softened
    • 1/4 cup powdered sugar
    • 1/2 teaspoon vanilla extract for filling
    • 1/4 teaspoon chili powder for filling

    Equipment

    • Mixing bowls
    • Electric mixer or whisk
    • Baking sheet & parchment paper
    • Ice cream scoop or spoon
    • Cooling Rack
    • Piping bag or spatula

    Method
     

    1. Preheat your oven to 180°C (350°F) and line a baking sheet with parchment paper.
    2. In a small bowl, whisk together the flour, baking soda, cinnamon, nutmeg, and chili powder to evenly combine.
    3. In a large bowl, beat the softened butter and brown sugar together with an electric mixer until light and fluffy, about 3 minutes. The mixture should look creamy and slightly paler in color.
    4. Add the egg to the butter mixture and beat until well incorporated. Then stir in the pumpkin puree and vanilla extract until the mixture is smooth.
    5. Gradually add the dry ingredients to the wet mixture, mixing on low speed just until combined. The dough will be moist and slightly sticky but scoopable.
    6. Use an ice cream scoop or spoon to drop dollops of dough onto the prepared baking sheet, spacing them about 5 cm apart. Slightly flatten each mound with the back of the spoon.
    7. Bake the cookies for 12-14 minutes, or until the edges are just golden and the centers look slightly soft but set. The cookies will spread and develop a gentle crackle on top.
    8. Remove the baking sheet from the oven and let the cookies cool on it for about 10 minutes, allowing them to firm up slightly.
    9. Transfer the cookies to a wire rack to cool completely before assembling. Meanwhile, prepare the filling by beating the softened cream cheese, powdered sugar, vanilla extract, and chili powder together until smooth and fluffy.
    10. Once cooled, pipe or spread a generous dollop of the chili cream filling onto the flat side of one cookie, then top with another cookie to form a sandwich.
    11. Repeat with remaining cookies and filling. Chill the assembled whoopie pies for at least 30 minutes to let the flavors meld and the filling set before serving.

    Notes

    For extra flavor, sprinkle a pinch of chili powder on the filling before assembling. These treats are best enjoyed within a few days of baking. Chilling the assembled pies helps the flavors develop and the filling to firm up.
    These pumpkin whoopie pies are not just a treat but a little nostalgic escape, especially with that unexpected dash of ancho chili powder in the filling. They’re perfect for sharing, even if it’s just with yourself on a quiet afternoon. Enjoy them warm or at room temperature, and don’t shy away from customizing the filling with your favorite spices or a splash of bourbon.

  • Halloween Trifle: A Spooky Layered Delight with a Twist

    Halloween is the one time I let my dessert go wild. This trifle is my way of embracing chaos—layers of color and flavor that look as spooky as they taste. It’s an easy build, but each layer should feel deliberate, almost like a mini art project in the kitchen.

    Why I Keep Coming Back to This Trick

    The joy of layering and the surprise of each bite keeps me engaged. It’s a flexible dessert that invites creativity. Plus, it’s a reminder that even simple ingredients can turn into something festive and memorable.

    Hauntingly Good Ingredients, Simplified

    • Pumpkin puree: Bright orange, smooth, and earthy—use canned or roasted pumpkin. Swap for sweet potato puree for a sweeter, denser flavor.
    • Mixed berries: Juicy and tart, they add vibrant purple hues. Frozen berries work in a pinch—just thaw and drain.
    • Whipped cream: Light, airy, and slightly sweet—make your own or buy ready-made. Use coconut cream for a dairy-free version.
    • Spiced cake or cookies: Crunchy and flavorful, they anchor the layers. Ginger snaps or speculoos cookies are perfect swaps.
    • Edible glitter or colored sugar: Adds a spooky shimmer—use sparingly for a magical effect.

    Tools of the Spooky Trade

    • Large glass trifle bowl: Show off your layers and keep everything visible.
    • Whisk: Beat the cream to soft peaks without overdoing it.
    • Sharp knife: Slice fruits and cake cleanly.
    • Mixing spoon: Layer ingredients smoothly and evenly.

    Crafting the Perfect Halloween Trifle: Step-by-Step

    Step 1: Gather your ingredients and tools first. You’ll need a large glass trifle bowl, a whisk, a sharp knife, and a mixing spoon.

    Step 2: Start by preparing the spooky layers—think bright orange pumpkin, deep purple berries, and ghostly whipped cream.

    Step 3: Layer your ingredients in the bowl, starting with the cake or cookie base, then alternating with fruit and cream. Chill for at least 2 hours before serving.

    Key Moments to Watch While Making Your Trifle

    • Color should be vivid and bright, especially the fruit layers—no dull or brownish hues.
    • The cream should hold soft peaks but not be stiff—over-whipping can turn it grainy.
    • Layers should be distinct and visible, with no mix of liquids and solids—think visually appealing and tidy.

    Troubleshooting Your Spooky Creation

    • Over-whipped cream? If the cream turns grainy, stop whipping immediately.
    • Lackluster layers? Dull colors? Add a splash of brightly colored fruit juice or edible glitter.
    • Layer mixing? Layers merge together? Chill longer between layers.
    • Soggy layers? If fruit is too watery, drain excess juice before layering.

    Halloween Spooky Trifle

    This Halloween-themed trifle layers vibrant pumpkin puree, juicy berries, crunchy spiced cookies, and airy whipped cream in a clear glass bowl, creating a visually striking and festive dessert. The assembly involves careful layering to ensure distinct, colorful strata that delight the senses and evoke a spooky atmosphere. The final product is a creamy, crunchy, and colorful treat with a playful, artful appearance.
    Prep Time 20 minutes
    Cook Time 10 minutes
    Total Time 2 hours 30 minutes
    Servings: 8
    Course: Main Course
    Cuisine: Festive
    Calories: 250

    Ingredients
      

    • 1 cup pumpkin puree canned or roasted
    • 1 cup mixed berries thawed if frozen
    • 1 cup whipped cream soft peaks, homemade or store-bought
    • 1 cup spiced cake or cookies ginger snaps or speculoos
    • 1 teaspoon edible glitter or colored sugar for shimmer

    Equipment

    • Large glass trifle bowl
    • Whisk
    • Sharp knife
    • Mixing spoon

    Method
     

    1. Gather your ingredients and tools: a large glass trifle bowl, a whisk, a sharp knife, and a mixing spoon.
    2. Slice the spiced cookies or cake into small, bite-sized pieces, creating a crunchy base for your layers.
    3. Pour a layer of pumpkin puree into the bottom of the trifle bowl, spreading it evenly with a spoon until the surface looks smooth and bright orange.
    4. Add a handful of mixed berries over the pumpkin layer, distributing them evenly for a burst of color and tart flavor.
    5. Spoon a layer of whipped cream over the berries, smoothing it gently to create a soft, white contrast.
    6. Place a layer of spiced cookies or cake pieces over the whipped cream, pressing them slightly into the cream to nestle them in place.
    7. Repeat the layering process—pumpkin, berries, whipped cream, and cookies—until the bowl is filled, ending with a final layer of whipped cream.
    8. Sprinkle a pinch of edible glitter or colored sugar on top for a spooky shimmer, then chill the trifle in the fridge for at least 2 hours to allow flavors to meld.
    9. Once chilled, serve the trifle with a long spoon, revealing the colorful layers and enjoying the festive, crunchy, and creamy textures.
    This Halloween trifle isn’t just a dessert; it’s a centerpiece that sparks conversation. The vibrant colors and playful layers make it feel like a celebration of all things spooky and sweet. Feel free to swap in your favorite seasonal fruits or tweak the cream for extra richness. It’s messy, joyful, and exactly what a holiday like this needs.

  • Unconventional Halloween Cake Pops: A Spooky Spin with a Surprise Center

    These Halloween cake pops started as a way to make spooky treats more playful and less fussy. The surprise filling adds a fun, chaotic element that keeps everyone guessing. I love how each batch feels like a tiny, edible mystery—crunch, goo, and all.
    Plus, they’re surprisingly forgiving for a holiday that loves to throw decorating chaos at you. The process is messy but rewarding, especially when you see the faces of friends or kids discovering that delicious secret inside.

    Why I Keep Making These Year After Year

    They’re a perfect mix of chaos and creativity, and every batch feels like a small, edible story. The surprise fillings spark joy and surprise, making each Halloween memorable. Plus, they’re surprisingly forgiving—messy, yes, but deeply satisfying. It’s a tradition that keeps the spirit of playful baking alive, especially when the kids or friends get involved.

    Inside the Candy Box: Key Ingredients and Tips

    • Chocolate melts: I use high-quality dark or milk chocolate for a glossy finish; cut with a teaspoon of coconut oil to keep it smooth. Swap for white chocolate if you want a lighter look.
    • Cake base: Use day-old cake crumbs mixed with frosting—keeps the texture dense enough to hold surprises. Any leftover sponge is fine, just crumble well.
    • Filling options: Caramel, fruit preserves, or even peanut butter—pick your flavor and heat it slightly if too thick. Oozing and smoky, these fillings make each bite special.
    • Decorative sprinkles: Choose spooky shapes or metallics for that extra Halloween shimmer. Keep a mix handy for quick decoration.
    • Cake pop sticks: Wooden or plastic, sturdy enough to hold your creation steady. I like the shorter ones for smaller hands or more controlled dipping.
    • Food coloring: Use gel colors for vibrant, mess-free hues. Just a few drops can turn your pops into mini Halloween art.
    • Edible glitter or dust: For that shimmer that catches the light—applies best after the coating sets, adding a final magical touch.

    Tools That Make the Magic Happen

    • Microwave or double boiler: For melting the chocolate smoothly without scorching.
    • Cake pop sticks: To hold the balls steady while decorating and drying.
    • Styrofoam block or cake pop holder: To keep the dipped pops upright and stable as they set.
    • Small spoon or piping bag: To add fillings neatly into the cake balls.
    • Sharp knife or toothpick: To create a small hole for inserting the surprise filling.

    Crafting the Perfect Halloween Cake Pop: Step-by-Step

    Step 1: Start by melting your chocolate and coating the cake balls to create a smooth, even shell. Chill until set, about 30 minutes.

    Step 2: Insert a surprise element—like a caramel or fruit jam—into each cake ball before coating, ensuring a gooey center.

    Step 3: Dip each chilled ball into the melted chocolate, swirling off excess to achieve a sleek finish.

    Step 4: Decorate with spooky sprinkles, edible glitter, or even tiny candy eyes for that perfect Halloween touch.

    Step 5: Let the cake pops rest in the fridge for at least 15 minutes before serving to set the coating and filling.

    Key Tips and Tricks for Halloween Cake Pops

    • Ensure the cake balls are well chilled before dipping—warm hands can melt the coating.
    • Watch the chocolate temperature—overheated chocolate can crack or become stringy.
    • Test your filling amount—too much can cause drips; too little, a dry center.
    • Use a styrofoam block to stick the cake pops in while drying for a neat finish.

    Common Pitfalls and How to Fix Them

    • Chocolate overheated or dried out.? MELTED CHOCOLATE SEIZES OR HARDENS—Add a bit of vegetable oil and gently reheat to restore smoothness.
    • Cake mixture too warm or overworked.? CAKE BALLS FALL APART—Ensure they are chilled enough and not overmixed.
    • Too much filling or overly liquid consistency.? Filling leaks or slides out—Make sure the hole is just the right size and the filling isn’t too runny.
    • Slow dipping or thick coating.? Cake pops crack when dipped—Dip quickly and smoothly, and avoid overworking the coating.

    Halloween Surprise Cake Pops

    These playful Halloween cake pops feature a crunchy chocolate shell with a gooey surprise filling inside, creating a fun, chaotic treat perfect for spooky celebrations. The process involves shaping cake crumbs with frosting, inserting flavorful fillings, and coating in glossy melted chocolate, resulting in bite-sized, edible mysteries that delight both kids and adults alike.
    Prep Time 30 minutes
    Cook Time 30 minutes
    Total Time 1 hour
    Servings: 12
    Course: Main Course
    Cuisine: Halloween
    Calories: 150

    Ingredients
      

    • 12 pieces cake balls prepared from crumbled cake mixed with frosting
    • 200 g dark or milk chocolate melts high-quality, for coating
    • 1 tsp coconut oil to thin chocolate melts
    • 12 tsp caramel or fruit preserves for surprise filling
    • Spooky sprinkles, edible glitter decorative toppings for decoration
    • 12 sticks cake pop sticks sturdy enough to hold the pops

    Equipment

    • Microwave or double boiler
    • Cake pop sticks
    • Styrofoam block or cake pop holder
    • Small spoon or piping bag
    • Sharp knife or toothpick

    Method
     

    1. Start by melting your chocolate melts in a microwave or double boiler until smooth and glossy, then stir in a teaspoon of coconut oil to keep it fluid.
    2. Using a small spoon or piping bag, carefully fill a piping bag with caramel or fruit preserves, then pipe a small amount into the center of each cake ball, creating a tiny well for the surprise filling.
    3. Insert a cake pop stick into each cake ball, ensuring it goes through the filling, then gently mold the cake balls into smooth spheres, sealing the filling inside.
    4. Place the filled cake balls on a tray and chill in the refrigerator for about 30 minutes until firm and cold.
    5. Once chilled, dip each cake ball into the melted chocolate, swirling gently to cover completely and remove excess coating.
    6. Decorate the coated cake pops with spooky sprinkles or edible glitter for a festive Halloween look, pressing toppings gently onto the surface.
    7. Place the decorated cake pops upright in a styrofoam block or cake pop holder and chill in the refrigerator for at least 15 minutes to set the coating and filling.
    8. Once set, carefully remove the cake pops from the holder and serve on a spooky platter, ready to delight everyone with their surprise-filled centers.

    Notes

    Ensure the cake balls are well chilled before dipping to prevent cracking. Use a gentle swirling motion when coating to achieve a smooth finish. Feel free to customize fillings and decorations for a personalized spooky touch.
    These cake pops aren’t just a treat; they’re a storytelling moment at your Halloween table. The hidden fillings transform each bite into a little adventure, making them a hit whether you’re handing them out or keeping them close. Plus, the messy, fun process makes for a great kitchen chaos to embrace with friends or kids. Have fun customizing the colors and fillings, and don’t be shy to get a little spooky with your decorations.

  • Spiderweb Cheesecake: A Rich, Intricate Dessert with a Touch of the Unexpected

    Spiderweb Cheesecake: A Rich, Intricate Dessert with a Touch of the Unexpected

    The idea of a spiderweb cheesecake might seem a bit whimsical, but it’s really a story of patience and detail. I fell for it during a holiday baking spree, drawn by the intricate design and the promise of creamy richness beneath. It’s not just dessert; it’s a conversation starter, a piece of edible art that feels special without needing fancy ingredients.

    Why I Keep Returning to This Cheesecake

    Its blend of precision and creativity keeps me hooked. Each time I make it, I find new ways to tweak the web design or filling spices. It’s a reminder that beauty and flavor can coexist in the kitchen, demanding patience and pride with every layer. Plus, the compliments when I serve it are worth every minute of effort.

    Deconstructing the Spiderweb Cheesecake

    • Graham crackers: Provide a crunchy, buttery base. Sub with digestive biscuits if unavailable.
    • Butter: Bind the crust together with richness and flavor. Use margarine for a dairy-free version.
    • Cream cheese: The creamy core, smooth and tangy. Full-fat gives the best texture.
    • Sugar: Sweetens the filling and balances acidity. Honey can replace part of it for a floral note.
    • Eggs: Help set the filling. Use flax eggs for a vegan take.
    • Sour cream: Creates the web’s decorative topping with a tangy zing. Yogurt works in a pinch.
    • Powdered sugar: Sweetens and thickens the topping. Adjust to taste.

    Tools for Your Web of Cheesecake Creation

    • Springform pan: Gives you a clean edge and easy removal for presentation.
    • Mixing bowls: Combine ingredients smoothly and efficiently.
    • Electric mixer or whisk: Beat the cream cheese and eggs to a silky texture.
    • Toothpick or skewer: Create the web pattern on top.
    • Spatula: Spread the topping evenly and handle delicate layers.

    Steps to Craft Your Spiderweb Cheesecake

    Step 1: Preheat your oven to 160°C (320°F).

    Step 2: Mix crushed graham crackers with melted butter and press into a 20cm (8-inch) springform pan, creating a thin, even crust.

    Step 3: Beat softened cream cheese with sugar and vanilla until smooth, then add eggs one at a time, mixing just until incorporated.

    Step 4: Pour the filling over the crust and bake for about 50-60 minutes until the edges are set but the center still jiggles slightly.

    Step 5: While baking, prepare the spiderweb topping: mix sour cream with powdered sugar and a splash of vanilla.

    Step 6: Once the cheesecake is out of the oven, let it cool in the pan for 30 minutes. Then refrigerate for at least 4 hours, ideally overnight.

    Step 7: Before serving, spread the sour cream mixture on top and use a toothpick to create a web pattern, starting from the center outward.

    Key Checks to Keep Your Spiderweb Cheesecake Perfect

    • Ensure the crust is pressed firmly and evenly to prevent cracks.
    • Bake until edges are lightly golden and the center jiggles just slightly, avoiding overbaking.
    • Create the web pattern when the topping is slightly set but still flexible to prevent smudging.
    • Refrigerate thoroughly to help the web firm up and set the design for clean slicing.

    Common Mistakes and How to Fix Them

    • Overmixing the filling can cause cracks.? CRACKED TOP? — Bake at a slightly lower temperature and avoid overmixing the filling.
    • Creating the web too early causes smudging.? WEB RUNNING? — Let the topping set for a few minutes before drawing the web.
    • Not refrigerating long enough or oven temperature inaccuracies.? CHEESECAKE TOO SOFT? — Chill longer or check oven temp with an oven thermometer.
    • Over-pressing the crust or using too much butter.? CRUSTS TOO HARD? — Use slightly less butter or press more gently.

    Spiderweb Cheesecake

    This stunning spiderweb cheesecake combines a crunchy graham cracker crust with a creamy, tangy filling, topped with a decorative web pattern made from sour cream. The intricate design and smooth texture make it a true showstopper, perfect for special occasions or holiday celebrations. Its rich flavor and eye-catching appearance make every slice a delightful treat.
    Prep Time 30 minutes
    Cook Time 1 hour
    Total Time 6 hours 30 minutes
    Servings: 8
    Course: Main Course
    Cuisine: American
    Calories: 450

    Ingredients
      

    • 1 1/2 cups graham cracker crumbs or digestive biscuits
    • 1/2 cup melted butter or margarine
    • 16 oz cream cheese softened
    • 1 cup sugar
    • 1 teaspoon vanilla extract
    • 3 eggs large
    • 1 cup sour cream
    • 1/2 cup powdered sugar

    Equipment

    • Springform Pan
    • Mixing bowls
    • Electric mixer or whisk
    • Toothpick or skewer
    • Spatula

    Method
     

    1. Preheat your oven to 160°C (320°F). Mix graham cracker crumbs with melted butter until evenly coated, then press this mixture firmly into the bottom of a 20cm (8-inch) springform pan to form a smooth crust. Bake for 10 minutes, then set aside to cool.
    2. In a large mixing bowl, beat softened cream cheese with sugar and vanilla until smooth and creamy. This creates a silky filling base with a slight tang.
    3. Add eggs one at a time to the cream cheese mixture, beating just until each is incorporated. The mixture should be thick and smooth, with no streaks.
    4. Pour the filling over the cooled crust, smoothing the top with a spatula. Bake for 50-60 minutes until the edges are lightly golden and the center jiggles slightly when moved.
    5. While the cheesecake bakes, mix sour cream with powdered sugar and a splash of vanilla until well combined. This will be used for the web decoration.
    6. Once baked, turn off the oven and let the cheesecake cool in the pan for about 30 minutes, then transfer it to the refrigerator to chill for at least 4 hours or overnight. This helps it set and develop a smooth texture.
    7. Spread the sour cream mixture evenly over the chilled cheesecake, creating a smooth top surface. Use a spatula to get a clean, flat finish.
    8. Using a toothpick or skewer, starting from the center, draw lines outward to create a web pattern. Repeat from the center to the edges, forming concentric circles for the web design.
    9. Finish by gently dragging the toothpick from the center outward along the lines to enhance the web effect. The pattern should look delicate and symmetrical, adding an artistic touch to your cheesecake.
    10. Slice the cheesecake carefully with a sharp knife, wiping it clean between cuts for neat slices. Serve chilled to enjoy the creamy texture and impressive design.

    Notes

    Ensure the web pattern is drawn when the topping is slightly set but still flexible to prevent smudging. Refrigerate thoroughly to help the web design firm up for clean slices.
    This cheesecake is a quiet marvel, with its delicate web pattern hiding a rich, creamy core. It’s a bit of a project, but the visual payoff makes it worth every step. Feel free to personalize the web design or tweak the filling to match your taste. Just remember, patience and gentle handling keep the texture silky and inviting. Enjoy every bite with a cup of strong coffee or a drizzle of berry compote.