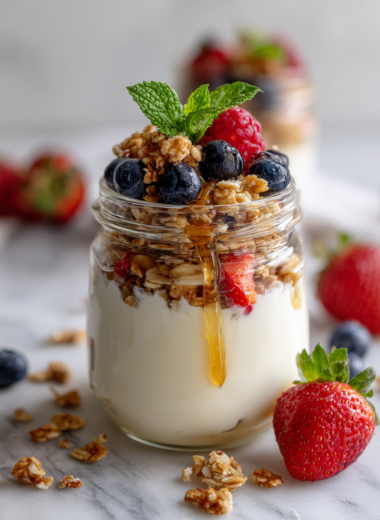
Category: Desserts

  • Spooky Cupcakes: A Playful Dive into Ghoulish Goodness

    Spooky Cupcakes: A Playful Dive into Ghoulish Goodness

    There’s a certain thrill in turning a simple cupcake into a tiny, edible horror show. These spooky cupcakes let you indulge in some creative chaos—think creepy faces, dripping eyes, and eerie colors. It’s a fun way to bring a little mischief to your baking table, especially when you’re feeling playful.
    They’re not just for Halloween either—anytime you want to surprise someone with a touch of the macabre, these fit the bill. The best part? They’re forgiving, a little messy, and packed with flavor. Perfect for when you want to bake with a side of mischief.

    Why I Keep Coming Back to These Spooky Cupcakes

    They’re unpredictable—each batch turns out uniquely creepy and charming. Plus, I love the chaos of decorating; it’s a messy, joyful process that sparks creativity every time. These cupcakes remind me that imperfect is often more fun and memorable than perfect. They’re a guaranteed hit at parties and bring a little mischief to otherwise ordinary days.

    Breaking Down the Spooky Ingredients

    • Dark cocoa powder: I love the deep, smoky flavor that sets the spooky tone, but you can swap in Dutch-processed cocoa for a richer hue.: Gives the cupcakes their rich, dark color and intense chocolate flavor.
    • Cream cheese: It’s tangy and creamy, perfect for frosting that’s not too sweet, but you could try mascarpone for a silkier finish.: Forms the base of the frosting, offering a tangy contrast to the sweet cupcake.
    • Lemon zest: Brightens everything up with a zingy note, but a splash of orange zest works if you prefer a sweeter citrus aroma.: Adds a fresh, citrusy punch that cuts through the richness.
    • Black food coloring: Use sparingly—just a few drops—to achieve that ghoulish black hue, or mix with dark purple for a more muted spook.: Colorizes the frosting and decorations, making them pop with eerie intensity.
    • Decorative eyes: Edible googly eyes are fun, but gummy candies or sliced almonds can work if you’re out.: Add creepy, unsettling details to your cupcakes.

    Tools & Equipment for Spooky Cupcakes

    • Muffin tin & paper liners: Shapes your cupcakes and keeps them from sticking.
    • Mixing bowls: Combine ingredients smoothly and efficiently.
    • Electric mixer or whisk: Get the batter fluffy and well-blended.
    • Piping bag and tips: Create spooky frosting designs and shapes.
    • Cooling rack: Allow cupcakes to cool evenly and prevent sogginess.

    Step-by-Step to Spooky Cupcakes

    Step 1: Preheat your oven to 175°C (350°F).

    Step 2: Line a muffin tin with paper liners—think tiny haunted houses.

    Step 3: Mix your dry ingredients: flour, cocoa powder, baking soda, a pinch of salt.

    Step 4: In a separate bowl, beat together eggs, sugar, oil, and vanilla until smooth.

    Step 5: Gradually add the dry ingredients to the wet, mixing just until combined.

    Step 6: Scoop the batter into the liners, filling each about two-thirds full.

    Step 7: Bake for 18-20 minutes, until a toothpick inserted comes out clean.

    Step 8: Let cool in the tin for 5 minutes, then transfer to a wire rack.

    Step 9: Prepare your spooky frosting: rich cream cheese with a hint of lemon zest.

    Step 10: Frost the cupcakes once completely cooled, using a piping bag for fun shapes.

    Step 11: Decorate with edible eyes, sprinkles, or black sugar for that creepy vibe.

    Key Checks for Perfect Spooky Cupcakes

    • The cupcakes should be risen and slightly domed, not flat.
    • Frosting should be creamy and hold its shape when piped.
    • Edges should be slightly crisp when baked, not dry or burnt.
    • Decorations should stick firmly without sliding off.

    Common Mistakes & How to Fix Them

    • Cupcakes look shiny and wet in the middle.? UNDER-BAKED, cupcakes are dense and wet → Insert toothpick; if moist, bake 2 minutes longer.
    • Frosting melts or slides off in warm conditions.? FROSTING sliding off → Chill cupcakes before frosting or use a thicker frosting.
    • Decorative elements fall off easily.? DECORATIONS falling off → Use a small amount of edible glue or royal icing to set features.
    • Edges are dark while the middle remains raw.? OVEN heat too high → Reduce temperature by 10°C (20°F) if edges burn.

    Spooky Cupcakes

    These spooky cupcakes are a playful treat that combine rich chocolate cake with tangy cream cheese frosting, decorated to resemble creepy faces and eerie eyes. They are baked until fluffy and moist, then topped with vibrant, black-colored frosting and spooky embellishments for a fun, slightly messy, and memorable dessert perfect for any mischievous occasion.
    Prep Time 20 minutes
    Cook Time 20 minutes
    Total Time 40 minutes
    Servings: 12
    Course: Main Course
    Cuisine: baking
    Calories: 250

    Ingredients
      

    • 1 1/2 cups all-purpose flour
    • 1/2 cup dark cocoa powder
    • 1 1/2 teaspoons baking soda
    • 1/4 teaspoon salt
    • 2 large eggs room temperature
    • 1 cup granulated sugar
    • 1/2 cup vegetable oil
    • 2 teaspoons vanilla extract
    • 3/4 cup hot water
    • 8 oz cream cheese cream cheese softened
    • 1/4 cup unsalted butter softened
    • 2 cups confectioners’ sugar
    • 1 teaspoon lemon zest fresh
    • a few drops black food coloring or more as needed
    • decorative edible googly eyes Edible googly eyes or gummy candies, sliced almonds

    Equipment

    • Muffin tin
    • Paper cupcake liners
    • Mixing bowls
    • Electric mixer or whisk
    • Piping bag and tips
    • Cooling Rack

    Method
     

    1. Preheat your oven to 175°C (350°F) and line your muffin tin with paper liners, imagining tiny haunted houses for each cupcake.
    2. In a large mixing bowl, sift together the flour, cocoa powder, baking soda, and salt to combine and remove any lumps, creating a rich, dark mixture.
    3. In another bowl, whisk the eggs, sugar, oil, and vanilla until the mixture is smooth, slightly frothy, and fragrant.
    4. Gradually add the dry ingredients to the wet, folding gently until just combined, creating a thick, chocolatey batter.
    5. Pour in the hot water slowly, stirring gently until the batter is smooth and slightly runny, which helps keep the cupcakes moist and tender.
    6. Using a spoon or scoop, fill each cupcake liner about two-thirds full with batter, aiming for a slightly rounded top.
    7. Bake for 18-20 minutes, or until a toothpick inserted into the center comes out clean, filling your kitchen with a warm, chocolatey aroma.
    8. Let the cupcakes cool in the tin for about 5 minutes, then transfer them to a wire rack to cool completely, ensuring they don’t become soggy.
    9. In a bowl, beat the softened cream cheese, butter, and lemon zest with an electric mixer until creamy and fluffy, filling your kitchen with a tangy, sweet scent.
    10. Gradually add the confectioners’ sugar, beating on low then high, until the frosting is smooth, thick, and holds its shape.
    11. Add a few drops of black food coloring to the frosting, mixing until you achieve a deep, spooky black hue.
    12. Pipe the frosting onto each cooled cupcake using a piping bag fitted with a decorative tip, creating spooky faces or eerie swirls.
    13. Decorate with edible googly eyes, gummy candies, or sliced almonds to add creepy details that bring your spooky cupcakes to life.

    Notes

    For extra creepiness, use different colored frosting and varied eye shapes. Keep decorations firm by chilling cupcakes briefly if needed.
    These cupcakes are a chaos of textures and flavors—moist crumb, zingy frosting, and creepy decorations. They’re chaotic, fun, and perfect for a Halloween gathering or a surprise treat for the kids. Play with the decorations to match your spooky theme, maybe add some gummy worms or candy eyes. Most importantly, enjoy the process and don’t stress if they look a little wild—these are meant to be delightfully imperfect.

  • Monster Rice Krispie Treats: A Crispy, Gooey Adventure

    Monster Rice Krispie Treats: A Crispy, Gooey Adventure

    Monster Rice Krispie Treats started as a wild idea—what if you made a batch so big and gooey, it felt like a small monster attack? I love how they’re part nostalgic childhood snack, part chaos in the kitchen. They’re perfect for when you want something sweet but crave that crunch and chew that only rice cereal can give.

    Why I keep coming back to this recipe

    Because these treats are unpredictable in the best way—crunchy, sticky, sweet chaos. Each batch reminds me of childhood, but with a modern, messy twist. They’re my go-to when I want to make something that feels like a celebration, no matter the occasion.

    Inside the monster ingredients

    • Marshmallows: The gooey core of these treats, creating that stretch and sweet flavor. Feel free to swap with vegan marshmallows if needed.
    • Butter: Gives richness and helps everything stick together. Salted or unsalted—your choice, but salted adds a subtle contrast.
    • Rice Krispies: The crispy backbone of the treat—light, airy puffs that turn golden when pressed.
    • Add-ins (optional): Chocolate chips, sprinkles, or even crushed cookies—whatever makes your monster unique.
    • Vanilla extract: A splash boosts sweetness and depth. Skip or substitute with almond extract for a different aroma.

    Tools & Equipment for Monster Krispies

    • Large mixing bowl: To hold and mix all ingredients comfortably.
    • Saucepan: For melting butter and marshmallows evenly.
    • Spatula: To stir and press the mixture smoothly into the pan.
    • 9×13-inch pan: To shape and cool the treats.
    • Wax paper or spatula: To press down and shape the treats without sticking.

    Step-by-step guide to epic monster rice krispie treats

    Step 1: Gather your ingredients and tools before you start. This makes the process smoother and keeps your focus on the gooey magic.

    Step 2: Melt butter and marshmallows in a big saucepan over low heat. Keep stirring until smooth and fragrant—about 2 minutes. The smell of sweet melting butter with marshmallow fumes is unbeatable.

    Step 3: Pour in the Rice Krispies and stir quickly to coat every puff. Keep moving fast—once the cereal hits the marshmallow, it starts to set.

    Step 4: Transfer the mixture to a greased pan. Press down firmly with a spatula or wax paper to get an even, tight layer. Don’t press too hard, or the treats turn dense.

    Cooking checkpoints & tips for monster rice krispie treats

    • Ensure marshmallows are fully melted and smooth before adding cereal.
    • Press mixture into pan with enough firmness to hold shape but avoid over-compressing.
    • Look for a shiny, slightly sticky surface before cooling—this indicates proper marshmallow melt.
    • Treats should feel firm but not hard when cooled; if too soft, refrigerate briefly before cutting.

    Common mistakes & how to fix them

    • Overheating marshmallows, which can turn them hard and dry.? Use low heat when melting marshmallows to prevent burning.
    • Pressing too hard, making the treats tough.? Press gently into the pan to avoid dense, brick-like treats.
    • Using too little marshmallows, resulting in crumbly treats.? Add extra marshmallows if treats are too dry.
    • Burnt marshmallow smell, which ruins the flavor.? Keep a close eye during melting—avoid scorching the marshmallows.

    Monster Rice Krispie Treats

    These colossal Rice Krispie Treats are a playful, gooey snack with a crunchy exterior and chewy interior. Made by melting marshmallows and butter, then mixing in crispy rice puffs and optional add-ins, they come together in a large pan to create a chaotic, nostalgic dessert. Their sticky, golden surface and substantial size make them a fun, messy treat perfect for celebrations or a sweet craving.
    Prep Time 10 minutes
    Cook Time 10 minutes
    Total Time 20 minutes
    Servings: 12
    Course: Main Course
    Cuisine: American
    Calories: 150

    Ingredients
      

    • 4 cups Marshmallows Feel free to use vegan marshmallows if preferred
    • 6 tablespoons Butter Salted or unsalted
    • 6 cups Rice Krispies
    • 1 teaspoon Vanilla extract Optional, boosts sweetness
    • Optional Chocolate chips, sprinkles, crushed cookies Add-ins for extra fun

    Equipment

    • Large mixing bowl
    • Saucepan
    • Spatula
    • 9×13-inch pan
    • Wax paper

    Method
     

    1. Gather all your ingredients and tools to keep the process smooth and enjoyable.
    2. Add the butter to a large saucepan and melt over low heat, stirring gently until it’s fully melted and fragrant, about 2 minutes. You’ll notice a bubbling, golden mixture.
    3. Add the marshmallows to the saucepan and continue stirring until they melt completely, creating a smooth, glossy, sticky mixture. The marshmallows should be fully melted and bubbling gently.
    4. Remove the saucepan from heat and stir in the vanilla extract for a fragrant boost. Mix well to distribute evenly.
    5. Pour the Rice Krispies into the marshmallow mixture and stir quickly with a spatula to coat each puff evenly. The mixture will be thick and sticky, starting to set as you work.
    6. Transfer the mixture to a greased 9×13-inch pan. Use a spatula or wax paper to press down firmly and evenly, creating a large, compact layer. Press gently to avoid dense, tough treats.
    7. If desired, sprinkle chocolate chips, sprinkles, or crushed cookies over the top for extra fun. Press them slightly into the surface so they stick.
    8. Let the treats cool completely at room temperature for about 30 minutes, or until firm and set. The surface should become shiny and slightly sticky to the touch.
    9. Once cooled, cut into squares or rectangles with a sharp knife. The treats will be thick, sticky, and satisfyingly chewy with a crispy crunch on the outside.
    10. Serve your monstrous Rice Krispie Treats immediately and enjoy their chaotic, nostalgic goodness. Perfect for sharing or indulging in a sweet, crunchy mess!

    Notes

    For extra chaos, mix in your favorite add-ins before pressing into the pan. Store in an airtight container for up to 3 days to keep them fresh and chewy.
    Once cooled and set, slice these monster treats into squares or fun shapes. They’re perfect for sharing, or keeping all to yourself if you’re feeling extra indulgent. The crispy edges with gooey centers make every bite a little chaotic, a little nostalgic. Enjoy customizing with add-ins like chocolate chips or sprinkles—whatever makes your monster happy.

  • Velvety Darkness: Crafting the Perfect Black Velvet Cupcakes with a Twist

    Black velvet cupcakes are a rare find, often reserved for special occasions or a daring snack. Their deep hue hints at rich cocoa, but it’s the texture that keeps people coming back—moist, tender, with a slight crumbly edge. I love how they look almost like little night skies on a plate, mysterious and inviting.

    What makes these cupcakes stand out isn’t just their color, but the way they balance sweetness with a hint of bitterness. It’s a reminder that sometimes, going dark isn’t just a trend—it’s a way to make your baking feel a bit more daring and personal.

    Why I keep making these black velvet cupcakes

    They’re a reminder that even in the chaos of baking, simplicity and darkness can come together beautifully. Each batch feels like a small act of rebellion, a way to add elegance to any occasion. Their rich aroma fills my kitchen, and their deep color sparks conversations. I keep returning to them because they’re just plain fun—dark, moist, and endlessly customizable.

    Dark ingredients—what makes these cupcakes special

    • Unsweetened cocoa powder: Gives the cupcakes their signature dark hue and deep chocolate flavor, with a slightly bitter kick.
    • Buttermilk: Adds moisture and a tender crumb, plus a slight tang that balances sweetness.
    • Vegetable oil: Keeps the cupcakes moist and rich, preventing dryness.
    • Hot water: Intensifies the cocoa flavor and creates a smooth, velvety batter.
    • Vanilla extract: Enhances all the chocolate notes, making the flavor pop with warmth.
    • Baking soda: React with the acid in buttermilk to give the cupcakes a light rise.
    • Salt: Highlights the chocolate and balances sweetness.

    Tools of the dark arts—what you need to get these just right

    • Mixing bowls: For combining wet and dry ingredients separately.
    • Sifter: To aerate dry ingredients and remove lumps for a smooth batter.
    • Muffin tin with liners: Holds the cupcake batter during baking.
    • Cooling rack: Allows cupcakes to cool evenly without getting soggy.
    • Toothpick or cake tester: To check doneness of baked cupcakes.

    Step-by-step guide to deep, dark cupcakes

    Step 1: Preheat your oven to 170°C (340°F). Line a muffin tin with paper liners.

    Step 2: In a bowl, sift together 1 1/2 cups of all-purpose flour, 1 teaspoon of baking soda, and 1/2 teaspoon of salt.

    Step 3: In a separate large bowl, whisk 1 cup of buttermilk, 1/2 cup of vegetable oil, 2 large eggs, and 1 teaspoon of vanilla extract until smooth.

    Step 4: In another bowl, gently combine 1/4 cup of unsweetened cocoa powder with 1/4 cup of hot water to form a thick paste.

    Step 5: Gradually add the cocoa mixture to the wet ingredients, then fold in the dry ingredients just until combined.

    Step 6: Divide the batter evenly among the liners, filling each about two-thirds full.

    Step 7: Bake for 20-25 minutes, or until a toothpick inserted into the center comes out clean. The tops should be glossy and slightly cracked.

    Step 8: Allow cupcakes to cool in the tin for 10 minutes, then transfer to a wire rack. Let them cool completely before frosting.

    Baking checkpoints and pro tips for that perfect black velvet

    • The batter should be smooth and glossy, not overmixed, to keep the cupcakes tender.
    • The tops should crack slightly and have a deep, rich color—these are signs of proper baking.
    • Use a toothpick to check doneness; it should come out clean without wet batter.

    Common pitfalls and how to dodge them in black velvet baking

    • Lumpy batter or tough crumb.? OVER-MIXING THE BATTER → Mix just until ingredients are combined; overmixing leads dense cupcakes.
    • Flat or cracked cupcakes.? BAKING AT WRONG TEMP → Ensure oven is accurately calibrated at 170°C (340°F); too hot or cold affects rise.
    • Frosting sliding off or cupcakes crumbling.? NOT COOLING CUPCAKES COMPLETELY → Let them cool fully to prevent frosting from melting.
    • Sunken centers.? OPENING THE OVEN DOOR TOO EARLY → Wait at least 15 minutes before checking; sudden temperature drop can cause sinking.

    Black Velvet Cupcakes

    Black velvet cupcakes are rich, moist chocolate treats with a striking deep hue, achieved through unsweetened cocoa powder and hot water. Their tender crumb features a slight crumbly edge, making them visually dramatic and delightfully flavorful. Perfect for special occasions or daring snack moments, these cupcakes balance bitterness and sweetness beautifully, with a glossy, slightly cracked top showing they’re baked to perfection.
    Prep Time 15 minutes
    Cook Time 25 minutes
    Total Time 40 minutes
    Servings: 12
    Course: Main Course
    Cuisine: American
    Calories: 220

    Ingredients
      

    • 1 1/2 cups all-purpose flour
    • 1 teaspoon baking soda
    • 1/2 teaspoon salt
    • 1 cup buttermilk
    • 1/2 cup vegetable oil
    • 2 large eggs
    • 1 teaspoon vanilla extract
    • 1/4 cup unsweetened cocoa powder
    • 1/4 cup hot water

    Equipment

    • Mixing bowls
    • Sifter
    • Muffin tin with liners
    • Cooling Rack
    • Toothpick or cake tester

    Method
     

    1. Preheat your oven to 170°C (340°F) and line a muffin tin with paper liners.
    2. Sift together the flour, baking soda, and salt in a bowl until well aerated and lumps are removed.
    3. In a large bowl, whisk the buttermilk, vegetable oil, eggs, and vanilla extract until the mixture looks smooth and slightly frothy.
    4. In a small bowl, combine the cocoa powder with hot water to make a thick, glossy paste; stir until smooth.
    5. Gradually pour the cocoa paste into the wet ingredients, folding gently until fully incorporated and the mixture is dark and shiny.
    6. Next, fold the sifted dry ingredients into the wet mixture just until combined; avoid overmixing to keep the cupcakes tender.
    7. Divide the batter evenly among the cupcake liners, filling each about two-thirds full to allow room for rising.
    8. Bake the cupcakes for 20-25 minutes, until a toothpick inserted into the center comes out clean and the tops are glossy and slightly cracked.
    9. Remove the cupcakes from the oven and let them cool in the tin for about 10 minutes before transferring to a wire rack.
    10. Allow the cupcakes to cool completely, which helps prevent frosting from melting and enhances their deep, dark appearance.
    11. Once cooled, frost with your favorite dark chocolate or cream cheese frosting, and enjoy the striking, moist cupcakes that look like little night skies.
    These cupcakes aren’t just about their striking color—they’re a reminder that a little black can bring a lot of elegance to your baking. The moist crumb and subtle cocoa aroma make them a treat to look at and taste. Feel free to dress them up with a dollop of cream cheese frosting or keep it simple with a dusting of powdered sugar. Baking something this dark and decadent always feels like a small act of rebellion, a little thrill in the kitchen.

  • Unconventional Charm: Halloween Sugar Cookies with a Twist

    Halloween sugar cookies are more than just treats; they’re a canvas for creativity and chaos. I love how a simple dough can turn into a spooky masterpiece with just a few tweaks. Every year, I find myself experimenting with new shapes, colors, and flavors, making this a seasonal ritual.
    The best part? These cookies are forgiving, forgiving enough for even the most amateur bakers to get right. They’re also perfect for kids or anyone who enjoys a bit of decorating madness.

    Why These Cookies Keep Calling Me Back

    The blend of buttery richness and nostalgic shapes makes every batch feel like a small celebration. I love how they turn out perfectly imperfect—crisp edges with a tender center. Plus, decorating them with kids or friends turns baking into a messy, joyful ritual that I’d never skip.

    Ingredients Breakdown for Halloween Sugar Cookies

    • Butter: Creamy, rich butter adds flavor and tenderness. Use unsalted for control.
    • Sugar: Granulated sugar provides sweetness and helps with browning.
    • Egg: Acts as a binder and adds moisture, making cookies tender.
    • Vanilla extract: A splash of vanilla brightens the overall flavor.
    • Flour: All-purpose flour gives structure; consider almond flour for a nutty twist.
    • Baking powder: Leavening that helps cookies puff slightly.
    • Salt: Enhances sweetness and balances flavors.

    Tools & Equipment for Perfect Halloween Sugar Cookies

    • Rolling pin: Rolls dough evenly to about 0.5 cm thickness.
    • Cookie cutters: Shape cookies into fun Halloween designs.
    • Baking sheet: Houses cookies while baking, ensuring even heat distribution.
    • Parchment paper: Prevent cookies from sticking and make cleanup easier.
    • Cooling rack: Cool cookies evenly without sogginess.

    Crafting the Perfect Halloween Sugar Cookies

    Step 1: Start by creaming butter and sugar until pale and fluffy, about 3 minutes on medium speed.

    Step 2: Add in a splash of vanilla and an egg, mix until just combined.

    Step 3: Mix in flour, baking powder, and a pinch of salt, then knead lightly into a dough.

    Step 4: Divide dough into two balls, wrap in plastic, and chill for at least 1 hour.

    Key Tips for Baking Halloween Sugar Cookies

    • Dough should be firm but pliable, not sticky. If sticky, chill longer.
    • Edges should be lightly golden, not burnt. Keep an eye after 8 minutes at 180°C (356°F).
    • Cookies should be firm but with a slight bounce when you gently press the center.

    Common Mistakes and How to Fix Them

    • Dough is overly sticky.? DUMPED dough too sticky? Chill it longer, then dust with flour before rolling.
    • Cookies spreading out too thin.? Cookies spread too much? Ensure oven is preheated, and dough is cold.
    • Burnt edges.? Over-baked cookies? Reduce baking time or lower oven temperature by 10°C.
    • Smudged decorations.? Decorations smudging? Wait until icing is fully dry before stacking.

    Halloween Sugar Cookies

    These Halloween sugar cookies are buttery, crisp-edged treats that are perfect for decorating. They’re made with a simple dough that becomes tender and slightly golden when baked, serving as a festive canvas for spooky designs. Their forgiving nature makes them ideal for both novice bakers and kids to enjoy decorating with colorful icing and fun shapes.
    Prep Time 20 minutes
    Cook Time 10 minutes
    Total Time 1 hour 10 minutes
    Servings: 24
    Course: Main Course
    Cuisine: American
    Calories: 150

    Ingredients
      

    • 1 cup unsalted butter softened
    • 1 cup granulated sugar
    • 1 large egg
    • 1 teaspoon vanilla extract
    • 2 3/4 cups all-purpose flour
    • 1 teaspoon baking powder
    • 1/2 teaspoon salt

    Equipment

    • Mixing bowls
    • Rolling pin
    • Cookie cutters
    • Baking sheet
    • Parchment paper
    • Cooling Rack

    Method
     

    1. In a large mixing bowl, beat the softened butter and sugar together with an electric mixer until the mixture is light, fluffy, and pale in color, about 3 minutes.
    2. Add the egg and vanilla extract to the creamed mixture; beat until just combined, keeping the mixture smooth and glossy.
    3. In a separate bowl, whisk together the flour, baking powder, and salt. Gradually add this dry mixture to the wet ingredients, mixing on low speed until just incorporated and a soft dough forms.
    4. Divide the dough into two equal parts, shape each into a flat disc, wrap tightly in plastic wrap, and refrigerate for at least 1 hour to let the dough relax and become firm.
    5. Preheat your oven to 180°C (356°F). Line baking sheets with parchment paper to prevent sticking.
    6. Remove one dough disc from the fridge, and on a lightly floured surface, roll it out to about 0.5 cm thickness. Keep the dough cold to prevent sticking and spreading.
    7. Use Halloween-themed cookie cutters to cut out shapes from the rolled dough, pressing firmly to ensure clean edges.
    8. Transfer the cut-out cookies carefully onto the prepared baking sheet, spacing them about 2 inches apart for expansion.
    9. Bake in the preheated oven for 8–10 minutes, or until the edges are just lightly golden. Keep a close eye to prevent burning.
    10. Once baked, remove the cookies from the oven and let them cool on the baking sheet for 5 minutes before transferring them to a cooling rack to cool completely.
    11. Decorate the cooled cookies with icing, sprinkles, or other fun toppings to create your spooky Halloween designs. Enjoy these festive treats!

    Notes

    For best results, keep the dough cold and avoid overworking it to maintain tender, crisp edges. Get creative with your decorations for a fun, festive touch!
    Once baked and cooled, these cookies offer a nostalgic crunch with a buttery, sweet flavor, perfect for spooky celebrations. Feel free to personalize with different colors or themed decorations, making each batch uniquely yours. Remember, the best part is the messy, joyful process—embrace it and enjoy every bite.

  • Spooky & Sweet: The Halloween Bark Recipe You Can’t Resist

    Spooky & Sweet: The Halloween Bark Recipe You Can’t Resist

    Halloween is a wild card—sometimes you want elegant, sometimes you want chaos. This bark is that perfect middle ground: a little spooky, a little sweet, and a whole lot of fun to make. It’s a no-fuss way to add some homemade flair to your spooky night.

    Why this Halloween Bark keeps calling me back

    It’s unpredictable—each batch turns out slightly different, which keeps the process exciting. Plus, it’s so forgiving—tweak toppings or the type of chocolate and still end up with a treat worth sharing.

    Ingredient breakdown: what makes this bark special

    • Chocolate (white, dark, or mixed): The base that melts into a smooth, rich canvas—use good quality for best flavor.
    • Candy or nuts: Add crunch and contrast—think mini pretzels, M&Ms, or chopped pecans.
    • Edible glitter or sprinkles: A shimmer of spooky—think black, orange, or shimmer powders for extra glam.
    • Sea salt flakes: A tiny pinch enhances sweetness and deepens flavor.
    • Decorative candies: Gummy eyes or pumpkin shapes make it truly festive.

    Tools of the trade for spooky chocolate treats

    • Double boiler or microwave-safe bowl: For gently melting chocolate without scorching.
    • Spatula: To spread melted chocolate evenly.
    • Baking sheet lined with parchment: To hold the bark while it sets.
    • Sharp knife or hands: To break the bark into shards.

    Step-by-step: Crafting your creepy, crunchy Halloween bark

    Step 1: Line a baking sheet with parchment paper. Prepare for a quick, mess-free spread.

    Step 2: Melt your chocolate (white, dark, or a mix) in a heatproof bowl over a double boiler or in short bursts in the microwave, stirring until smooth.

    Step 3: Pour melted chocolate onto the prepared sheet. Use a spatula to spread it into an even layer, about 1/4 inch thick.

    Step 4: While still warm, sprinkle on candies, nuts, or edible glitter. Press lightly to set them into the chocolate.

    Step 5: Let the bark cool at room temperature or in the fridge for about 30 minutes until firm.

    Step 6: Once set, break into irregular shards with your hands or a sharp knife. Serve or store in an airtight container.

    Cooking checkpoints to watch out for

    • Chocolate should be melted smooth, without lumps or burning. Use low heat and stir constantly.
    • Sprinkle toppings evenly so they stick well, but don’t overload—you want to see the chocolate.
    • The bark should be firm but not brittle; if it cracks too easily, give it a few more minutes in the fridge.
    • Watch the edges for slight caramelization—if they darken too much, the chocolate might be burnt.

    Common Halloween Bark Mishaps & How to Fix Them

    • Chocolate scorched or seized.? Use low heat and stir constantly to avoid burning the chocolate.
    • Toppings sliding off or not sticking.? Sprinkle toppings immediately after pouring, while still warm.
    • Bark stays soft or sticky.? Chill the bark until fully firm—don’t rush the setting process.
    • Jagged, uneven shards.? Use a sharp knife to cut after chilling for clean breaks.

    Halloween Chocolate Bark

    This Halloween bark is a playful and festive treat that combines melting chocolate with colorful toppings for a visually striking snack. The process involves melting chocolate using a double boiler or microwave, spreading it onto a parchment-lined sheet, and decorating with candies, nuts, and glitter before chilling until firm. The final product features crunchy shards with a glossy finish and whimsical decorations, perfect for spooky celebrations.
    Prep Time 15 minutes
    Cook Time 15 minutes
    Total Time 30 minutes
    Servings: 8
    Course: Main Course
    Cuisine: Halloween
    Calories: 150

    Ingredients
      

    • 12 oz chocolate (white, dark, or mixed) good quality for flavor
    • 1/2 cup candies or nuts mini pretzels, M&Ms, chopped pecans, etc.
    • 1/4 cup edible glitter or sprinkles black, orange, shimmer powders for a spooky shimmer
    • 1 pinch sea salt flakes to enhance sweetness and flavor
    • Decorative candies gummy eyes or pumpkin shapes for festive decoration

    Equipment

    • Double boiler or microwave-safe bowl
    • Spatula
    • Baking sheet lined with parchment
    • Sharp knife or hands

    Method
     

    1. Line a baking sheet with parchment paper, ensuring a smooth, flat surface for your bark.
    2. Chop your chocolate into smaller pieces if necessary, then melt it in a double boiler or microwave in short bursts, stirring until completely smooth and glossy.
    3. Pour the melted chocolate onto the prepared parchment-lined sheet, spreading it evenly with a spatula into about a 1/4-inch thick layer.
    4. Sprinkle your chosen candies, nuts, and edible glitter evenly over the warm chocolate, pressing lightly to help them stick.
    5. Finish by adding a tiny pinch of sea salt flakes on top for a flavor boost.
    6. Allow the bark to cool at room temperature or place it in the fridge for about 30 minutes until it’s fully set and firm to the touch.
    7. Once cooled, break the bark into irregular shards using your hands or a sharp knife, revealing the colorful toppings inside.
    8. Arrange the shards on a serving platter, showcasing their shiny, decorated surfaces, ready to serve and enjoy!
    This bark is a chaos of textures and flavors—crunchy, sweet, a little salty, with that satisfying snap. It’s perfect for spooky parties or just a cozy night in, watching horror movies. Personalize it with your favorite candies or a drizzle of dark caramel for an extra flair. Whatever you do, just enjoy the messy, festive process.

  • Pumpkin Spice Cookies: A Cozy Bite of Fall’s Heart

    Pumpkin Spice Cookies: A Cozy Bite of Fall’s Heart

    Baking pumpkin spice cookies is a ritual that markers the shift from summer to fall. The smell of cinnamon, ginger, and nutmeg brewing in the oven makes the house feel welcoming and warm. I love how these cookies are forgiving — a little overmixing, a splash of extra pumpkin, and they still turn out tender.

    Why These Cookies Call Me Back Again and Again

    The blend of spices, pumpkin’s softness, and crunchy nuts makes them a perfect fall treat. They’re forgiving, adaptable, and smell like home every time. I keep coming back because they remind me of cozy mornings and quiet afternoons, with a little chaos and a lot of comfort woven in.

    Inside the Pantry: Ingredient Insights for Pumpkin Spice Cookies

    • Pumpkin puree:: Adds moisture and a subtle earthy sweetness. Swap with sweet potato puree if needed.
    • Cinnamon:: Brings that warm, woody aroma. Use fresh or ground, but avoid stale.
    • Dried cranberries:: Offer bursts of tartness and chew. Dried cherries can be a sweet swap.
    • Chopped pecans:: Add crunch and richness. Walnuts work well too.
    • Brown sugar:: Provides a molasses note and moisture. Coconut sugar is a good alternative.
    • Butter:: Gives richness and tender crumb. For a dairy-free version, try coconut oil.
    • All-purpose flour:: Structural backbone. Whole wheat flour adds nuttiness but alters texture.

    Tools of the Trade for Pumpkin Spice Cookies

    • Mixing bowls: Combine wet and dry ingredients comfortably.
    • Electric mixer or whisk: Cream butter and sugar to fluffy perfection.
    • Cookie scoop: Portion dough evenly.
    • Baking sheet: Hold the cookies while baking.
    • Parchment paper: Prevent sticking and easy cleanup.
    • Wire rack: Cool cookies evenly without sogginess.

    Baking Steps for Pumpkin Spice Cookies

    Step 1: Preheat your oven to 180°C (350°F).

    Step 2: Line a baking sheet with parchment paper.

    Step 3: In a large bowl, cream together 1/2 cup softened butter and 1/2 cup brown sugar until fluffy.

    Step 4: Add 1/2 cup canned pumpkin puree and 1 teaspoon vanilla extract; mix well.

    Step 5: In a separate bowl, whisk together 1 1/2 cups all-purpose flour, 1 teaspoon baking soda, 1 teaspoon cinnamon, 1/2 teaspoon ginger, and a pinch of nutmeg.

    Step 6: Gradually add dry ingredients to wet, mixing just until combined.

    Step 7: Fold in 1/2 cup chopped pecans and 1/4 cup dried cranberries for texture and color.

    Step 8: Using a cookie scoop, portion dough onto prepared baking sheet, spacing about 2 inches apart.

    Step 9: Bake for 10-12 minutes, until edges are golden and centers are set.

    Step 10: Let cookies cool on the sheet for 5 minutes, then transfer to a wire rack to cool completely.

    Baking Confidence: Checkpoints for Pumpkin Spice Cookies

    • Edges turn a light golden brown, not too dark, indicating they’re baked through.
    • The cookies feel firm at the edges but still soft in the center, a sign of perfect texture.
    • Smell a warm, spicy aroma as they bake, a good cue that spices are balanced and fragrant.

    Common Baking Pitfalls and How to Sidestep Them

    • Oven not hot enough, cookies spread too much.? FORGOT to preheat the oven? Always do it first, so baking starts right away.
    • Dry, crumbly cookies.? DUMPED too much flour? Use a spoon to lightly fluff and spoon into cups, then level.
    • Burned edges and underbaked centers.? OVER-TORCHED the edges? Reduce baking time or lower oven temp slightly.
    • Flat, greasy cookies.? Didn’t chill the dough? Chill for 15 minutes to prevent spreading.

    Pumpkin Spice Cookies

    These pumpkin spice cookies are soft and tender with a chewy texture, infused with warm spices like cinnamon, ginger, and nutmeg. They feature a moist pumpkin base, crunchy pecans, and tart cranberries, creating a cozy fall treat. Baked until golden with fragrant aromas, they’re perfect for celebrating the season with comforting flavors.
    Prep Time 15 minutes
    Cook Time 12 minutes
    Total Time 27 minutes
    Servings: 12
    Course: Main Course
    Cuisine: American
    Calories: 150

    Ingredients
      

    • 1/2 cup butter, softened
    • 1/2 cup brown sugar
    • 1/2 cup canned pumpkin puree
    • 1 teaspoon vanilla extract
    • 1 1/2 cups all-purpose flour
    • 1 teaspoon baking soda
    • 1 teaspoon cinnamon
    • 1/2 teaspoon ginger
    • 1/4 teaspoon nutmeg
    • 1/2 cup chopped pecans
    • 1/4 cup dried cranberries

    Equipment

    • Mixing bowls
    • Electric mixer or whisk
    • Cookie scoop
    • Baking sheet
    • Parchment paper
    • Wire rack

    Method
     

    1. Preheat your oven to 180°C (350°F) and line a baking sheet with parchment paper.
    2. In a large mixing bowl, cream together the softened butter and brown sugar until the mixture is light and fluffy, about 2-3 minutes, and you hear a gentle whirring.
    3. Add the pumpkin puree and vanilla extract to the creamed mixture, mixing until well combined and smooth, with a slightly glossy appearance.
    4. In a separate bowl, whisk together the flour, baking soda, cinnamon, ginger, and nutmeg to evenly distribute the spices.
    5. Gradually add the dry ingredients to the wet mixture, mixing just until combined and the dough begins to come together, feeling slightly sticky but manageable.
    6. Fold in the chopped pecans and dried cranberries, distributing them evenly throughout the dough for bursts of crunch and tartness.
    7. Using a cookie scoop, portion the dough onto the prepared baking sheet, spacing each mound about 2 inches apart to allow for spreading.
    8. Bake the cookies in the preheated oven for 10-12 minutes, until the edges turn golden brown and the centers still feel soft when gently pressed.
    9. Remove the baking sheet from the oven and let the cookies cool on it for about 5 minutes, allowing them to firm up slightly.
    10. Transfer the cookies to a wire rack to cool completely, revealing a tender, moist interior with a slightly chewy exterior.
    11. Once cooled, enjoy these cozy pumpkin spice cookies with a cup of tea or your favorite warm beverage.
    These cookies carry a whisper of autumn in every bite—spiced, soft, with a little chew from the nuts and tartness from the cranberries. They’re forgiving in the oven and versatile in flavor tweaks. Enjoy them with a mug of coffee or a cold glass of milk, and let the season’s warmth settle in. Baking these is a quiet act of comfort, perfect for slow mornings or a cozy afternoon.

  • Spooky-Sweet Halloween Brownies with a Twisted Edge

    Spooky-Sweet Halloween Brownies with a Twisted Edge

    I’ve always loved the idea of turning something familiar into a creepy spectacle for Halloween. These brownies are my go-to for a quick, impressive spooky snack that’s also deeply chocolatey and rich. The best part? You can customize the decorations to match your haunted vibe, making each batch uniquely terrifying.

    Why Make These Brownies Again and Again

    They’re quick to whip up, look wicked fun, and taste like a dark chocolate dream. Every year, I find new ways to zombie-ify them, which keeps the process fresh and the kids (and grown-ups) totally hooked. Plus, the smell of melting chocolate and baked brownie wafts through the house—an irresistible call to the spooky kitchen.

    Ingredient Secrets and Swaps

    • Dark chocolate: Gives that intense, rich flavor, but you can swap with semi-sweet if you prefer milder notes.
    • Cocoa powder: Adds depth and a smoky boost. Use Dutch-processed for a smoother, less acidic taste.
    • Butter: The base for that fudgy texture. Coconut oil can be a dairy-free alternative.
    • Eggs: Bind everything together. Flax eggs (1 tbsp flaxseed + 3 tbsp water) work well for vegan vibes.
    • Sugar: Sweetens and balances the bitterness. Brown sugar adds a caramel touch.
    • Decorative icing or melted chocolate: For creepy faces and designs. Use colored candies or sprinkles for more chaos.

    Tools of the Spooktrade

    • Mixing bowls: For combining the wet and dry ingredients.
    • Double boiler or microwave: To melt butter and chocolate gently.
    • Parchment paper: To line the baking pan for easy removal.
    • Sharp knife or decorating tools: To cut and create spooky designs.
    • Wire cooling rack: To cool the brownies evenly.

    Guided Steps for a Creepy, Delicious Finish

    Step 1: Preheat your oven to 175°C (350°F). Line a 20x20cm (8×8 inch) baking pan with parchment, letting edges hang over for easy removal.

    Step 2: Melt 125g (1/2 cup) butter and 200g (7 oz) dark chocolate together in a double boiler or microwave, stirring until smooth.

    Step 3: In a bowl, whisk 3 eggs with 150g (3/4 cup) sugar until slightly foamy, then mix in the cooled chocolate blend.

    Step 4: Fold in 100g (3/4 cup) all-purpose flour, 30g (1/4 cup) cocoa powder, and a pinch of salt. Don’t overmix—just combine.

    Step 5: Pour batter into your prepared pan, spreading evenly. Bake for 20-25 min, until the edges set but the center still jiggles slightly.

    Step 6: Let cool in the pan for 15 minutes, then lift out using the parchment overhang. Cool completely on a wire rack.

    Step 7: Once cool, cut into squares. Use black icing or melted dark chocolate to draw creepy designs or faces on each brownie.

    Cooking Cues and Tips to Nail It

    • The batter should be glossy and thick, not runny. If too thin, add a little more flour.
    • Edges should be firm and slightly crackled, but the center still jiggles when gently shaken.
    • Brownies are done when a toothpick inserted near the center comes out with moist crumbs, not wet batter.

    Common Pitfalls and How to Dodge Them

    • Batter spills over during baking.? OVERCROWDED PAN → Use a smaller pan or bake in batches to avoid uneven baking.
    • Brownies are too dry or crumbly.? UNDERCooked center → Extend baking time slightly or test with a toothpick.
    • Chocolate burns or becomes grainy.? Chocolate seizes → Melt slowly and gently, stirring constantly.
    • Designs run or smudge when touching.? Decorations smudge → Let icing set before stacking or storing.

    Spooky Halloween Brownies

    These rich, fudgy brownies are baked to perfection with a deep chocolate flavor and a moist, dense texture. Once cooled, they’re decorated with creepy faces and designs using melted chocolate and icing, making them a fun and impressive treat for Halloween. Their dark, glossy appearance and spooky decorations make them a perfect festive snack.
    Prep Time 15 minutes
    Cook Time 25 minutes
    Total Time 40 minutes
    Servings: 16
    Course: Main Course
    Cuisine: American
    Calories: 250

    Ingredients
      

    • 125 g butter unsalted
    • 200 g dark chocolate chopped
    • 3 eggs large
    • 150 g sugar granulated or brown
    • 100 g all-purpose flour
    • 30 g cocoa powder Dutch-processed preferred
    • optional decorative icing or melted chocolate for spooky faces and designs

    Equipment

    • Mixing bowls
    • Double boiler or microwave
    • Parchment paper
    • Sharp knife or decorating tools
    • Wire cooling rack

    Method
     

    1. Preheat your oven to 175°C (350°F) and line an 8-inch square baking pan with parchment paper, letting the edges hang over for easy removal.
    2. Combine the butter and chopped dark chocolate in a double boiler or microwave, heating gently and stirring until smooth and glossy, filling the kitchen with a rich chocolate aroma.
    3. Whisk the eggs and sugar together in a large bowl until slightly frothy and the mixture becomes lighter in color, about 2 minutes.
    4. Pour the cooled chocolate mixture into the egg and sugar blend, gently folding until combined and smooth.
    5. Sift the flour and cocoa powder into the bowl, then fold gently until just incorporated, taking care not to overmix to keep the brownies fudgy.
    6. Pour the batter into your prepared pan, spreading it evenly with a spatula to create a smooth surface.
    7. Bake in the preheated oven for 20-25 minutes, until the edges are set and slightly cracked, but the center still jiggles gently when shaken.
    8. Remove the pan from the oven and let the brownies cool in the pan for about 15 minutes, then lift them out using the parchment overhang and transfer to a wire rack to cool completely.
    9. Once cooled, cut the brownies into squares using a sharp knife, creating clean edges.
    10. Use decorative icing or melted dark chocolate to draw creepy faces or designs on each brownie, adding spooky flair for Halloween.
    11. Let the decorations set for a few minutes before serving, ensuring your spooky brownies are ready to impress and delight.
    These brownies aren’t just a treat; they’re a little piece of spooky art. They taste rich and fudgy, with a hint of smoky cocoa that lingers. Feel free to tweak the decorations—maybe add a splash of red icing for a bloody effect or some crushed candies for texture. The chaos of decorating adds to the fun, making each piece a tiny Halloween masterpiece.

  • Whimsical Witch Hat Cupcakes: A Playful Twist on Classic Sweets

    Whimsical Witch Hat Cupcakes: A Playful Twist on Classic Sweets

    I stumbled on this idea during a chaotic Halloween bake-off, where I needed something quick yet charming. The idea of transforming simple cupcakes into tiny witch hats felt just right—quirky, fun, and a bit spooky. It’s a project that invites creativity, especially when you get to decorate each hat with little details.

    Why I Keep Making These Little Witch Hats

    They’re a hit at parties, a quick creative outlet, and oddly satisfying to assemble. Each batch feels like a tiny craft project, and the smiles when people see them are priceless. Plus, they’re simple enough to adapt—glitter, sprinkles, or even edible gold make each batch a new adventure.

    Inside the Magic: Key Ingredients for Witch Hat Cupcakes

    • All-purpose flour: Gives structure, a neutral base that’s easy to tweak with cocoa or spices.
    • Granulated sugar: Sweetens and tenderizes; use less if you want a more subdued sweetness.
    • Baking powder: Leavens the batter, helps hats keep their shape.
    • Eggs: Bind the mixture, add richness, and stability.
    • Butter: Adds moisture and flavor—use unsalted for control.
    • Vanilla extract: Brightens everything with a subtle, aromatic note.
    • Chocolate or colored candy melts: Perfect for decorating the hat brim and accents—consider dark or bright shades for contrast.

    Tools of the Trade for Witch Hat Magic

    • Mixing bowls: Combine ingredients smoothly and efficiently.
    • Electric mixer or whisk: Ensure a uniform, fluffy batter.
    • Muffin tin and paper liners: Shape and hold the cupcakes as they bake.
    • Piping bags and tips: Create the hat shapes and decorative accents.
    • Cooling rack: Cool cupcakes evenly and prevent sogginess.

    Crafting the Perfect Witch Hat Cupcakes: Step-by-Step

    Step 1: Preheat your oven to 180°C (350°F).

    Step 2: Line a muffin tin with paper liners.

    Step 3: Prepare the cupcake batter: mix flour, sugar, baking powder, salt, eggs, butter, and vanilla until smooth.

    Step 4: Fill each liner about two-thirds full.

    Step 5: Bake for 18-20 minutes, until a toothpick inserted comes out clean.

    Step 6: Let the cupcakes cool completely on a wire rack.

    Catching the Magic: Tips for Perfect Witch Hat Cupcakes

    • Ensure cupcakes are fully cooled before decorating to prevent melting.
    • Use a sturdy piping bag for clean, sharp hat shapes.
    • Check oven temperature with an oven thermometer for even baking.
    • Bake until the tops are golden and a toothpick tests clean.

    Oops Moments: Common Mistakes and How to Fix Them

    • Batter looks lumpy and uneven.? Use room temperature ingredients to avoid lumps.
    • Cupcakes are over-baked or unevenly risen.? Adjust oven rack to middle for even heat.
    • Hat shapes are uneven or sagging.? Pipe with steady pressure and a consistent motion.
    • Decorations melt or slide off.? Ensure cupcakes are cooled completely before decorating.

    Witch Hat Cupcakes

    These adorable witch hat cupcakes are made from classic vanilla cupcakes decorated to resemble tiny, whimsical hats. The recipe involves baking fluffy cupcakes and piping chocolate or colored candy melts to create the hat shapes, resulting in a charming, festive treat perfect for Halloween parties. The final appearance is a glossy, pointed hat with a decorative brim, guaranteed to delight both kids and adults.
    Prep Time 20 minutes
    Cook Time 20 minutes
    Total Time 40 minutes
    Servings: 12
    Course: Main Course
    Cuisine: Halloween
    Calories: 220

    Ingredients
      

    • 2 ½ cups all-purpose flour sifted
    • 1 ¾ cups granulated sugar
    • 1 tablespoon baking powder baking powder
    • ½ teaspoon salt salt
    • 3 large eggs at room temperature
    • 1 cup unsalted butter unsalted butter melted and cooled
    • 1 tablespoon vanilla extract vanilla extract
    • 1 cup chocolate or colored candy melts candy melts for decorating

    Equipment

    • Mixing bowls
    • Electric mixer or whisk
    • Muffin tin
    • Paper liners
    • Cooling Rack
    • Piping bags and tips
    • Microwave-safe bowl for candy melts

    Method
     

    1. Preheat your oven to 180°C (350°F) and line a muffin tin with paper liners.
    2. In a large mixing bowl, whisk together flour, sugar, baking powder, and salt until well combined and airy.
    3. Add eggs, melted butter, and vanilla extract to the dry mixture. Whisk everything together until the batter is smooth, shiny, and slightly thickened.
    4. Divide the batter evenly among the paper liners, filling each about two-thirds full. The batter should look fluffy and slightly domed.
    5. Bake the cupcakes for 18-20 minutes, or until a toothpick inserted into the center comes out clean and the tops are golden.
    6. Remove the cupcakes from the oven and transfer them to a cooling rack. Let them cool completely until they feel firm and are no longer warm to the touch.
    7. While the cupcakes cool, melt the candy melts in a microwave-safe bowl in 30-second intervals, stirring until smooth and glossy.
    8. Fill a piping bag fitted with a round tip with the melted candy melts. Pipe a small dollop of chocolate onto the center of each cupcake to create the base of the hat.
    9. Using the piping bag, pipe a tall, pointed cone on top of the dollop to form the hat’s peak, shaping it carefully as you go.
    10. Optional: Decorate the brim of each hat with additional candy melts, sprinkles, or edible glitter for extra charm and whimsy.
    11. Allow the decorated cupcakes to set at room temperature for about 15 minutes until the candy is firm and shiny.
    12. Enjoy these delightful, spooky treats as they are or serve them at your next Halloween party for guaranteed smiles!

    Notes

    For best results, ensure cupcakes are completely cooled before decorating. Use sturdy piping tips for sharp, well-defined hats. Feel free to customize with different colors and decorations to match your party theme.
    These cupcakes are more than just a treat; they’re a little bit of magic on a plate. The process is straightforward, but the visual payoff is worth every minute. Feel free to add your own tweaks—maybe a drizzle of dark chocolate or a sprinkle of edible glitter—to make them uniquely yours. Enjoy the process and the smiles they bring when served.

  • Ghost Meringues: A Whisper of Sweetness from the Shadows

    There’s a strange allure to ghost meringues, these airy, ephemeral clouds that seem to vanish at a touch. I love that they embody a quiet kind of magic—simple ingredients transformed through patience and gentle heat. Making them feels like whispering secrets to the oven, waiting for something delicate to emerge.

    Why These Ghost Meringues Keep Calling Me Back

    They’re a humble reminder that beauty often lies in imperfection. Each batch feels like whispering secrets to the oven, watching fragile shapes form and vanish. Their fleeting nature makes every bite a small victory, a moment of sweet, airy calm in the chaos of the kitchen. Plus, they’re endlessly adjustable—flavor, size, shape—each time a new ghost appears.

    Unveiling the Ghostly Ingredients

    • Egg whites: I use fresh, room temperature whites for maximum fluff—skip the yolks, or they won’t whip well.: Their neutral flavor lets the sugar and any added essence shine.
    • Granulated sugar: I prefer superfine for quicker dissolving, but regular works if you whisk longer.: It’s the backbone of the crisp, sweet exterior.
    • Lemon zest (optional): Adds a bright, smoky aroma—use sparingly, just enough to hint at citrus.: A tiny punch of zest brings a lively contrast to the sweetness.
    • Cornstarch (a pinch): Helps stabilize the meringue—if you’re nervous, add a pinch.: Smooths out the texture, keeps the meringues from collapsing.
    • Vanilla extract (optional): Just a drop for warmth—don’t overdo it, or it masks the airy flavor.: A subtle depth that lingers on the tongue.

    Tools for the Job: Essential Meringue Gear

    • Stand mixer or hand whisk: To whip the egg whites to perfect stiffness.
    • Piping bag or spoon: To shape the meringues into neat nests or whimsical shapes.
    • Baking sheet & parchment paper: To provide a non-stick surface for drying the meringues.
    • Oven: To gently dry out the meringues, making them crisp.

    How to Make Ghost Meringues from Shadowy Whispers

    Step 1: Preheat your oven to 90°C (194°F).

    Step 2: Line a baking sheet with parchment paper, and set aside.

    Step 3: In a clean, dry bowl, whip egg whites until soft peaks form, about 3 minutes.

    Step 4: Gradually add sugar, a tablespoon at a time, while whipping to stiff, glossy peaks.

    Step 5: Spoon or pipe the meringue mixture onto the prepared baking sheet, creating small, airy nests.

    Step 6: Bake for 1.5 hours, then turn off the oven and let the meringues dry inside for another hour.

    Step 7: Once cooled and crisp, gently peel off the parchment, and prepare to enjoy the whisper of sweetness.

    Tips & Tricks for Perfect Ghost Meringues

    • Ensure your bowl and whisk are scrupulously clean and dry. Moisture kills the fluff.
    • Whip egg whites until they hold stiff peaks—if they droop, whip longer.
    • Bake at a low, steady temperature to avoid browning or collapsing.
    • Listen for a faint crackling sound during baking—signs they’re drying out properly.

    Common Meringue Mishaps & How to Fix Them

    • Whipping egg whites too long or not enough.? If the meringue is runny, over-whip the whites and add a pinch of cornstarch.
    • Baking at too high a temperature.? If they crack while baking, lower the oven temperature slightly.
    • Using a greasy or wet bowl.? If they don’t hold shape, check for grease or moisture in the bowl.
    • Baking at too high a temp or for too short a time.? If they don’t dry properly, extend the baking time very gradually.

    Ghost Meringues

    Ghost meringues are light, airy clouds that melt in your mouth with a crisp exterior and delicate interior. Made from whipped egg whites coated with sugar and baked at a low temperature, they embody a fragile, ethereal appearance that vanishes with a gentle touch. Their simple ingredients and gentle baking process create a whimsical, melt-in-your-mouth treat.
    Prep Time 15 minutes
    Cook Time 2 minutes
    Total Time 2 minutes
    Servings: 8
    Course: Main Course
    Cuisine: Dessert
    Calories: 50

    Ingredients
      

    • 4 large egg whites preferably at room temperature
    • 1/2 cup granulated sugar prefer superfine, but regular works with longer whipping
    • 1 tsp lemon zest optional, for brightness
    • 1 pinch cornstarch helps stabilize the meringue
    • 1 drop vanilla extract optional, for warmth

    Equipment

    • Stand mixer or hand whisk
    • Piping bag or spoon
    • Baking sheet
    • Parchment paper
    • Oven

    Method
     

    1. Preheat your oven to 90°C (194°F) and line a baking sheet with parchment paper.
    2. In a clean, dry bowl, whip the egg whites using a stand mixer or hand whisk until they reach soft peaks, about 3 minutes. You should see gentle folds forming when you lift the whisk.
    3. Gradually add the sugar, one tablespoon at a time, while continuing to whip. Keep beating until the mixture becomes glossy and holds stiff peaks—this takes about 5-7 minutes, and you’ll notice a firm, shiny texture.
    4. Gently fold in the lemon zest, cornstarch, and vanilla extract if using, just until evenly mixed. The mixture should be smooth and shiny.
    5. Using a spoon or piping bag, shape small nests or whimsical ghost shapes onto the prepared baking sheet. Keep them spaced apart since they will dry out and become crisp.
    6. Place the baking sheet in the oven and bake for about 1.5 hours. During baking, you’ll hear a faint crackling sound as the meringues dry out and become crisp.
    7. Once the baking time is up, turn off the oven but leave the door ajar slightly to allow the meringues to dry further. Let them sit inside for an additional hour until completely crisp and airy.
    8. Carefully peel the ghost meringues from the parchment paper. They should feel light, fragile, and crisp to the touch.
    9. Enjoy these delicate, ethereal treats immediately or store them in an airtight container for up to a day to preserve their crispness.

    Notes

    Make sure your mixing bowl and utensils are completely grease-free to achieve perfect peaks. Baking at a low temperature ensures they dry out without browning. These meringues are best enjoyed fresh but can be stored in an airtight container for a day to maintain their crisp texture.
    These ghost meringues are more than just a sweet treat; they’re a quiet celebration of patience and simplicity. Their delicate, airy crunch reminds me of ghostly whispers through the kitchen. Feel free to experiment with flavors or add a hint of lemon zest for brightness. Keep a watchful eye—their fragile texture makes them a challenge, but it’s worth every crackle and melt.

  • Haunted House Cookies: A Spooky Twist on a Classic Treat

    Baking haunted house cookies is like creating tiny edible nightmares. It’s a mix of nostalgia and chaos, where simple sugar cookies become spooky structures with a little imagination. I love how these cookies let you combine childhood joy with a touch of eerie artistry. Plus, they’re just plain fun to make, especially when you get to decorate them with all sorts of creepy details.

    Why Do I Keep Making These?

    Because they’re a perfect mix of chaos and charm, especially when you’re craving a creative project. Each batch feels like a little haunted adventure, a break from the usual. Plus, the kids love helping craft spooky shapes, turning baking into a mini Halloween festival in July. It’s just the right amount of mess and magic.

    What’s in Your Haunted House?

    • Butter: Gives cookies richness and helps them crisp. Use unsalted for control.
    • Sugar: Sweetens and helps with spreading. Use superfine for a smoother texture.
    • Egg: Adds moisture and helps hold shapes. Substitute with flaxseed for vegan version.
    • Vanilla extract: Brightens flavor, making spooky details pop.
    • Flour: The base that holds everything together. Use unbleached for depth.
    • Baking soda: Creates a slight rise, giving your haunted structures some lift.
    • Decorative icing and candies: For decorating—think googly eyes, black icing, and spooky sprinkles.

    Tools for Building Your Haunted House

    • Mixing bowls: For combining ingredients smoothly.
    • Electric mixer: To cream butter and sugar effortlessly.
    • Baking sheet: To hold the cookies while baking.
    • Parchment paper: Prevents sticking and makes cleanup easier.
    • Cookie cutters or knives: Shape your haunted houses and spooky shapes.
    • Decorating tips and piping bags: Add details like windows, doors, and creepy ghosts.

    Step-by-Step to Spook-tacular Cookies

    Step 1: Preheat your oven to 180°C (350°F).

    Step 2: In a mixing bowl, cream together 1 cup of softened butter and 1/2 cup of sugar until light and fluffy, about 3-4 minutes.

    Step 3: Add 1 large egg and 1 teaspoon of vanilla extract; beat until combined.

    Step 4: In a separate bowl, whisk together 2 cups of all-purpose flour, 1/2 teaspoon of baking soda, and 1/4 teaspoon of salt.

    Step 5: Gradually add dry ingredients to wet, mixing just until incorporated.

    Step 6: Scoop dough onto a baking sheet lined with parchment paper, forming spooky shapes or rounds.

    Step 7: Bake for 10-12 minutes, until edges are golden and haunted-looking.

    Step 8: Let cookies cool on the sheet for 5 minutes, then transfer to a wire rack.

    Ghostly Baking Tips & Tricks

    • Watch the edges; they should be golden, not burnt.
    • Ensure dough is chilled enough to hold spooky shapes.
    • If cookies spread too much, chill the dough 15 minutes before baking.
    • Cracks in cookies? Lightly press to smooth or decorate with icing.
    • For extra haunted effect, add black food coloring to icing.

    Haunted Baking Blunders & How to Fix Them

    • Cookies spread too much.? FORGOT to chill dough → Chill for at least 30 minutes to prevent spreading.
    • Dough feels crumbly and hard to shape.? DUMPED in too much flour → Use a light hand; too much dries out the dough.
    • Edges turn dark before cookies are baked through.? OVER-TORCHED edges → Reduce baking time or lower oven temp by 10°C (20°F).
    • Decorations bleed into each other.? Frosting too runny → Add more powdered sugar until thick enough to pipe.

    Haunted House Cookies

    These spooky cookies are crafted by shaping sugar cookie dough into haunted house structures and decorating them with eerie details like black icing and spooky candies. The process involves mixing, shaping, baking until golden, and decorating for a fun, creative Halloween-inspired treat with a crispy exterior and slightly chewy interior.
    Prep Time 30 minutes
    Cook Time 12 minutes
    Total Time 42 minutes
    Servings: 12
    Course: Main Course
    Cuisine: Halloween
    Calories: 150

    Ingredients
      

    • 1 cup unsalted butter softened
    • 1/2 cup granulated sugar
    • 1 large egg
    • 1 teaspoon vanilla extract
    • 2 cups all-purpose flour
    • 1/2 teaspoon baking soda
    • 1/4 teaspoon salt
    • decorative icing and candies for decorating

    Equipment

    • Mixing bowls
    • Electric Mixer
    • Baking sheet
    • Parchment paper
    • Cookie cutters or knives
    • Decorating tips and piping bags

    Method
     

    1. Begin by creaming softened butter and sugar together in a mixing bowl until the mixture is light, fluffy, and fragrant, about 3-4 minutes, with a gentle whir of the mixer.
    2. Add the egg and vanilla extract to the creamed mixture, beating until well combined and smooth, with a slight increase in volume.
    3. In a separate bowl, whisk together the flour, baking soda, and salt to evenly distribute the leavening agents.
    4. Gradually add the dry ingredients to the wet mixture, mixing just until the dough begins to come together and is soft but not sticky.
    5. Turn the dough out onto a lightly floured surface, kneading gently for a minute to ensure everything is well combined and the dough is smooth.
    6. Wrap the dough in plastic wrap and chill in the refrigerator for at least 30 minutes to make shaping easier and prevent spreading during baking.
    7. Preheat your oven to 180°C (350°F) and line a baking sheet with parchment paper.
    8. Remove the chilled dough from the fridge and roll it out on a lightly floured surface to about 1/4 inch thickness. Use cookie cutters or knives to cut out haunted house shapes or other spooky structures.
    9. Place the shaped cookies onto the prepared baking sheet, spacing them about 1 inch apart, and bake for 10-12 minutes until edges are golden and have a slightly haunted appearance.
    10. Let the cookies cool on the baking sheet for about 5 minutes until they firm up, then transfer them to a wire rack to cool completely.
    11. Decorate the cooled cookies with spooky icing, candies, and details like windows, doors, and creepy eyes to bring your haunted house to life.

    Notes

    Chill the dough well to maintain shape. Use vibrant icing colors for extra spooky effects. Have fun with creative decorations!
    These haunted house cookies are more than just treats—they’re a fun, nostalgic project that sparks creativity and a little chaos in the kitchen. Enjoy decorating them with icing and candies, making each one a tiny haunted masterpiece. Perfect for seasonal gatherings or a quiet night craving a bit of spooky sweetness. Trust me, once you get the hang of it, these become your go-to for fun baking with a dash of creepy flair.