Category: Beverages

  • Spine-Chilling Elegance: The Halloween Poison Apple Martini

    Spine-Chilling Elegance: The Halloween Poison Apple Martini

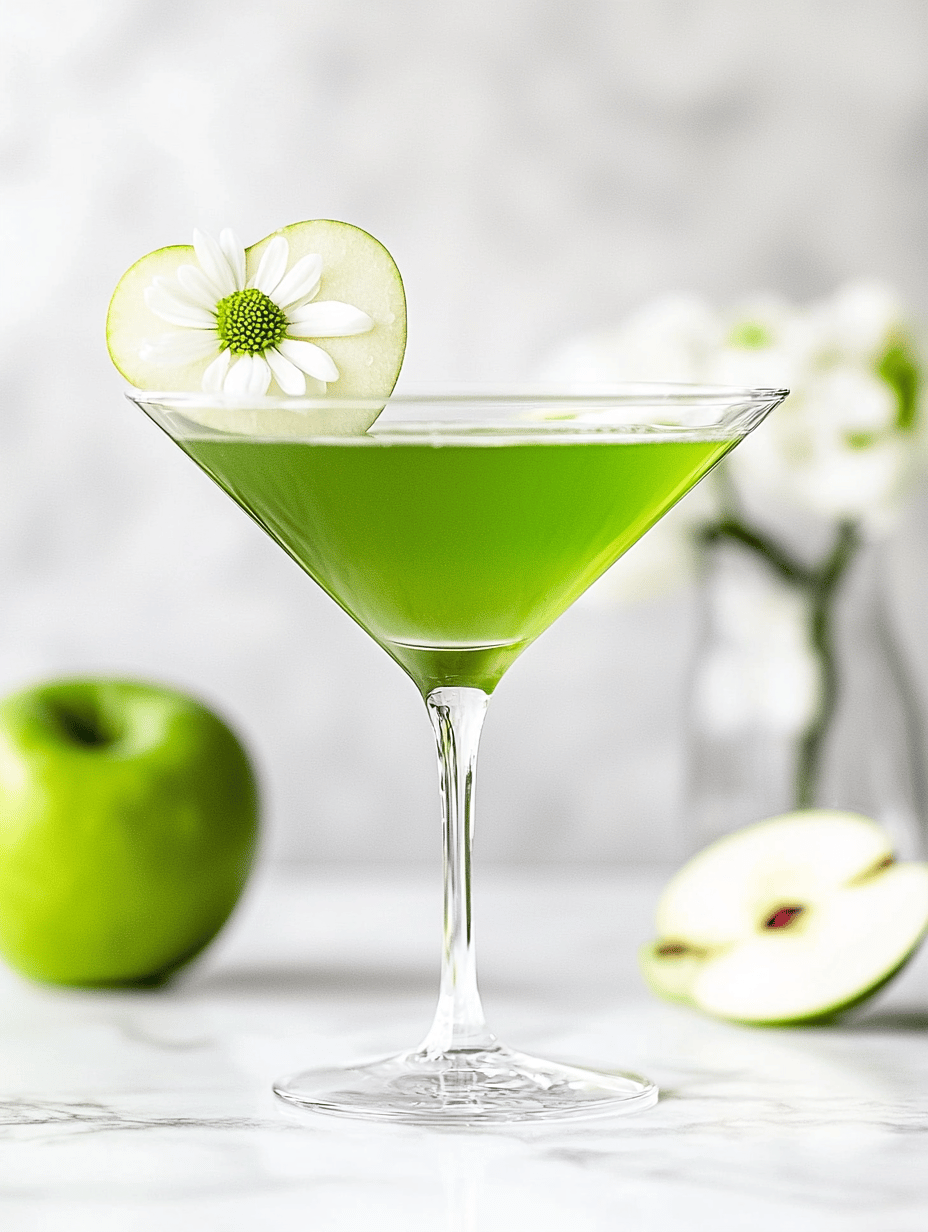
    As autumn leaves crunch beneath our feet, the spirit of Halloween beckons our most creative drinks. This Poison Apple Martini is not just a cocktail; it’s a visual and flavorful prank that sparks delight and surprise at any party. Its haunting green hue and candy apple aroma make it impossible to ignore, pulling guests into a world of eerie elegance.

    Today, I explore this luminescent potion from the perspective of a seasoned cocktail enthusiast who loves adding a touch of theatricality to every sip. With a few simple ingredients and a dash of daring, you can craft a drink that feels like liquid Halloween charms. Prepare to enchant your friends with a potion that’s as stunning as it is delicious.

    **WHY I LOVE THIS RECIPE?**

    • It transforms an ordinary evening into a magical experience with minimal effort.
    • The vibrant green color is perfect for Instagram-worthy photos and festive vibes.
    • The combination of sour apple and sweet liqueur hits a nostalgic note for candy-loving hearts.
    • I love how it’s both playful and sophisticated, enchanting guests at any gathering.
    • The scent of green apples and lime makes the whole room feel alive with autumn magic.

    **AVOID MY DISASTER (You’re Welcome)**

    • FORGOT to chill the glass — the cocktail lost its icy crispness. Solution: pre-chill for 15 minutes.
    • DUMPED in too much liqueur — turned into a syrupy mess. Measure carefully to keep balance.
    • OVER-TORCHED the sugar rim — it turned bitter and burnt. Use a gentle blowtorch flame just until golden.
    • SPILLED the red food coloring — accidentally dyed my hand; use a dropper next time for precision.

    **QUICK FIXES THAT SAVE YOUR DAY**

    • When the cocktail is too sour, splash in a dash more apple schnapps to balance sweetness.
    • Patch the color by adding a tiny amount of green food coloring until vibrant.
    • Shield the rim from burning by lowering your torch and moving quickly over the sugar.
    • When you forgot to strain the ice, quickly scoop out large chunks for a cleaner look.
    • When the drink lacks shimmer, stir in a pinch of edible glitter—shimmering potions enchant instantly.

    Crafting the Poison Apple Martini brings a fun and mysterious element to your Halloween table. Its bold look and lively flavors make it a standout among seasonal cocktails. Plus, the playful twist on a classic apple flavor is a sweet reminder of childhood candies with a wicked adult twist.

    As the night deepens and ghosts start to appear, this drink will keep the spirits high. The blend of sour, sweet, and a hint of bitterness captures the essence of spooky season perfectly. Cheers to creating nightmarish delights that are truly unforgettable.

    Poison Apple Martini

    The Poison Apple Martini is a vividly green, visually striking cocktail made with sour apple liqueur, vodka, and lime juice, giving it a tart, sweet flavor. It has a smooth, icy texture with a glowing, luminescent appearance, often enhanced with a sugared rim and edible glitter for a magical presentation.
    Prep Time 10 minutes
    Total Time 10 minutes
    Servings: 2
    Course: Main Course
    Cuisine: Cocktail
    Calories: 180

    Ingredients
      

    • 2 oz sour apple liqueur (e.g., Sour Apple Schnapps)
    • 1 oz vodka
    • 0.5 oz fresh lime juice preferably freshly squeezed
    • a few drops green food coloring adjust for vibrancy
    • pinch edible glitter
    • to taste granulated sugar for rimming the glass

    Equipment

    • Cocktail shaker
    • Martini glasses
    • Small plate for sugar rim
    • Lime wedge

    Method
     

    1. Start by preparing your glasses: spread a thin layer of sugar on a small plate, then rub the rim with a lime wedge and dip it into the sugar to create a sparkling, sugared edge. Set aside.
    2. Fill your cocktail shaker with ice and pour in the sour apple liqueur, vodka, and fresh lime juice. This combination creates the tart base with a refreshing kick.
    3. Add a few drops of green food coloring to the shaker to give the drink its signature glowing, eerie green hue, adjusting until you reach your desired vibrancy.
    4. Secure the lid on the shaker and shake vigorously for about 15 seconds, until the outside feels cold and slightly frosted. You’ll hear the ice clinking and the mixture becoming smooth and chilled.
    5. Remove the shaker from the ice, then strain the vibrant green liquid into your prepared, sugar-rimmed glasses to ensure a clean, ice-free presentation.
    6. Sprinkle a pinch of edible glitter over the top of each cocktail. As you do, you’ll see the glitter shimmer and catch the light, making the drinks look magical and otherworldly.
    7. Garnish each glass with a small lime wedge for a pop of contrasting color and a citrus aroma that complements the drink’s flavor.
    8. Your Poison Apple Martini is now ready to serve. The glowing green color, shimmering glitter, and frosty texture make it perfect for hauntingly festive occasions—enjoy and revel in its eerie charm!

    Notes

    Chill the glasses in advance for an even more refreshing experience. Be careful with the amount of edible glitter to avoid a gritty texture. Use a gentle hand when adding food coloring for the perfect glow.

    Every sip of this Poison Apple Martini is a chance to add a little mystery and magic to your festivities. Its eye-catching color and crisp apple taste are a perfect match for cool autumn nights filled with laughter and stories. Enjoy making it as much as enjoying it—this is the kind of drink that sparks conversations and brings out playful witches and ghouls.

    Remember, the best Halloween parties are those filled with surprises and delightful treats. This cocktail is a small but mighty piece of the spooky puzzle, creating memories that will linger well past October 31. Happy haunting—and cheers to many more spirited creations!

  • The Art of the Mango Slushie: A Tropical Escape in Your Glass

    The Art of the Mango Slushie: A Tropical Escape in Your Glass

    Imagine capturing the essence of a tropical island on a scorching summer day. The mango slushie isn’t just a drink; it’s a mini vacation for your taste buds, blending the ripe sweetness of mango with a cool, refreshing chill. This recipe transforms simple frozen fruit into a vibrant, zesty treat that instantly lifts your mood.

    What’s unique about this mango slushie? It’s all about the balance—bright citrus notes meet the mellow, honey-like flavor of ripe mango. The texture is silky smooth yet icy, like biting into a freshly frozen mango orchard.

    Mango Slushie

    This mango slushie is a frozen beverage made by blending ripe mango chunks with citrus juice and ice, resulting in a silky, icy texture. The drink offers a vibrant flavor combination of sweet mango and zesty citrus, creating a refreshing tropical treat with a bright appearance. It’s perfect for hot days and captures the essence of a tropical island vacation in a glass.
    Prep Time 10 minutes
    Total Time 10 minutes
    Servings: 2
    Course: Main Course
    Cuisine: Tropical
    Calories: 150

    Ingredients
      

    • 2 cups ripe mango chunks fresh or frozen
    • 1/2 cup fresh citrus juice lime or lemon juice
    • 1 cup ice cubes
    • 1-2 tablespoons honey or agave syrup optional, for added sweetness

    Equipment

    • Blender
    • Measuring cup

    Method
     

    1. Measure out the mango chunks and place them into your blender. If using fresh mango, peel and cut into chunks beforehand.
    2. Add the fresh citrus juice and honey or agave syrup to the blender with the mango. This will enhance the bright, zesty flavor and balance the sweetness.
    3. Pile the ice cubes into the blender, ensuring they are evenly distributed for a consistent icy texture.
    4. Secure the lid on the blender and blend on high speed until the mixture is smooth and frosty, with a silky consistency that’s easy to pour.
    5. Taste the slushie and adjust sweetness if needed by adding more honey or citrus juice, blending briefly to incorporate.
    6. Pour the vibrant mango slushie into glasses, showcasing its bright orange color and inviting icy texture.
    7. Optionally, garnish with a slice of lime or a sprig of mint for a fresh finish.

    Notes

    For an extra smooth texture, blend longer or add a little more citrus juice to help the mixture blend more easily.
    As the heat waves roll in, having a cold mango slushie on hand feels like an instant escape. It’s quick to whip up, and the flavor punch is addictive enough to suit any summer gathering or solo afternoon retreat. Keep a handful of ripe mangoes in your freezer and this refreshing concoction is always within reach.

    The beauty of a mango slushie is how it makes you feel—bright, energized, and ready to conquer the day. Whether it’s for a backyard barbecue or an unexpected guest, this recipe brings a touch of sunshine to your glass. Cheers to cool moments and sweet memories, all in one sip.

  • Chill Out with a Tropical Twist: The Ultimate Pineapple Slushie Guide

    Chill Out with a Tropical Twist: The Ultimate Pineapple Slushie Guide

    Imagine walking into a summer fiesta with the scent of sweet pineapples wafting through the air. I stumbled upon this recipe during a heatwave when all I craved was a burst of tropical refreshment that didn’t require a fancy cocktail shaker or a trip to the Caribbean. This pineapple slushie became my go-to, and I can’t wait to share its secret recipe with you.

    What sets this drink apart isn’t just its vibrant color or icy texture, but the surprising depth of flavor that balances sweet, tart, and a hint of mint. It’s the kind of refreshment that feels like a cool breeze on a sweltering day, with every sip sparking memories of barefoot beach days and tropical sunsets. Perfect for spontaneous gatherings or a solo moment of escape.

    Pineapple Slushie

    This pineapple slushie is a frozen beverage made by blending ripe pineapple chunks with sweetened liquid and ice until smooth and icy. The result is a vibrant, frosty drink with a slightly granular texture and a refreshing tropical flavor, often garnished with mint leaves for added aroma. It showcases a bright yellow color and a thick, slushy consistency perfect for hot days.
    Prep Time 10 minutes
    Total Time 10 minutes
    Servings: 2
    Course: Main Course
    Cuisine: Tropical
    Calories: 140

    Ingredients
      

    • 2 cups fresh pineapple chunks ripe and sweet
    • 1/2 cup cold water or coconut water for blending
    • 2 tablespoons honey or agave syrup adjust to taste for sweetness
    • 1 cup ice cubes for slushie texture
    • 2 small fresh mint leaves for garnish and flavor

    Equipment

    • Blender
    • Measuring cups and spoons

    Method
     

    1. Add the pineapple chunks, water or coconut water, honey, and ice cubes into the blender.
    2. Secure the lid and blend on high until the mixture is smooth and the ice is fully crushed, about 30-40 seconds.
    3. Stop the blender and check the texture. The mixture should be thick, frosty, and slightly granular, like a slush.
    4. Pour the slushie into glasses, creating a satisfying icy pour with a vibrant yellow hue.
    5. Garnish each serving with a few fresh mint leaves for aroma and a pop of color.
    6. Serve immediately with a straw, and enjoy the cooling, tropical refreshment.

    This pineapple slushie isn’t just a drink; it’s an invitation to slow down and savor the sunshine. Whether you make it for a quick refresh on a warm afternoon or serve it at your next summer party, it’s guaranteed to bring smiles and a cool breeze to any situation.

    Remember, the best recipes are the ones you tweak to suit your mood and mood swings. So experiment with a splash of coconut milk or a dash of chili for that unexpected kick. Whatever you choose, this slushie will transport you straight to those golden coastlines, one icy spoonful at a time.

  • Enchanted Elixir: Crafting the Halloween Black Magic Margarita

    Enchanted Elixir: Crafting the Halloween Black Magic Margarita

    Imagine the flicker of candlelight reflecting off a shimmering black liquid, fizzing with mysterious allure. The Black Magic Margarita is no ordinary cocktail; it’s a spell in a glass, perfect for conjuring up Halloween night festivities. The deep, inky hue invites a sense of enchantment and chaos that’s utterly captivating.

    This recipe turns the familiar margarita into a bewitching potion by infusing it with activated charcoal and vibrant lime. The result is a drink that not only looks stunning but also delivers a surprisingly refreshing punch. It’s the ideal centerpiece for a spooky soirée or a daring twist on a classic favorite.

    Black Magic Margarita

    The Black Magic Margarita is a visually striking cocktail made with tequila, lime juice, and activated charcoal that gives it a deep, inky color. The drink is shaken to combine the ingredients until chilled and frothy, resulting in a smooth, glossy beverage with a vibrant lime twist and a slightly smoky flavor.
    Prep Time 5 minutes
    Total Time 5 minutes
    Servings: 2
    Course: Main Course
    Cuisine: International
    Calories: 180

    Ingredients
      

    • 2 oz tequila preferably blanco
    • 1 oz fresh lime juice preferably freshly squeezed
    • 1 tsp activated charcoal powder food grade
    • 0.5 oz triple sec orange liqueur
    • 0.5 oz simple syrup adjust to taste
    • ice cubes for shaking and serving

    Equipment

    • Cocktail shaker
    • Measuring jigger
    • Strainer
    • Lime squeezer

    Method
     

    1. Measure out the tequila, fresh lime juice, triple sec, and simple syrup into a cocktail shaker.
    2. Add the activated charcoal powder to the shaker, followed by a handful of ice cubes.
    3. Secure the lid and shake vigorously for about 15 seconds until the mixture is well chilled and frothy, and the liquid turns a deep black color.
    4. Remove the shaker lid and strain the dark liquid into a chilled glass filled with fresh ice.
    5. Garnish with a lime wedge on the rim for a vibrant contrast and a hint of citrus aroma.
    6. Serve immediately and enjoy the striking, eerie glow of the Black Magic Margarita.

    Notes

    Ensure to use food-grade activated charcoal to avoid any health issues. Adjust the amount of simple syrup based on your sweetness preference.
    As the night deepens, this Black Magic Margarita keeps the atmosphere lively and mysterious. Its smoky aroma and striking appearance make it unforgettable, sparking conversations and cheers. In a season driven by haunting tales and colorful costumes, this cocktail fits perfectly into the revelry.

    Enjoy the blend of bold flavors and eerie elegance. It’s a drink that invites intrigue, sparks joy, and adds just the right amount of chaos to your Halloween celebration.

  • Chill Out with an Unusual Milkshake Slushie Twist

    Chill Out with an Unusual Milkshake Slushie Twist

    Ever wondered how to bring a bit of winter magic to a summer classic? Imagine sipping on a milkshake but with a frosty, slushie texture that cools you from the inside out. This recipe is perfect for those sweltering days when you crave something sweet but also crave instant refreshment.

    The secret lies in blending your favorite creamy milkshake with crushed ice to create a dessert that’s halfway between a drink and a frozen treat. It’s a clever way to cool down without turning on the oven or waiting for ice cream to soften. Plus, it’s simple enough to make in minutes, and fun to customize with your favorite flavors.

    Frozen Milkshake Slushie

    This frozen milkshake slushie combines creamy milk and ice to create a refreshing, snow-like dessert with a smooth, icy texture. Blended until frosty and thick, it resembles a milkshake but with a more slushie consistency, ideal for hot days. The result is a vibrant, cold treat with a silky appearance that can be customized with various flavors.
    Prep Time 5 minutes
    Total Time 5 minutes
    Servings: 2
    Course: Main Course
    Cuisine: General
    Calories: 150

    Ingredients
      

    • 1 cup milk any type of milk
    • 2 cups crushed ice preferably finely crushed for easier blending
    • 2 tablespoons sweetener (optional) sugar, honey, or syrup to taste
    • 1 teaspoon vanilla extract for flavor

    Equipment

    • Blender
    • Measuring cups and spoons

    Method
     

    1. Measure out the milk, crushed ice, sweetener, and vanilla extract to prepare your ingredients.
    2. Add the milk to the blender, followed by the crushed ice for that signature slushie texture.
    3. Pour in the sweetener and add the vanilla extract for added flavor.
    4. Secure the lid on the blender, then blend on high speed until the mixture is smooth, thick, and frosty, about 30-45 seconds. Listen for the swishing sound and watch for the icy texture to develop.
    5. Stop the blender and check the consistency; it should be creamy with a snow-like appearance and a little resistance when stirred.
    6. Pour the frozen milkshake slushie into glasses, allowing some of the icy texture to remain visible on top.
    7. If desired, garnish with a sprig of mint or a slice of fruit for a colorful touch before serving.

    Notes

    For an extra flavorful variation, add fruit puree or cocoa powder before blending.
    This milkshake slushie isn’t just an easy summer fix—it’s also a nostalgic trip back to childhood. The crunch of ice combined with the rich, sweet flavors creates a sensory experience that’s both satisfying and invigorating.

    As the days get hotter and the need for quick, delicious cooling solutions rises, this recipe offers a playful, refreshing option. It’s perfect for backyard gatherings, solo indulgence, or unexpected guests. Sometimes, the simplest treats really are the best.

  • Spooky Sip: The Haunted Blood Mary Cocktail for Halloween

    Spooky Sip: The Haunted Blood Mary Cocktail for Halloween

    Every October, I find myself craving a cocktail that stirs the senses and ignites the Halloween spirit. This Bloody Mary isn’t just a drink; it’s a midnight ritual with a twist of eerie flair. Bright red, with a whisper of spice and a splash of chaos, it transforms the classic brunch staple into a haunted house of flavors.

    As the scent of tomato and horseradish mingles with the crisp October air, I love how this cocktail becomes a centerpiece of Halloween gatherings. It’s perfect for those who want to sip something bold and visual, even as the lights flicker and jack-o’-lanterns grin mischievously around you. This Halloween, let your drink do the talking—and the haunting.

    Spicy Tomato Bloody Mary

    This Bloody Mary combines ripe tomato juice with horseradish, hot sauce, and spices, blended to a smooth consistency with a hint of spice and acidity. The mixture is poured over ice and garnished with fresh vegetables and herbs, creating a vibrant, garnished drink with a rich, thick texture. Its bright red color and fragrant aroma make it a striking centerpiece for Halloween festivities.
    Prep Time 10 minutes
    Total Time 10 minutes
    Servings: 1
    Course: Main Course
    Cuisine: American
    Calories: 120

    Ingredients
      

    • 4 oz tomato juice preferably well-seasoned
    • 1/2 oz lemon juice freshly squeezed
    • 1 tsp Worcestershire sauce
    • 1/2 tsp hot sauce such as Tabasco
    • 1/4 tsp ground black pepper
    • 1/4 tsp celery salt
    • 1 tsp horseradish prepared
    • a pinch ground paprika for garnish
    • ice cubes ice
    • celery stalk celery for garnish
    • pickle spear pickles for garnish
    • Lemon wedge lemon slice for garnish

    Equipment

    • Cocktail shaker or mixing glass
    • Tall glass or serving glass
    • Stirring spoon

    Method
     

    1. Pour the tomato juice into a mixing glass or cocktail shaker. Add freshly squeezed lemon juice, Worcestershire sauce, hot sauce, ground black pepper, celery salt, and prepared horseradish.
      4 oz tomato juice, 1/2 oz lemon juice, 1 tsp Worcestershire sauce, 1/2 tsp hot sauce, 1/4 tsp ground black pepper, 1/4 tsp celery salt, 1 tsp horseradish
    2. Stir or gently shake the mixture until all ingredients are well combined and slightly chilled. You should see a smooth, uniform red mixture with a spicy aroma.
    3. Fill a tall glass with ice cubes, creating a frosty base for the drink.
      ice cubes ice
    4. Pour the shaken tomato mixture over the ice, filling the glass almost to the top. The liquid should cascade smoothly, creating a vibrant red appearance.
    5. Garnish the drink with a celery stalk, a pickle spear, and a lemon wedge, arranging them attractively on the rim.
      celery stalk celery, pickle spear pickles, Lemon wedge lemon slice
    6. Sprinkle a pinch of ground paprika on top for a pop of color and a subtle smoky flavor.
      a pinch ground paprika
    7. Serve immediately with a stirring spoon nearby, allowing the drinker to adjust the flavor or spice level if desired.

    Notes

    Adjust hot sauce and horseradish to taste for more or less spice. For an eerie Halloween touch, garnish with black olives or a skewer of cherry tomatoes.

    Crafting this Bloody Mary elevates any spooky soirée, blending tradition with a ghoulish twist. Its vivid color and zesty brightness make it a conversation starter and a memorable part of your night. Plus, the mixing process is as fun as the last sip.

    Whether you’re hosting or just treating yourself, this recipe is a delightful way to celebrate the season’s spooky charm. It’s a toast to creativity and chaos in a glass, perfect for embracing all the fun and fright that Halloween brings.

  • The Surprising Charm of Kool Aid Slushies in Hot Weather

    The Surprising Charm of Kool Aid Slushies in Hot Weather

    On scorching days, the thought of a chilled, sweet treat becomes almost a necessity. But instead of heading for the usual store-bought options, I love recreating nostalgic childhood favorites with a twist. Enter the Kool Aid slushie—a playful blend of vibrant flavor, icy texture, and memory-lane fun.

    This recipe isn’t just about quenching thirst; it’s about rediscovering simple joys in a glass. The bright colors and punchy flavors instantly lift moods and create moments of happiness amid chaos or quiet days alike. It’s an easy, customizable escape from the summer heat cluttering your schedule.

    Kool Aid Slushie

    This Kool Aid slushie is a cold, vibrant beverage made by blending fruit-flavored Kool Aid with ice until smooth and icy. The resulting drink has a slushy, semi-frozen texture with bright color and punchy flavor, perfect for hot days.
    Prep Time 5 minutes
    Total Time 5 minutes
    Servings: 2
    Course: Main Course
    Cuisine: American
    Calories: 50

    Ingredients
      

    • 1 packet Kool Aid powder (flavor of choice) preferably unsweetened
    • 1 cup hot water to dissolve the Kool Aid
    • 2 cups ice cubes plus extra if needed

    Equipment

    • Blender
    • Measuring cups and spoons

    Method
     

    1. Dissolve the Kool Aid powder in hot water by stirring until fully combined and no lumps remain.
    2. Pour the sweetened Kool Aid mixture into a blender.
    3. Add the ice cubes to the blender, filling it up to about the second line for optimal blending.
    4. Secure the lid and blend everything on high speed until the mixture is thick, slushy, and smooth, usually about 30-45 seconds. You should see the ice breaking down and the color brightening.
    5. Pause briefly to check the consistency; if it’s too thick, add a splash of cold water or more Kool Aid and blend again for a creamier texture.
    6. Taste a small spoonful to ensure the flavor is vibrant and the texture is icy but scoopable.
    7. Pour the Kool Aid slushie into glasses or cups, garnishing with a slice of fruit or a colorful straw if desired.

    As the last slushie melts away, I find myself grateful for these small, joyful recipes. They remind us that sometimes, the simplest ingredients craft the greatest moments. With just a few cups of Kool Aid and a blender, you can turn a dull day into a lively, refreshing celebration.

    Whether you’re hosting a summer gathering or just need a quick pick-me-up, this slushie ticks all the boxes. It’s a nostalgic burst of flavor that’s both playful and satisfying, perfect for any warm day or spontaneous craving. Cheers to easy, delightful escapes in a glass.

  • Fizzy Nostalgia: The Unexpected Charm of Coke Slushies

    Fizzy Nostalgia: The Unexpected Charm of Coke Slushies

    Few drinks ignite nostalgia like a Coke slushie on a hot day. The way the chilled syrupy soda crunches with every sip sparks memories of carefree afternoons and summer fairs.

    But beyond just being a treat, making a Coke slushie at home lets you customize flavors and control sweetness. It’s this simple pleasure that becomes a mini celebration amid busy days or lazy weekends.

    WHY I LOVE THIS RECIPE?

    • The chaotic joy of crushing ice with a spoon before mixing in syrup makes me smile.
    • There’s a nostalgic rush with every sip of that sweet, fizzy bite.
    • Perfect for spontaneous gatherings or solo indulgence when I crave a cold, bubbly escape.
    • The ability to tweak the flavors adds a fun, rebellious twist—no rules, just taste.

    Homemade Coke Slushie

    This Coke slushie is made by freezing cola with ice and blending until frosty and smooth, resulting in a vibrant, icy drink with a bubbly texture. The mixture maintains a sweet, fizzy flavor and a crunchy, semi-frozen consistency in each sip.
    Prep Time 10 minutes
    Total Time 10 minutes
    Servings: 2
    Course: Main Course
    Cuisine: American
    Calories: 150

    Ingredients
      

    • 1 can cola soda chilled
    • 1 cup ice cubes preferably crushed or small pieces

    Equipment

    • Blender
    • Freezer

    Method
     

    1. Pour the chilled cola into a shallow dish or container and freeze for at least 4 hours, stirring every 30 minutes to prevent large ice crystals from forming.
    2. Once the cola is frozen into a slushy consistency, transfer it to a blender along with the ice cubes.
    3. Blend on high speed until the mixture is smooth, frosty, and resembles a thick slushie with a bubbly appearance.
    4. Pour the icy mixture into glasses immediately to enjoy its refreshing texture and fizzy flavor.
    5. Optional: garnish with a slice of lemon or a cherry for added visual appeal.

    This Coke slushie recipe is a reminder that simple ingredients can bring big smiles. It’s quick, easy, and endlessly customizable, making it perfect for sunny days or unexpected guests. Sometimes, all you need is a little crushed ice and a splash of fizzy fun.

    Next time you want a cool kick of nostalgia, grab your favorite cola and a handful of ice. It’s those small moments of joy that add up—brightening an ordinary day with a splash of childhood magic.

  • The Secret Sparkle: A Champagne Slushie with a Twist

    The Secret Sparkle: A Champagne Slushie with a Twist

    Imagine a summer evening where the air is thick with the scent of ripe peaches and the distant hum of city life. You want something sparkling, something chilled, but with a playful twist that surprises your senses. That’s where this champagne slushie becomes your new favorite secret to impress.

    This isn’t just any frozen cocktail; it’s a nostalgic dance of bubbly elegance and icy refreshment. Crafting it with a curious touch elevates simple ingredients into a celebration in every sip. It’s perfect for spontaneous soirées or quiet moments alone, craving a little luxury.

    Champagne Peach Slushie

    This champagne peach slushie combines sparkling wine with blended ripe peaches to create a frosty, effervescent beverage. The mixture is puréed until smooth and served chilled, offering a refreshing and visually appealing drink with a slightly slushy texture.
    Prep Time 10 minutes
    Total Time 10 minutes
    Servings: 2
    Course: Main Course
    Cuisine: American
    Calories: 150

    Ingredients
      

    • 2 cups ripe peaches, peeled and sliced preferably yellow or white peaches
    • 1 cup champagne chilled for best effect
    • 2 tablespoons honey or simple syrup optional, to taste
    • 1 cup ice cubes

    Equipment

    • Blender
    • Measuring Cups
    • peeler
    • Knife

    Method
     

    1. Peel the peaches using a peeler or knife, then slice them into smaller chunks to make blending easier.
    2. Place the sliced peaches, honey or simple syrup, and ice cubes into the blender.
    3. Pour the chilled champagne into the blender, then secure the lid firmly.
    4. Blend on high speed until the mixture is smooth, frosty, and has a slushy texture, about 30-40 seconds.
    5. Stop the blender and check the consistency; if it’s too thick, add a splash more champagne and blend briefly to incorporate.
    6. Pour the slushie into chilled glasses, allowing the icy mixture to mound slightly over the rim.
    7. Garnish with a small peach slice or a sprig of mint if desired, and serve immediately.

    Notes

    For an extra burst of flavor, add a splash of fresh lemon juice before blending. Best enjoyed immediately while frosty and bubbly.
    As you sit back with a glass of this shimmering slushie, notice how the cold numbs your tongue just enough to heighten the champagne’s crispness. The slight fruit sweetness mingles with sparkling finesse, making every sip a delicate adventure.

    This recipe arrives just in time for heatwaves or dinner parties that need a tiny bit of sparkle. It’s an easy fix for unexpected guests or a thoughtful way to elevate an ordinary afternoon. Pour, blend, sip—simple, elegant, and refreshingly unexpected.

  • Chill Out with the Unusual Oreo Slushie

    Chill Out with the Unusual Oreo Slushie

    Craving something that merges childhood nostalgia with a summer chill? The Oreo slushie is my unexpected savior when the heat blares outside. Its creamy, cookie-infused sweetness makes even the dullest afternoon burst with flavor. Plus, it’s so quick to make, you’d think it’s cheating.

    What’s special about this recipe is the playful texture — crunchy Oreo bits intermingled with icy smoothness. It’s like biting into a cookie, then savoring a refreshing breeze. With just a handful of ingredients, it transforms your usual milkshake into a fun, chaos-filled adventure for your taste buds.

    WHY I LOVE THIS RECIPE?

    • My secret guilty pleasure since childhood reimagined as a frozen treat.
    • It’s chaotic, charming, and perfectly imperfect every single time.
    • The smell of crushed Oreos and vanilla ice cream makes my kitchen feel like a sweet shop.
    • Super flexible — jazz it up with chocolate syrup or a splash of coffee.

    Oreo Slushie

    The Oreo slushie is a cold, creamy beverage made by blending ice, vanilla ice cream, and crushed Oreo cookies until smooth. It features a textured combination of icy softness with crunchy cookie bits, resulting in a vibrant, dessert-like drink with a speckled appearance. The final product is a refreshing, sweet treat with a slightly gritty, cookie-embedded consistency.
    Prep Time 10 minutes
    Total Time 10 minutes
    Servings: 2
    Course: Main Course
    Cuisine: American
    Calories: 250

    Ingredients
      

    • 4 whole Oreo cookies crushed
    • 2 cups vanilla ice cream cold and creamy
    • 1.5 cups ice cubes adjust for thickness
    • 1/2 cup milk whole or dairy of choice

    Equipment

    • Blender
    • Measuring cups and spoons

    Method
     

    1. Place the Oreo cookies in a zip-top bag and crush them into small crumbs using a rolling pin or the back of a spoon, capturing the crunchy bits.
    2. Add the crushed Oreos to your blender along with the vanilla ice cream, ice cubes, and milk.
    3. Secure the lid and blend on high until the mixture is smooth and thick, about 30-45 seconds, with the cookie bits evenly distributed.
    4. Stop the blender and check the consistency — it should be slushy, with tiny bits of Oreo visible and a creamy texture. If it’s too thick, add a splash more milk and blend briefly.
    5. Pour the Oreo slushie into glasses, allowing some of the cookie bits to settle and show through the rim.
    6. Finish with a sprinkle of crushed Oreos on top for added crunch and visual appeal.
    7. Insert a straw, serve immediately, and enjoy the cool, crunchy bite of your homemade Oreo slushie!

    In a world where moments of chaos often turn into sweet escapes, this oreo slushie stands out as the ultimate treat. It’s a quick fix for the heat or a nostalgic pick-me-up on a lazy day. The crunch, the cold, and the rich creaminess give every sip a joyful surprise.

    Now, whenever you need a cheerful break, blend up this frosty delight. It’s simple, fun, and just a little bit messy — exactly what makes it memorable. Cheers to enjoying every spoonful of your coolest, crispiest dessert.