Category: Beverages

  • Spooky Elegance: The Haunted Vampire Punch

    Spooky Elegance: The Haunted Vampire Punch

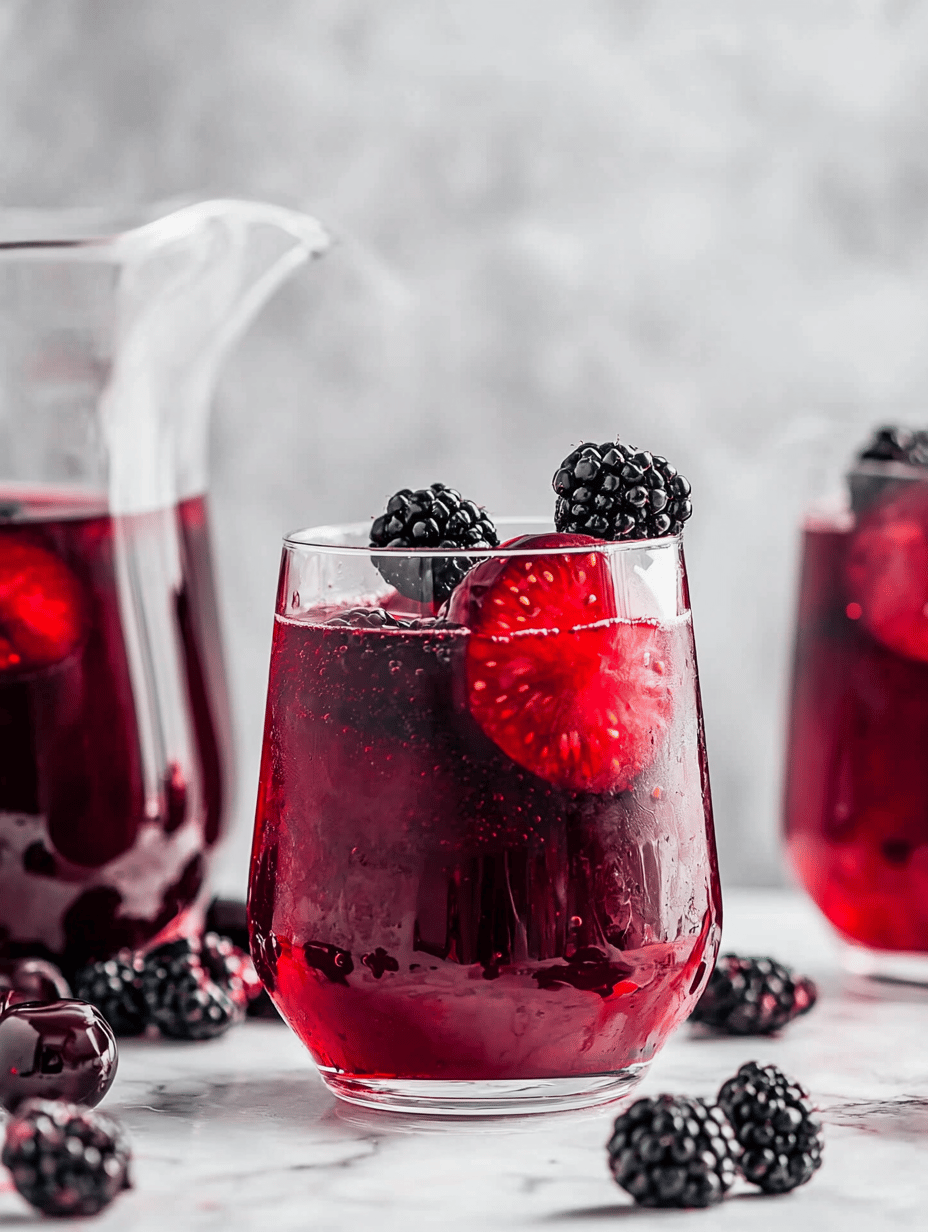
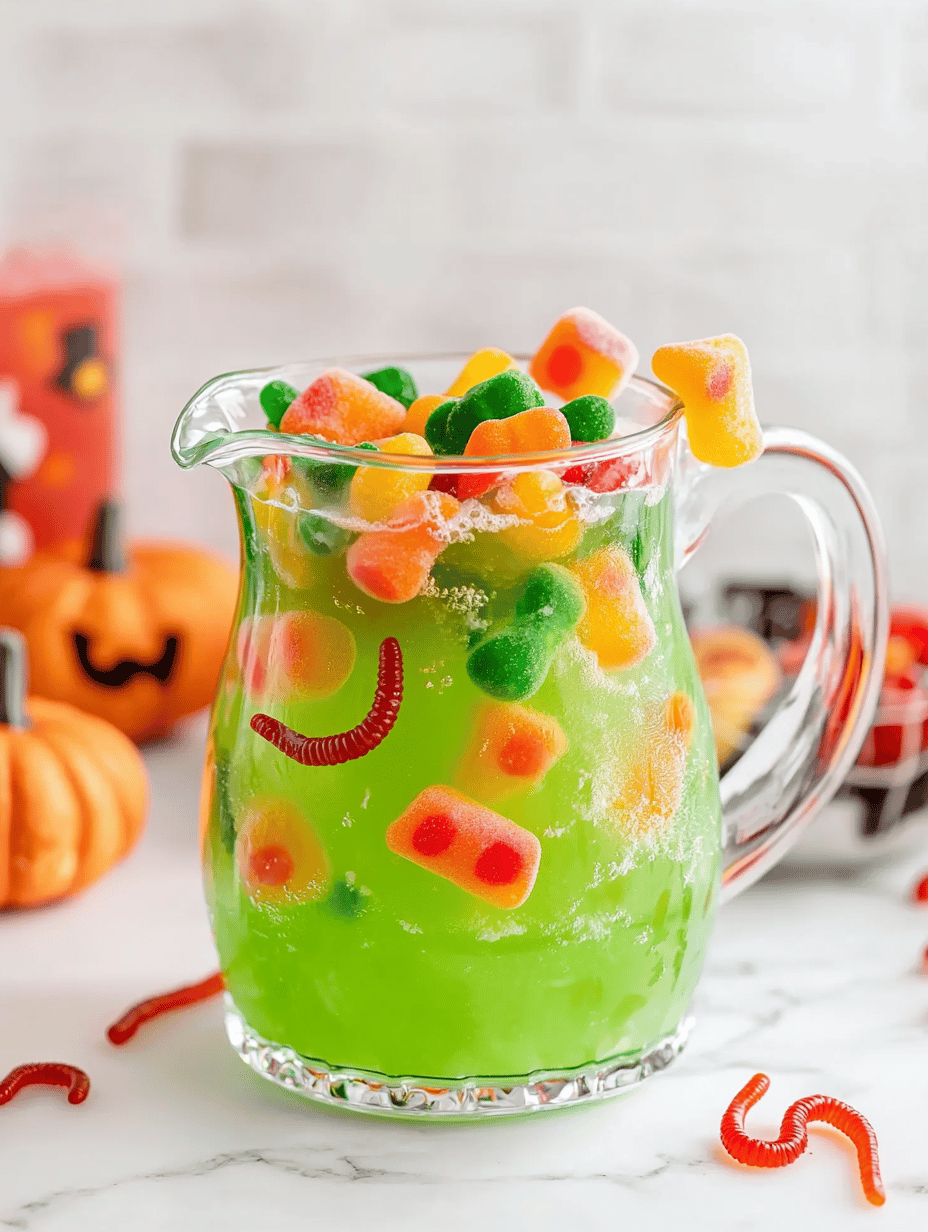
    As October winds down, I love diving into recipes that mix the creepy with the chic. This Halloween Vampire Punch isn’t just a drink; it’s a theatrical experience, simmering with the blood-red hue of ripe cherries and pomegranate juice. Its bubbling, vibrant look is like a potion straight from a Gothic novel.

    What makes this potion really special is how it combines simplicity with theatrical flair. A splash of sparkling water or soda transforms the deep red into a shimmering, effervescent spectacle. It’s perfect for haunted gatherings or just when you want to feel a little witchy at home.

    WHY I LOVE THIS RECIPE?

    • Unusual color sparks instant attention and makes my party unforgettable.
    • The mixture of tart and sweet flavors balances surprisingly well.
    • I love how easy it is to whip up with just a few ingredients.
    • The shimmering effect makes kids and adults smile.
    • Perfect for themed celebrations, no fancy equipment needed.

    AVOID MY DISASTER (You’re Welcome)

    • FORGOT the ice—ended up with a watered-down nightmare, so add plenty of it next time.
    • DUMPED too much rum—got a fiery mess, fix with extra juice to dilute.
    • OVER‑TORCHED the fruit garnish—lost the bright red color; re-chill before serving.
    • BURNED the sugar syrup—smelled like a campfire; use low heat and stir constantly.

    QUICK FIXES THAT SAVE YOUR DAY

    • When the punch is too sweet, SPLASH in some lime juice for a zing.
    • Patch bitter spots with a touch more tart cherry juice.
    • Shield from over-dilution by adding a splash of concentrated fruit syrup.
    • When the color dulls, sprinkle in a few crushed red candies for vibrance.
    • Work in a 5-second rescue—stir vigorously to reincorporate fizz and color.

    As the night falls and shadows deepen, this Vampire Punch glows ominously on the table. Its bright, blood-red hue makes it a centerpiece without needing elaborate decor. It’s a reminder that even simple ingredients can turn into a scene-stealing spectacle.

    This recipe feels like a mini adventure—playful, a little chaotic, and utterly fun. Perfect for Halloween, yes, but also for any dark, moody gathering where you want a splash of the supernatural. Cheers to casting a spell with something as easy as a glass of vibrant red brew.

    Vampire Punch

    Vampire Punch is a vibrant, blood-red beverage made by combining cherry and pomegranate juices with sparkling water, creating a bubbling, effervescent cocktail. The drink has a striking appearance with a deep red hue and a shimmering surface, perfect for Halloween or dark-themed gatherings.
    Prep Time 10 minutes
    Total Time 10 minutes
    Servings: 6
    Course: Main Course
    Cuisine: Gothic
    Calories: 80

    Ingredients
      

    • 1 cup cherry juice preferably tart or unsweetened
    • 1 cup pomegranate juice for rich color and flavor
    • 2 cups sparkling water or soda chilled, for shimmer and fizz
    • to taste ice cubes plenty to keep the punch cold

    Equipment

    • Large Mixing Pitcher
    • Measuring cups and spoons

    Method
     

    1. Pour the cherry juice into a large mixing pitcher, filling it about halfway.
    2. Add the pomegranate juice to the pitcher, creating a deep, blood-red mixture.
    3. Stir gently with a spoon to combine the juices thoroughly, watching the vibrant color blend smoothly.
    4. Add a generous handful of ice cubes to the pitcher, cooling the mixture instantly and creating a slight crackling sound.
    5. Slowly pour the chilled sparkling water or soda into the pitcher, allowing it to bubble up and create a shimmering, effervescent surface.
    6. Gently stir the punch again to distribute the bubbles evenly and enhance the sparkling effect.
    7. Serve the Vampire Punch in glasses filled with additional ice cubes for a chilling presentation and enjoy the bubbling, blood-red spectacle.

    Notes

    For extra theatrical effect, add some crushed red candies or a cherry garnish on top before serving.

    Once the glasses are raised, and the eerie glow begins to shimmer in the dark, you’ll see how this drink brings extra magic to the night. It’s not just about the looks but also the surprise of flavors that dance on the tongue with each sip.

    Even after Halloween, this Vampire Punch stays a favorite for its instant cheer factor and simple charm. A little chaos, a lot of color, and a touch of mystery make it an ideal choice for celebrating the spooky season or just adding some dark whimsy to your evening.

  • Chill Out with an Unusual Strawberry Slushie Twist

    Chill Out with an Unusual Strawberry Slushie Twist

    Imagine transforming a simple strawberry slushie into a sensory journey that surprises your palate. This recipe dives into the playful side of summer drinks, combining fresh strawberries with a hint of unexpected spices. It’s perfect for those who crave a cool refreshment with an unusual twist that sparks conversation.

    As someone who loves blending tradition with a dash of chaos, I found that a pinch of sea salt and a splash of balsamic vinegar elevate the fruity sweetness. This isn’t your average frozen treat; it’s a small adventure in a glass, bursting with bold flavors and icy crunch. Perfect for hot days or when you need a vibrant pick-me-up that feels anything but ordinary.

    Spiced Strawberry Slushie

    This spiced strawberry slushie is a frozen beverage made by blending fresh strawberries with spices, ice, and a splash of vinegar. The mixture results in a vibrant, icy drink with a smooth texture and bold flavor contrasts. The final appearance is a bright pink, slushy consistency, perfect for hot days or an adventurous palate.
    Prep Time 10 minutes
    Total Time 10 minutes
    Servings: 2
    Course: Main Course
    Cuisine: Contemporary
    Calories: 90

    Ingredients
      

    • 1 pint fresh strawberries hulled and halved
    • 1 cup ice cubes
    • 1 teaspoon balsamic vinegar adds depth and tang
    • 1/4 teaspoon sea salt enhances sweetness and flavor
    • 1 tablespoon honey or to taste

    Equipment

    • Blender
    • Measuring cups and spoons

    Method
     

    1. Place the halved strawberries into the blender jar.
    2. Add the ice cubes to the blender over the strawberries.
    3. Pour in the balsamic vinegar and sprinkle the sea salt over the mixture.
    4. Secure the lid on the blender and blend on high until the mixture is smooth and icy, about 30-40 seconds.
    5. Pause to check the texture—if it’s too thick, add a splash of water or juice and blend briefly again.
    6. Pour the slushie into glasses, jolts of icy pink ready to serve.
    7. Optionally, garnish with a fresh strawberry or a sprig of mint for visual appeal.

    This strawberry slushie captures the essence of summer’s playful spirit, ideal for spontaneous gatherings or solo moments of bliss. The surprise ingredients keep every sip interesting, making it a memorable addition to your drink repertoire. Enjoy the burst of freshness—simple ingredients, maximum impact—right in your own kitchen, whenever the heat calls for it.

    Remember, sometimes the quirkiest recipes make the best stories. Keep experimenting, stay cheerful, and let each sip remind you that a little chaos can lead to the sweetest discoveries.

  • Chill with a Twist: The Unexpected Charm of Whiskey Slushies

    Chill with a Twist: The Unexpected Charm of Whiskey Slushies

    As summer wanes and the evenings turn crisper, I find myself craving a drink that’s both playful and unexpected. Enter the whiskey slushie, a frozen cocktail that whispers nostalgia while daring to be different. The scent of bourbon mingles with sweet fruit, conjuring lazy sunsets and spontaneous backyard parties.

    This recipe is not just about cooling off; it’s about embracing the chaos of flavor—rich, boozy, and refreshingly icy. It’s a reminder that even in the glow of twilight, a little rebellion can be delicious. Perfect for those warm nights when you want a little more than a regular pour.

    Whiskey Slushie

    A whiskey slushie is a frozen cocktail made by blending bourbon, fruit juice, and sugar with ice until smooth and icy. The resulting dessert-like drink has a thick, slushy texture with a vibrant, frosty appearance and a balanced mix of sweetness and boozy warmth. It’s served chilled, often topped with fresh fruit or a sprig of mint for garnish.
    Prep Time 10 minutes
    Total Time 10 minutes
    Servings: 4
    Course: Main Course
    Cuisine: American
    Calories: 250

    Ingredients
      

    • 1 ½ cups bourbon or your preferred whiskey
    • 2 cups fruit juice (e.g., orange or cranberry) choose your favorite for flavor
    • ½ cup simple syrup or sugar syrup, adjust sweetness to taste
    • 3 cups ice cubes crushed ice works best

    Equipment

    • Blender
    • Measuring cups and spoons

    Method
     

    1. Measure out the bourbon, fruit juice, and simple syrup, then add them to the blender.
    2. Add the ice cubes to the blender on top of the liquid ingredients.
    3. Secure the lid on the blender and pulse a few times to start breaking up the ice.
    4. Blend on high for about 30-60 seconds until the mixture is smooth, thick, and frosty with a slushy consistency.
    5. Check the texture—if it’s too thick, add a splash of juice and blend briefly to loosen; if too thin, add more ice and pulse again.
    6. Pour the whiskey slushie into glasses, optionally garnished with fresh fruit or a sprig of mint.

    Notes

    Serve immediately for the best icy texture. You can freeze leftovers briefly to keep the consistency firm before serving.
    Whiskey slushies are surprisingly easy to make, and they add a splash of excitement to any gathering. Whether you’re reminiscing about summer or chasing away the evening chill, this drink carries a bold twist that always catches the eye.

    Next time you want a frozen treat with attitude, remember this simple recipe. It’s the kind of refreshment that sparks conversations and keeps the spirit lively well into the night.

  • The Art of Making the Perfect Watermelon Slushie on a Hot Day

    The Art of Making the Perfect Watermelon Slushie on a Hot Day

    Whether you’re lounging in your backyard or hosting a weekend gathering, this watermelon slushie is your go-to. It’s easy, quick, and impossible to mess up — a sweet relief when the heat is relentless. Plus, it feels like a small victory every time you sip on something so beautifully chilled and colorful.

    Watermelon Slushie

    This watermelon slushie is made by blending ripe watermelon chunks with ice until smooth, resulting in a cold, refreshing beverage. Its vibrant pink color and icy texture make it ideal for hot days, offering a sweet and juicy final result that’s both visually appealing and thirst-quenching.
    Prep Time 5 minutes
    Total Time 5 minutes
    Servings: 2
    Course: Main Course
    Cuisine: Global
    Calories: 120

    Ingredients
      

    • 4 cups cubed watermelon seedless or deseeded
    • 1 cup ice cubes adjust for desired consistency

    Equipment

    • Blender
    • Measuring cup

    Method
     

    1. Place the watermelon chunks and ice cubes into a blender.
    2. Secure the lid and blend on high speed until the mixture is smooth, icy, and uniform in texture. This usually takes about 30 seconds to 1 minute.
    3. Stop the blender and check the consistency; if it’s too thick, add a splash of water or more watermelon and blend again until it reaches your preferred smoothness.
    4. Pour the blended mixture into glasses, allowing the vibrant pink color and icy texture to spill over the rims.
    5. Serve immediately with a straw or small spoon, enjoying the refreshing, icy sensation and juicy flavor.
    As the heat builds outside, knowing you have a batch of vibrant watermelon slushie ready to go can be a game changer. It’s a reminder that the best moments sometimes come from the simplest ideas. Stay cool, enjoy the sunshine, and savor every frozen sip.

  • The Unexpected Charm of Rosé Wine Slushies for Summer Surprises

    The Unexpected Charm of Rosé Wine Slushies for Summer Surprises

    Imagine turning a simple glass of rosé into a shimmering icy treat that refreshes more than just your palate. This recipe transforms the usual summer sipper into a playful frozen delight, perfect for those lazy afternoons when the heat hits unexpectedly hard. It’s a bit chaotic, a little nostalgic, and undeniably fun.

    What makes this frosé stand out isn’t just its cooling effect, but the way it captures the spirit of carefree summer days. As the wine combines with icy crunch, it sparks memories of childhood treats and long conversations under the sun. Plus, it’s surprisingly easy to whip up, even with a busy schedule or last-minute guests.

    WHY I LOVE THIS RECIPE?

    • It’s a symbol of spontaneity, perfect for unplanned summer moments.
    • The aroma of chilled rosé mixed with frozen fruit is irresistibly inviting.
    • I love how it turns a simple wine into a show-stopping dessert.
    • Each sip offers a refreshing burst that’s both tart and mildly sweet.
    • Sharing it sparks joy and messy laughter.

    AVOID MY DISASTER (You’re Welcome)

    • FORGOT to chill the rosé overnight — the slushie turned into icy water. Freeze extra wine ahead.
    • DUMPED too much sugar — the flavor was too sweet. Use less for a balanced taste.
    • OVER-TORCHED the fruit — it caramelized and lost freshness. Use fresh, ripe berries instead.
    • FORGOT to blend long enough — texture was grainy. Pulse until smooth and creamy.

    QUICK FIXES THAT SAVE YOUR DAY

    • When the mixture is too liquid, add more frozen fruit and blend briefly.
    • Splash in a little lemon juice to brighten dull flavors.
    • Patch by adding a splash of sparkling water for extra shimmer.
    • If it’s too icy, let it sit a few minutes at room temperature.
    • Shield by serving immediately to prevent melting and loss of texture.

    This frozen rosé treat is more than just a drink; it’s a conversation starter and a sweet escape wrapped into one.

    Right now, as summer tips into its hottest moments, this recipe offers an effortless way to keep cool while embracing the playful chaos of the season. It’s a reminder that sometimes, the best moments come from simple, spontaneous choices — like turning wine into something icy and magical.

    Frozen Rosé Treat

    This frozen rosé dessert is made by blending chilled rosé wine with frozen fruit and sugar to create a slushy, icy texture. The mixture is processed until smooth and scoopable, resulting in a vibrant, shimmering frozen drink that resembles a slushie with a wine-infused flavor. It has a refreshing, tart-sweet taste with a visually appealing icy appearance.
    Prep Time 10 minutes
    Total Time 10 minutes
    Servings: 4
    Course: Main Course
    Cuisine: Summer
    Calories: 120

    Ingredients
      

    • 2 bottles (750 ml each) rosé wine chilled overnight
    • 2 cups frozen mixed berries ripe and fresh
    • 1/4 cup granulated sugar optional, for sweetness

    Equipment

    • Blender
    • Measuring cups and spoons

    Method
     

    1. Measure out the chilled rosé and pour it into the blender.
    2. Add the frozen mixed berries to the blender, ensuring they are evenly distributed for a vibrant color and flavor.
    3. Pulse the blender gently at first to break up the frozen fruit, then increase to high speed, blending until the mixture becomes smooth and slushy, with no large chunks remaining.
    4. Taste the mixture and adjust sweetness if needed by adding a splash more sugar or lemon juice, then pulse briefly to combine.
    5. Once the mixture is creamy, vibrant, and evenly blended, pour it into glasses or bowls.
    6. Optional: Garnish with fresh mint, edible flowers, or a rim of sugar for a decorative touch.
    7. Serve immediately with a straw or spoon, enjoying the cool, icy burst of flavor.

    Notes

    For best results, freeze extra rosé ahead of time to ensure a perfect slushy texture. You can customize sweetness and fruit choices to suit your taste. Serve immediately to prevent melting.

    Whether you’re lounging on a porch or hosting a last-minute gathering, this rosé slushie adds a bit of merry chaos to any summer scene. Its tangy, fruity character is a gentle reminder to embrace the imperfect and enjoy fleeting moments of joy.

    So next time the sun blazes high and plans fall apart, remember this easy, crowd-pleasing treat. It’s all about making the most of the warm days and creating memories that taste as sweet as the slushie itself.

  • The Secret Vanilla Slushie That Turns Lazy Afternoons Into Flavor Festivals

    The Secret Vanilla Slushie That Turns Lazy Afternoons Into Flavor Festivals

    WHY I LOVE THIS RECIPE?

    • Reminds me of childhood summer afternoons, simple and bursting with vanilla aroma.
    • The texture is playful — crunchy ice that melts into smooth freshness.
    • Very forgiving recipe—adjust sweetness and creaminess easily.
    • Perfect for last-minute cravings, with just a handful of pantry staples.

    AVOID MY DISASTER (You’re Welcome)

    • FORGOT to blend long enough, ended up with chunky ice. Just re-blend, no worries!
    • DUMPED in too much vanilla extract—totally overpowering. Use sparingly!
    • OVER‑TORCHED the sugar syrup — caramel scent was not what I wanted. Keep heat steady.
    • FORGOT to chill the glass, and it spilled everywhere. Chill it beforehand, or serve immediately!

    QUICK FIXES THAT SAVE YOUR DAY

    • When texture is too icy—splash in a splash of milk or cream and re-blend gently.
    • Patch flavor—add a dash of vanilla extract or vanilla bean paste for extra aroma.
    • Shield over-blended ice—pulse instead of continuous blend to keep crunch.
    • When sweetness is lacking—mix in a quick syrup or honey for a quick dress-up.
    • If the mixture isn’t cold enough—blend with ice right before serving for immediate chill.

    Vanilla Blueberry Ice Slush

    This ice slush is made by blending crushed ice with vanilla extract and fresh blueberries to create a refreshing, crunchy-textured dessert. The mixture results in a snowy, smooth consistency with bursts of berry flavor and a fragrant vanilla aroma. It’s a simple, nostalgic treat that showcases the interplay of icy crunch and smooth chill.
    Prep Time 5 minutes
    Total Time 5 minutes
    Servings: 2
    Course: Main Course
    Cuisine: American
    Calories: 120

    Ingredients
      

    • 3 cups crushed ice preferably finely crushed
    • 1 teaspoon vanilla extract use pure vanilla
    • 1/2 cup fresh blueberries washed and stems removed

    Equipment

    • Blender
    • Measuring cups and spoons
    • Serving glasses or bowls

    Method
     

    1. Place the crushed ice into the blender, filling it about three-quarters full for easy blending.
    2. Pour in the vanilla extract over the ice to evenly distribute the fragrant flavor throughout.
    3. Add the fresh blueberries on top of the ice, distributing them for vibrant bursts of color and fruitiness.
    4. Secure the lid tightly on the blender and pulse gently to start breaking down the ice, listening for that satisfying crunching sound.
    5. Blend on medium-high speed until the mixture is smooth and icy, with a slightly slushy texture and visible berry pieces.
    6. Pour the icy mixture into chilled glasses or bowls, letting it overflow slightly for a layered look.
    7. Garnish with a few extra blueberries or a sprig of mint if desired, enhancing visual appeal and freshness.

    Notes

    To prevent over-blending, pulse in short bursts to keep the crunch. If the mixture is too icy, add a splash of milk or cream and gently blend again to achieve the desired consistency.
    This vanilla slushie feels like a small rebellion against the heat, a quick escape into nostalgic bliss. It7s surprisingly versatile and easy to whip up, making it an ideal companion for lazy weekends or spontaneous gatherings.

    As the season shifts and the days grow warmer, having a simple frozen treat on hand becomes more than just a luxury—it’s a necessity. Whether enjoyed on a porch or packed in a cooler for a picnic, these icy vanilla dreams bring a little magic to everyday moments.

  • Chilling Secrets: The Surprising Art of Caramel Slushie Crafting

    Chilling Secrets: The Surprising Art of Caramel Slushie Crafting

    Imagine a sweltering summer day where the only thing that could save you from the heat is a drink so decadent, it whispers of caramel dreams. Instead of the usual icy mixes, I stumbled upon a method that amplifies that rich caramel aroma with a hint of salty chaos, transforming a simple slushie into an obsession. This recipe isn’t just about cooling down; it’s about elevating your frozen treat game to a whole new level.

    What makes this caramel slushie stand out is its layered history and unconventional twist. I experimented with different caramel intensities and added a splash of sea salt to balance the sweetness, creating a flavor profile that dances on the tongue. Now, whenever I need a quick reprieve, this chilly delight is my go-to, turning even the gloomiest days into moments of sugary joy.

    Salted Caramel Slushie

    This salted caramel slushie combines rich caramel with a splash of sea salt, blended into a icy, smooth beverage. The mixture is prepared using caramel sauce and then frozen and blended until creamy, resulting in a visually appealing, velvety texture. It offers a sweet, salty, and indulgent frozen treat perfect for hot days.
    Prep Time 10 minutes
    Total Time 10 minutes
    Servings: 2
    Course: Main Course
    Cuisine: Modern
    Calories: 200

    Ingredients
      

    • 1/2 cup Caramel sauce preferably salted
    • 1 cup Milk dairy or non-dairy alternative
    • 1 cup Crushed ice or ice cubes enough to fill the blender
    • 1/4 teaspoon Sea salt to enhance caramel flavor

    Equipment

    • Blender
    • Measuring cups and spoons
    • Ice cube tray or crushed ice

    Method
     

    1. Pour the caramel sauce and milk into the blender, and blend on low speed until the mixture is well combined and slightly frothy.
    2. Add the crushed ice or ice cubes to the blender, filling it up to the top.
    3. Sprinkle the sea salt over the mixture, then increase the blender speed to high, blending until the ice is broken down and the mixture becomes smooth and slushy, about 30-40 seconds.
    4. Pause briefly to check the texture; if it’s too thick, add a splash more milk and blend again for a softer consistency.
    5. Once the slushie is thick, creamy, and vibrant in color, turn off the blender and pour into chilled glasses.
    6. Optional: Garnish with a drizzle of caramel or a pinch of sea salt on top for extra flavor and visual appeal.
    7. Serve immediately with a straw and enjoy this cold, decadent treat.

    Notes

    For best results, use high-quality caramel sauce and freshly crushed ice. Adjust the salt to taste for a more or less salty flavor.

    Every spoonful delivers a satisfying crunch of ice combined with utterly luscious caramel that stays with you long after the last sip. It’s a reminder that some simple ingredients, when handled with a bit of flair, can become pure magic during the hottest months.

    As the season slides into peak summer, this caramel slushie offers a nostalgic yet fresh escape. It’s perfect for backyard gatherings, solo indulgence, or a quick burst of happiness in the middle of a hectic day. Keep the blender ready; this treat is bound to become your new favorite way to beat the heat.

  • Chill Out with the Most Unexpected Chocolate Slushie Twist

    Chill Out with the Most Unexpected Chocolate Slushie Twist

    On those scorchingly hot days, I crave icy treats that shock my taste buds. But instead of reaching for the usual popsicle, I stumbled upon a secret trick to make a chocolate slushie that combines childhood nostalgia with a daring flavor twist. This recipe is my go-to when I want a frozen hug, but with a kick of something extraordinary.

    What makes this chocolate slushie special isn’t just the velvety richness of cocoa but how it transforms with unexpected ingredients—think a dash of smoky salt or a swirl of spicy chili. It’s perfect for backyard parties or a solo escape after a busy day. I promise, it’s not just a drink, it’s an adventure in every sip.

    **WHY I LOVE THIS RECIPE?**

    • My childhood favorite with a modern, rebellious twist.
    • The surprising flavors make it feel like a special treat every time.
    • It’s so easy—blend, freeze, enjoy — no fuss.
    • Perfect for spontaneous hot days or unexpected guests.
    • The texture is insanely smooth, almost like velvet melting on your tongue.

    **AVOID MY DISASTER (You’re Welcome)**

    • FORGOT to check the ice-to-liquid ratio? Ended up waterlogged. Reduce the ice slightly!
    • DUMPED in too much cocoa powder? Bitter slush. Balance with a little milk or cream.
    • OVER-TORCHED the chocolate? Smells burnt. Use gentle heat and stir constantly.
    • FROZEN fruit got stuck to the freezer? Let it thaw for a few minutes to blend better.

    **QUICK FIXES THAT SAVE YOUR DAY**

    • When the texture’s too icy, splash in a little more milk and blitz again.
    • Patch a flavor dullness with a dash of vanilla extract or a pinch of sea salt.
    • Shield chaos by pre-chopping frozen ingredients to avoid clumping.
    • If mixture is too thick, add a splash of cold water—shimmering with ease.
    • When in doubt, a quick run under hot water melts stubborn blocks in seconds.

    Chocolate Spicy Chili Slushie

    This chocolate slushie combines the richness of cocoa with a spicy kick, resulting in a velvety, frozen beverage. It uses blending and freezing techniques to achieve a smooth, icy texture with surprising flavor contrasts. The final appearance is a thick, chocolatey slush with a glossy surface and hints of spice and smokiness.
    Prep Time 10 minutes
    Total Time 10 minutes
    Servings: 2
    Course: Main Course
    Cuisine: Fusion
    Calories: 150

    Ingredients
      

    • 1 cup whole milk for blending and smooth texture
    • 1/2 cup unsweetened cocoa powder for rich chocolate flavor
    • 1/4 teaspoon smoked sea salt adds smoky depth
    • 1 teaspoon chili powder for a spicy kick
    • 1 tablespoon honey sweetens and balances spice
    • 1 cup ice cubes for chilling and thickening

    Equipment

    • Blender
    • Freezer

    Method
     

    1. Add milk, cocoa powder, smoked salt, chili powder, and honey into a blender. Blend on high until the mixture is smooth and velvety, with no lumps, and the aroma of cocoa and spices is fragrant.
    2. Add the ice cubes to the blender and pulse a few times to start crushing the ice, then blend on high until the mixture is thick, slushy, and glossy, about 30-45 seconds. The texture should be creamy but with a noticeable icy bite.
    3. Stop the blender and check the texture; if it’s too icy, add a splash more milk or honey and blend briefly again until desired consistency is achieved. If it’s too thin, add a few more ice cubes and blend again for a thicker consistency.
    4. Pour the slushie mixture into chilled glasses. The surface should be a glossy, thick layer with visible flecks of chili and smoky salt particles for an appealing look and flavor burst.
    5. Garnish with a tiny sprinkle of smoked salt or a chili flake if desired. Serve immediately with a straw or spoon, enjoying the contrast of cold, creamy chocolate and spicy warmth.

    Notes

    Ensure the ice is fresh and slightly crushed before blending for a smoother texture. Adjust spice levels according to your taste. For an extra smoky flavor, add a dash of smoked paprika instead of smoked salt.

    This chocolate slushie recipe is a true reflection of summer’s playful spirit. Its sudden burst of unconventional spices or textures reminds us to enjoy the moments of surprise. Each sip carries a burst of joy that’s perfect for relishing in the present.

    Even as the season shifts, this recipe stays fresh because it captures that carefree, spontaneous vibe. It’s a simple but memorable way to turn ordinary ingredients into a memorable frozen treat. Let it be your secret weapon on the hottest days or whenever you crave an unexpected chocolate escape.

  • Chill Out with an Exotic Iced Tea Slushie Adventure

    Chill Out with an Exotic Iced Tea Slushie Adventure

    Most iced tea recipes stick to the familiar: a splash of lemon, a dash of sweetness. But I recently discovered a way to turn this classic into a summer spectacle, with just a blender and a splash of daring. The secret? Infusing the tea with unexpected flavors like fresh basil or a hint of spicy ginger before turning it into a frosty slushie.

    As the ice hits the fruity or herbal notes, the texture becomes icy yet smooth, like biting into a refreshing cloud. This recipe lets you customize the flavor palette, transforming your ordinary iced tea into a conversation-starting chill-out drink. Perfect for those long, lazy afternoons or spontaneous gatherings in the backyard.

    Frosted Basil Ginger Iced Tea Slushie

    This iced tea slushie combines brewed black tea infused with fresh basil and spicy ginger, blended with ice until smooth and icy. The final texture is a frosty, refreshing beverage with a vibrant herbal and spicy flavor profile, resembling a chilled cloud of flavor.
    Prep Time 10 minutes
    Cook Time 5 minutes
    Total Time 15 minutes
    Servings: 4
    Course: Main Course
    Cuisine: Fusion
    Calories: 120

    Ingredients
      

    • 4 cups water for brewing tea
    • 4 bags black tea bags or 4 teaspoons of loose leaf tea in a infuser
    • 1 cup fresh basil leaves roughly chopped, for infusion
    • 1 inch fresh ginger sliced thin
    • 0.5 cup honey or simple syrup adjust sweetness to taste
    • 4 cups ice cubes plus extra for serving

    Equipment

    • Kettle or saucepan
    • Blender
    • Measuring cups and spoons
    • Fine strainer

    Method
     

    1. Bring water to a boil in a kettle or saucepan. Once boiling, pour it over the black tea bags in a heatproof container and steep for 5 minutes. Remove the tea bags and let the tea cool to room temperature.
    2. While the tea cools, add chopped basil and sliced ginger to the cooled tea. Stir in honey or simple syrup until fully dissolved. Cover and refrigerate for at least 30 minutes to allow the flavors to infuse deeply.
    3. Strain the infused tea through a fine strainer into a blender, discarding the herbs and spices. Add the remaining ice cubes to the blender.
    4. Blend on high speed until the mixture is smooth, frosty, and thickened—about 30 seconds. The texture should be icy and slushie-like, with the herbal and spicy notes well incorporated.
    5. Pour the frosty iced tea slushie into glasses, garnishing with fresh basil leaves if desired. Serve immediately for a refreshing, chilled beverage.

    Notes

    Adjust sweetness and herbal intensity based on personal preference. For a spicier kick, add more ginger or a dash of cayenne pepper before blending.

    Living through these warm months, I find that a cold, flavorful slushie can swiftly change the mood of any day. It’s a simple joy that combines the familiarity of iced tea with a cool twist, making even the hottest days bearable. Plus, it’s a delightful way to sip something sweet while craving less sugar.

    Enjoying this drink offers a little escape, a moment to pause, and a burst of refreshment that’s both satisfying and easy to whip up. The next time the sun is blazing, remember that a frozen tea delight might just be what you need to beat the heat with style.

  • Spooktacularly Weird: The Halloween Monster Mash Punch

    Spooktacularly Weird: The Halloween Monster Mash Punch

    Every October, my kitchen turns into a chaotic carnival of colors and textures as I prepare something truly unconventional—my Halloween Monster Mash Punch. This bright, bubbly brew isn’t just about taste; it’s a visual feast with luminous greens, eerie purples, and blood-red splashes that look straight out of a haunted house. The best part? Its funky scent of citrus and soda that even ghosts can’t resist.

    Unlike typical punches, this recipe embraces the chaos of halloween, blending strange ingredients with a whimsically spooky presentation. It’s a recipe that invites giggles and gasp-worthy reactions from everyone, young and old. The secret? It’s all about turning simple sodas and candies into a monstrous masterpiece that’s as fun to make as it is to sip.

    Halloween Monster Mash Punch

    This vibrant, bubbly punch combines brightly colored sodas, fruit juices, and fun candies to create a visually striking and fizzy beverage. It features a mix of luminous greens, eerie purples, and red splashes, with a lively texture from carbonated drinks and chewy candies, resulting in a fun, spectacle-worthy drink perfect for Halloween festivities.
    Prep Time 15 minutes
    Total Time 15 minutes
    Servings: 8
    Course: Main Course
    Cuisine: Halloween
    Calories: 120

    Ingredients
      

    • 2 cups green fruit punch chilled
    • 2 cups purple grape soda chilled
    • 1 cup red berry-flavored soda chilled
    • 1 cup orange fruit juices chilled
    • 1 cup green gummy worms for garnish
    • 1 cup purple candies (like grapes or gummies) for garnish
    • 1/2 cup red sour candies or red sprinkles for extra blood-red splashes

    Equipment

    • Large punch bowl
    • Mixing spoon

    Method
     

    1. Pour the chilled green fruit punch into a large punch bowl, creating a vibrant base for your monstrous mixture.
    2. Add the purple grape soda to the bowl, pouring gently to maintain the striking color contrast and create a swirling, eerie effect.
    3. Stir the mixture gently with a mixing spoon, blending the different colors while keeping the carbonation lively and bubbly.
    4. Pour in the red berry-flavored soda and the orange fruit juices, watching as the colors meld into a spooky, swirling concoction.
    5. Garnish the punch with green gummy worms by nesting them on the surface, giving a creepy, crawling appearance.
    6. Scatter purple candies across the top, adding pops of color and texture to resemble mysterious gemstones in your potion.
    7. Sprinkle red sour candies or red sprinkles over the surface to mimic blood splashes, enhancing the spooky theme.
    8. Serve the punch immediately in glasses or cups, allowing everyone to enjoy the colorful, bubbling spectacle of your Halloween Monster Mash Punch.

    Notes

    Feel free to add more candies or gummy worms for extra spookiness. For a less sugary version, swap some sodas for fruit-infused waters.

    This punch is a seasonal staple that sparks joy and a little bit of spooky nostalgia at every Halloween gathering. Its playful appearance and surprising flavor combinations make it a standout centerpiece on any party table. Plus, it’s easy enough to whip up in moments when the chaos of costumes and decorations is already in full swing.

    As the night winds down, the glowing remnants of this monstrous drink remain a sweet memory of the evening’s chaos and creativity. The kids will talk about the wild colors and fizzy fun for days, while adults will appreciate how simple ingredients became a jaw-dropping spectacle. Here’s to many more years of creepy sips and spooky cheers!