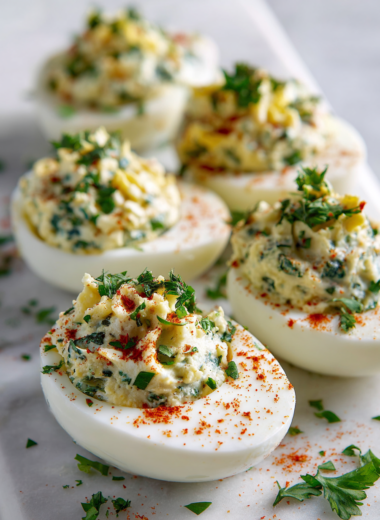
Category: Appetizers

  • Spooky Gourmet: Halloween Deviled Egg Eyeballs That Wow

    Spooky Gourmet: Halloween Deviled Egg Eyeballs That Wow

    Choosing a Halloween appetizer that’s both creepy and delicious can be tricky. This year, I decided to push the boundaries with an eerie twist on classic deviled eggs. The idea of transforming simple deviled eggs into eyeballs combines eeriness with familiar comfort, making them a perfect party center piece.

    Striking visuals matter almost as much as taste during the spooky season. I experimented with different edible

    Eerie Eyeball Deviled Eggs

    This dish features hard-boiled eggs with creamy yolk filling, topped with visual elements that resemble eyeballs. The eggs are prepared by boiling, halving, and filling, then decorated with pea or olive pupils to create a spooky, realistic appearance. The final presentation is both creepy and appealing, ideal for Halloween-themed gatherings.
    Prep Time 15 minutes
    Cook Time 10 minutes
    Total Time 25 minutes
    Servings: 6
    Course: Main Course
    Cuisine: American
    Calories: 80

    Ingredients
      

    • 6 pieces large eggs fresh, room temperature for easier peeling
    • 3 tablespoons mayonnaise creamy filling base
    • 1 teaspoon yellow mustard adds tang to the filling
    • to taste salt seasoning
    • to taste black pepper optional, for seasoning
    • 1/4 cup green peas or sliced black olives for the eyeball pupils

    Equipment

    • Saucepan
    • Mixing bowl
    • Small spoon or piping bag
    • Knife
    • Plate for serving

    Method
     

    1. Place the eggs in a saucepan and cover with cold water. Bring to a boil over medium-high heat, then reduce to a simmer and cook for 9–10 minutes.
    2. Once cooked, transfer the eggs to a bowl of ice water to stop the cooking process and make peeling easier. Let them cool for at least 5 minutes.
    3. Peel the eggs carefully, then slice them in half lengthwise with a sharp knife. Gently remove the yolks and place them in a mixing bowl.
    4. Mash the yolks with a fork until smooth, then stir in mayonnaise, yellow mustard, salt, and pepper until the mixture is creamy and well combined.
    5. Use a small spoon or piping bag to carefully fill each egg white half with the yolk mixture, creating a smooth, domed top.
    6. Slice green peas or black olives to create small round pupils, then place a pea or olive in the center of each filled egg to resemble an eyeball.
    7. Arrange the decorated eggs on a serving plate, ensuring the eyeballs are prominently displayed for maximum spooky effect.

    Notes

    For extra creepiness, add a small pooled drop of red food coloring around each eyeball or use red bell pepper strips for veins.

    These eyeball deviled eggs turn an ordinary snack into a conversation starter. Their shock factor promises to delight guests and spark lots of playful squeals. Plus, they’re surprisingly easy to whip up in advance, keeping your kitchen chaos-free during party prep.

    In a season that celebrates all things spooky, these eggs add just the right touch of grotesque charm. They remind us that fun is about breaking the rules and embracing a little chaos at the dinner table. And honestly, nothing beats the smile of a guest realizing they’re biting into a tiny eyeball.

  • Spooky Delight: Halloween Mummy Hot Dogs

    Spooky Delight: Halloween Mummy Hot Dogs

    Every October, I find myself craving a mix of nostalgia and chaos, especially when it comes to holiday treats. This year, I decided to get a little creative with the classic hot dog, transforming it into an eerie mummy that’s both playful and surprisingly satisfying. The smell of sizzling puff pastry and hot dogs is an instant reminder of childhood Halloweens, infused with a mischievous twist.

    What sets these Mummy Hot Dogs apart is their simplicity and the fun chaos of wrapping dough with a messy, mummy-like flair. They’re perfect for last-minute parties or a fun kitchen adventure with kids. Plus, their spooky appearance guarantees plenty of oohs, ahhs, and giggles at your gathering.

    **WHY I LOVE THIS RECIPE?**

    • I love how this recipe combines fun and flavor effortlessly.
    • The chaos of wrapping is pure joy, especially with little helpers.
    • The aroma of baked pastry with smoky hot dogs is irresistible.
    • It’s a nostalgic trip to childhood Halloween parties.
    • The quick prep makes it a perfect last-minute treat.

    **AVOID MY DISASTER (You’re Welcome)**

    • FORGOT to pinch edges, hot dog slid out—re-pinch and patch the pastry tightly.
    • DUMPED ketchup on my costume—cleaned, then used edible eyes for a spooky touch.
    • OVER-TORCHED pastry—set a timer and watch carefully for that golden glow.
    • MISSED the marking on dough—use a ruler or freehand confidently for uneven shapes.

    **QUICK FIXES THAT SAVE YOUR DAY**

    • When pastry sticks, splash cold water along the edges to loosen.
    • Patch a torn puff pastry with extra dough pieces and a quick egg wash.
    • Shield hot spots by rotating tray for even baking.
    • When in doubt, serve with a smear of mustard—adds flavor and covers imperfections.
    • Swap out frozen puff pastry if fresh isn’t available; it still crisps beautifully.

    Mummy Hot Dogs

    Mummy Hot Dogs are a playful appetizer featuring hot dogs wrapped in flaky puff pastry that resemble mummies. The dough is wrapped loosely to create a messy, spooky appearance, then baked until golden and crispy. The final dish has a crunchy exterior with hot, smoky hot dogs peekaboo from the wrapping.
    Prep Time 10 minutes
    Cook Time 15 minutes
    Total Time 25 minutes
    Servings: 6
    Course: Main Course
    Cuisine: American
    Calories: 220

    Ingredients
      

    • 1 pack puff pastry sheets thawed if frozen
    • 6 large hot dogs
    • 1 egg egg, beaten for egg wash
    • optional for decoration edible eyes small candy or icing eyes for added spookiness

    Equipment

    • Baking sheet
    • Parchment paper
    • Knife
    • Pastry brush

    Method
     

    1. Preheat your oven to 400°F (200°C) and line a baking sheet with parchment paper.
    2. Unroll the puff pastry sheets on a lightly floured surface. Cut each sheet into 3–4 strips, about 1 inch wide, to create enough length for wrapping hot dogs.
    3. Place a hot dog on the end of a pastry strip and gently wrap the dough around it, leaving a slight gap at the top for the ‘face.’ Loosely overlap the dough so it resembles a mummy, with some strips hanging or uneven for a spooky look.
    4. Repeat this process with all hot dogs, arranging them spaced out on the prepared baking sheet.
    5. Brush each wrapped hot dog lightly with the beaten egg to help the pastry turn golden and shiny when baking.
      1 pack puff pastry sheets
    6. Bake for 12–15 minutes, or until the pastry is puffed up, golden brown, and crispy to the touch.
    7. Remove from the oven and let cool slightly. Use edible eyes or small candies to add spooky facial features to each mummy for extra fun.
      1 pack puff pastry sheets
    8. Serve these fun Mummy Hot Dogs warm, with mustard or ketchup on the side for dipping. Enjoy the crispy, savory bites that are perfect for any Halloween celebration.
    These Mummy Hot Dogs are a celebration of chaos and creativity, perfect for Halloween’s playful spirit. Their quirky appearance and satisfying bites make them a favorite for both kids and adults alike. Plus, the ease of making them means you’ll have more time to enjoy the shadows and screams of the evening.

    This recipe captures the unpredictably fun side of Halloween while satisfying that craving for salty, crispy treats. It’s a small, delicious reminder that sometimes, the messiest ideas turn out to be the most memorable. No matter the chaos in the kitchen, these mummies always bring smiles and spooky cheer.

  • Spooky Souls: Halloween Jack-o’-Lantern Stuffed Peppers That Delight and Surprise

    Spooky Souls: Halloween Jack-o’-Lantern Stuffed Peppers That Delight and Surprise

    Imagine a hauntingly cute centerpiece for your Halloween table. These stuffed bell peppers shaped like tiny jack-o’-lanterns add a playful, spooky charm to your feast. What makes this recipe stand out? It combines the classic comfort of stuffed peppers with the eerie fun of Halloween decoration, all in a bite-sized form.

    The magic happens as you hollow out colorful peppers, carve little faces, and fill them with a savory mixture. The aroma of roasting peppers mingling with seasoned filling is almost as satisfying as the visual delight. Plus, these are surprisingly simple to prepare, even if you’ve never carved a pumpkin before.

    WHY I LOVE THIS RECIPE?

    • I adore turning everyday ingredients into festive sights that kids and adults will adore.
    • The chaos of carving and stuffing is half the fun — and it smells divine as they bake.
    • It’s a nostalgic nod to childhood costumes and candy, reimagined as a savory snack.
    • Sharing these makes me proud — they’re cute, delicious, and spark joyful screams.
    • The process adds a whimsical touch to my Halloween prep, making it feel like a creative ritual.

    AVOID MY DISASTER (You’re Welcome)

    • FORGOT to check your peppers’ size—too large and they overwhelm; small ones look perfect.
    • DUMPED filling into the oven prematurely—keep an eye on the baking time and temperatures.
    • OVER‑TORCHED the peppers — a burnt face ruins the look; cover loosely with foil to prevent this.
    • FORGOT to seed the peppers—saves time and prevents sogginess in the filling.

    QUICK FIXES THAT SAVE YOUR DAY

    • When peppers aren’t filling out, GENTLY deepen the carving for a more defined face.
    • SPLASH extra cheese on top for a crispy, bubbly finish—your kitchen will smell irresistible.
    • When filling seems sparse, PACE it into each cavity carefully for a full look.
    • Over‑cooked? TRADE out burnt bits with fresh, crunchy peppers in a flash.
    • If your peppers look dull, SPRINKLE a dash of paprika for vivid color and smoky aroma.

    These jack-o’-lantern stuffed peppers are a playful way to bring festive energy to your Halloween. The crunchy, tender peppers paired with savory filling make every bite memorable. They’re a fun, edible decoration that also satisfies your craving for something hearty and flavorful.

    As the air turns crisp and the nights grow longer, this recipe is perfect for embracing the season’s whimsy. It invites a splash of creativity in the kitchen and a burst of nostalgia at the table. Whether you serve them for a party or a cozy family dinner, they turn simple ingredients into a delightful holiday tradition.

    Halloween Jack-o’-Lantern Stuffed Peppers

    This dish features small bell peppers carved into pumpkin faces and filled with a savory mixture of seasoned rice, vegetables, and cheese. The stuffed peppers are baked until tender and the tops are bubbly, creating a festive, bite-sized centerpiece with a combination of crunchy and tender textures. Their playful appearance makes them a fun and flavorful Halloween decoration.
    Prep Time 20 minutes
    Cook Time 30 minutes
    Total Time 50 minutes
    Servings: 6
    Course: Main Course
    Cuisine: Halloween
    Calories: 180

    Ingredients
      

    • 6 small bell peppers preferably colorful, medium-sized
    • 1 cup cooked rice cooled
    • 1/2 cup diced onion finely chopped
    • 1 cup shredded cheddar cheese plus extra for topping
    • 2 cloves garlic minced
    • 1 teaspoon paprika for color and flavor
    • 2 tablespoons olive oil for sautéing

    Equipment

    • Baking sheet
    • Knife

    Method
     

    1. Preheat your oven to 375°F (190°C). Slice off the tops of the peppers and remove seeds and membranes carefully, creating hollow cavities.
    2. Slice the removed tops into small circles or strips to use as the pumpkin’s face features later.
    3. Heat olive oil in a skillet over medium heat. Add diced onion and cook until translucent and fragrant, about 3-4 minutes.
    4. Stir in minced garlic and cook for another 30 seconds until fragrant. Remove from heat and let cool slightly.
    5. In a mixing bowl, combine cooked rice, sautéed onion and garlic, shredded cheese, paprika, salt, and pepper. Mix until well combined.
    6. Fill each hollowed-out pepper with the savory rice and cheese mixture, pressing lightly to pack it in.
    7. Place the stuffed peppers on a baking sheet and arrange the carved faces on top using the pepper slices or bits to create eyes and a mouth.
    8. Bake in the preheated oven for about 25-30 minutes, until the peppers are tender and the cheese is bubbly and golden around the edges.
    9. Remove from oven and sprinkle extra cheese on top, then bake for an additional 2-3 minutes if desired for a crispy, bubbly finish.
    10. Allow the peppers to cool slightly before serving. They should be tender with a slightly crisp, roasted skin and a warm, savory filling inside.

    Making these Halloween stuffed peppers is a small act of culinary playfulness, perfect for the season. They bring a sense of joy and a dash of spooky charm that resonates with the time of year. Plus, they taste just as fun as they look — crispy, cheesy, and packed with flavor.

    In a world that often feels hurried, taking a moment to craft something whimsical reminds us of the simple joys of cooking. These peppers serve as a cheerful, tasty reminder that the best celebrations are made with a bit of effort and a lot of imagination. Enjoy your spooky, savory creations!

  • Spooky Cheer: The Halloween Spider Cheese Ball

    Spooky Cheer: The Halloween Spider Cheese Ball

    Halloween parties are all about unleashing creative snacks that surprise and delight. This Spider Cheese Ball transforms a simple appetizer into a creepy, crave-worthy centerpiece. Its mischievous spider shape adds a playful touch to your spooky spread, catching both eyes and taste buds.

    What makes this recipe stand out is the way it combines creamy cheese with a crispy crunch, topped with crunchy pretzels that mimic webbed legs. It’s fun to make and even more fun to eat, especially as the anticipation of Halloween night’s spooky fun builds up. Plus, it’s guaranteed to spark conversations and giggles at any gathering.

    Spider Cheese Ball

    This Spider Cheese Ball is a creamy cheese mixture shaped into a spherical form and decorated with pretzel legs to resemble a spider. The dish combines smooth, tangy cheese with crunchy pretzels, creating a contrast in textures and a playful appearance suitable for Halloween parties. It has a firm yet spreadable consistency that holds its shape when served.
    Prep Time 15 minutes
    Total Time 15 minutes
    Servings: 8
    Course: Main Course
    Cuisine: American
    Calories: 150

    Ingredients
      

    • 8 oz cream cheese softened at room temperature
    • 1 cup shredded cheddar cheese
    • 1 teaspoon garlic powder
    • 1/2 teaspoon paprika
    • 1 dollop hot sauce optional for flavor
    • 20 pretzels pretzel sticks or pretzels for spider legs
    • additional additional pretzels or crackers for serving

    Equipment

    • Mixing bowl
    • Plastic wrap
    • Spoon
    • Baking sheet
    • Pretzel sticks or pretzels

    Method
     

    1. In a mixing bowl, combine the softened cream cheese, shredded cheddar, garlic powder, paprika, and hot sauce if using. Mix everything thoroughly until the cheese mixture is smooth and uniform in color, with no lumps remaining.
    2. Shape the cheese mixture into a tight, round ball using your hands or a spatula, making sure it holds together well.
    3. Wrap the cheese ball in plastic wrap and refrigerate for at least 30 minutes to help it firm up.
    4. Remove the cheese ball from the fridge and place it on a serving platter. Unwrap the plastic, revealing a firm, smooth sphere ready for decoration.
    5. Arrange pretzel sticks or pretzels around the cheese ball, securing them into the surface to look like spider legs.
    6. Adjust the placement of pretzels to evenly distribute them around the sphere, ensuring a balanced spider shape.
    7. Optionally, add small crackers or more pretzels around the base for extra decoration and serving options.
    8. Once decorated, serve immediately or keep refrigerated until ready to present to keep the cheese firm and fresh.

    Wrapping up, the Halloween Spider Cheese Ball is a perfect way to blend fun and flavor in your spooky season menu. Its eye-catching design makes it a highlight that everyone remembers and talks about long after the night ends.

    While simple enough for a beginner, it offers enough whimsy to impress your friends and family. Whether you’re hosting a ghostly gathering or a last-minute costume bash, this cheesy spider adds that dash of devilish delight everyone will enjoy. Happy haunting and snacking!

  • Spooky Elegance: Halloween Eyeball Caprese Bites

    Spooky Elegance: Halloween Eyeball Caprese Bites

    Halloween is not just about candies and costumes; it’s an opportunity to embrace playful sophistication. These Eyeball Caprese Bites turn the classic Italian appetizer into a spooky, bite-sized adventure perfect for your spooky soirée.

    The secret lies in the playful mimicry of eyeballs using fresh mozzarella, cherry tomatoes, and perfect blood-red balsamic drizzle. The bright, fresh basil adds a whisper of green, contrasting the eerie red and white. They’re as fun to assemble as they are to eat, making party prep a delightful chaos.

    Every bite offers a burst of creamy cheese, a hint of basil, and a sweet vinegary punch that snaps in your mouth. This easy, eye-catching appetizer gets everyone talking—and reaching for seconds. Plus, they’re so simple, even the most distracted chef can pull them off before the clock strikes midnight.

    Eyeball Caprese Bites

    These Eyeball Caprese Bites are small appetizer skewers assembled with fresh mozzarella, cherry tomatoes, and basil, mimicking creepy eyeballs. Drizzled with balsamic reduction, they have a creamy, juicy texture with a vibrant red, white, and green appearance, perfect for spooky parties. The dish emphasizes simple assembly and fresh ingredients, resulting in an eye-catching, bite-sized treat.
    Prep Time 15 minutes
    Total Time 15 minutes
    Servings: 8
    Course: Main Course
    Cuisine: Italian
    Calories: 80

    Ingredients
      

    • 8 pieces cherry tomatoes select firm, ripe ones
    • 8 pieces fresh mozzarella balls small size for bite-sized presentation
    • 8 leaves fresh basil small leaves or torn pieces
    • to taste balsamic glaze or reduction for drizzling

    Equipment

    • Small skewers or cocktail picks
    • Balsamic glaze or reduction
    • Knife
    • Cutting board

    Method
     

    1. Skewer a cherry tomato onto a small pick or skewer.
    2. Add a small piece of basil on top of the cherry tomato, creating a green “iris”.
    3. Place a fresh mozzarella ball on top of the basil, completing the eyeball assembly.
    4. Repeat the process with remaining ingredients until all skewers are assembled.
    5. Drape a few drops of balsamic glaze over each skewer, allowing it to gently run down and mimic bloodshot eyes.
    6. Arrange the eyeball bites on a serving platter and serve immediately for a spooky, fun appetizer.

    These Eyeball Caprese Bites aren’t just creepy-cute—they also bring a fresh, flavorful twist to your Halloween spread. They look surprisingly sophisticated on a tray and add that punch of color every spooky party needs. Plus, they’re a great way to sneak in some fresh ingredients while keeping the vibe fun and festive.

    As the night unfolds, I find that small, stunning bites like these keep the chaos light and the conversation lively. They remind me that Halloween is about celebrating creativity—whether through costumes or clever snacks. Here’s to a night full of ghoulish charm and delicious, eyeball-worthy bites.

  • Spooky Good! Halloween Mummy Meatballs That Steal the Show

    Spooky Good! Halloween Mummy Meatballs That Steal the Show

    Every October, I crave recipes that blend nostalgia with a sprinkle of chaos. Halloween is my excuse to create culinary monsters, and these mummy meatballs are no exception. They turn a simple dinner into a playful, edible spectacle that kids and grown-ups adore.

    What makes this recipe special is how approachable it is. Combining familiar flavors with a touch of dress-up makes dinner feel like a little celebration. Plus, the aroma of seasoned meatballs baking with crispy cheese bandages is irresistible — it’s pure comfort with a spooky twist.

    WHY I LOVE THIS RECIPE?

    • The way the cheesy bandages add crispy texture and salty punch
    • How easily these turn my kitchen into a Halloween scene
    • The joyful chaos of helping kids decorate their own mummies
    • The nostalgic rush of childhood trick-or-treat memories

    Halloween Mummy Meatballs

    These mummy meatballs are made by shaping seasoned ground meat into balls, baking them until cooked through, and wrapping them with crispy cheese strips to resemble bandages. The final dish features tender meatballs decorated with crunchy cheese accents, giving a playful and spooky appearance suitable for Halloween celebrations.
    Prep Time 15 minutes
    Cook Time 25 minutes
    Total Time 40 minutes
    Servings: 4
    Course: Main Course
    Cuisine: American
    Calories: 300

    Ingredients
      

    • 1 1/2 pounds ground beef or ground turkey for leaner option
    • 1 cup breadcrumbs preferably panko for crunch
    • 1 eggs egg lightly beaten
    • 2 cloves garlic minced
    • 1/4 cup grated Parmesan cheese
    • 1 teaspoon salt
    • 1/2 teaspoon black pepper
    • 4 ounces cheddar cheese for crisp cheese strips
    • 1 tablespoon olive oil for brushing

    Equipment

    • Baking sheet
    • Cooking parchment or silicone mat
    • Mixing bowl
    • Grater
    • Small sharp knife
    • Cooking brush

    Method
     

    1. Preheat your oven to 400°F (200°C). Line a baking sheet with parchment or a silicone mat to prevent sticking.
    2. In a large mixing bowl, combine the ground meat, breadcrumbs, beaten egg, minced garlic, grated Parmesan, salt, and black pepper. Mix everything thoroughly until well incorporated—this helps the meatballs hold together during baking.
    3. Shape the mixture into evenly-sized meatballs, about 1 to 1.5 inches in diameter. Place them spaced apart on the prepared baking sheet.
    4. Bake the meatballs in the preheated oven for 20 to 25 minutes, or until they are cooked through and browned on the outside. The interior should reach 160°F (71°C).
    5. While the meatballs bake, grate the cheddar cheese using a fine grater. Spread the grated cheese on a piece of parchment and microwave in short bursts until melted and spreadable—about 30 seconds to 1 minute.
    6. Spread the melted cheese evenly over a new sheet of parchment. Using a small sharp knife, cut thin strips lengthwise to resemble mummy bandages; aim for irregular, jagged edges for a spooky effect.
    7. Once the meatballs are done baking and slightly cooled, brush them lightly with olive oil to help the cheese strips stick better.
    8. Wrap each meatball with several cheese strips, overlapping them to mimic bandages, and press gently so they stay in place. Leave some space on the surface to add more cheese strips for a more mummified look.
    9. Place the decorated meatballs back in the oven for another 3-5 minutes, or until the cheese strips become crispy and golden around the edges, adding a crunchy texture.
    10. Remove from the oven, let cool slightly, and serve these spooky mummy meatballs with your favorite sides or dip. Enjoy the crispy bites and playful presentation!

    Notes

    For an extra spooky touch, add small olive eyes or peppercorns to the cheese bandages before baking.

    These mummy meatballs are more than just a fun dish — they’re a chance to bring some delight and mischief to your table. Whether you’re hosting a party or just craving a cozy, festive dinner, they fit right into the season’s spirit.

    Making them is straightforward, and the playful presentation is enough to spark smiles all around. As the evening settles, the smell of baked cheese and seasoned meat will linger, promising a memorable Halloween feast for everyone involved.

  • Spook-tacular Ghost Veggie Platter: A Halloween Snack with a Friendly Fright

    Spook-tacular Ghost Veggie Platter: A Halloween Snack with a Friendly Fright

    Halloween often leads us to indulge in sweets and treats that might leave us craving something fresh and crunchy. This Ghost Veggie Platter turns healthy snacks into a fun, ghostly centerpiece that kids and adults alike will adore. It’s a playful way to encourage veggie eating amidst the chaos of costume parties and festive chaos.

    Imagine this: a platter sprinkled with bright bell peppers, crisp cucumbers, and snowy cauliflower, all crafted into ghostly shapes with adorable eyes. The aroma of fresh veggies mixed with a hint of garlic and tangy dips fills the room, making it as tempting as any candy bowl. Plus, it’s quick to assemble, perfect for last-minute Halloween prep or a spontaneous spooky gathering.

    Ghost Veggie Platter

    This Ghost Veggie Platter features an assortment of fresh vegetables arranged into ghostly shapes using bell peppers, cucumbers, and cauliflower. The crunchy textures and vibrant colors create a playful centerpiece, complemented by tangy dips and subtle garlic flavor. It offers a healthy, visually appealing snack that’s quick to assemble for Halloween gatherings.
    Prep Time 15 minutes
    Total Time 15 minutes
    Servings: 8
    Course: Main Course
    Cuisine: Halloween
    Calories: 50

    Ingredients
      

    • 2 each bell peppers (preferably white or yellow) for ghost shapes
    • 1 large cucumber for ghost bodies
    • 1 head cauliflower for snowy ghost figures
    • to taste for dipping hummus or ranch dip
    • to taste fresh garlic optional
    • 1 tbsp olive oil optional for dipping

    Equipment

    • Vegetable peeler
    • Melon baller or small cookie cutter
    • Serving platter

    Method
     

    1. Wash all vegetables thoroughly. Slice the bell peppers into thin strips and then cut out small ghost-shaped figures using a melon baller or small cookie cutter.
    2. Peel the cucumber lightly to create a smooth surface. Cut the cucumber into manageable sections, then carve small eye holes into each ghost-shaped piece using a small spoon or cookie cutter to mimic eyes.
    3. Separate the cauliflower into small fluffy clusters, resembling tiny snowballs or ghosts. Rinse and pat dry. You can also dip the cauliflower in a mixture of olive oil and minced garlic for extra flavor if desired.
    4. Arrange the bell peppers, cucumbers, and cauliflower on a large serving platter, positioning the ghost shapes to create a playful scene. Place small dollops of your chosen dip for easy access and added flavor.
    5. Optionally, drizzle a little olive oil over the cauliflower ghosts and sprinkle with minced garlic for enhanced flavor. Add more dip around the platter for dipping fun.
    6. Serve the spooky veggie ghosts immediately, encouraging everyone to pick up their favorite shapes and dip into the delicious sauces. Enjoy this healthy, fun Halloween centerpiece!

    Notes

    For easier carving, slightly chill vegetables beforehand. Feel free to add additional vegetables or dips to customize your platter.
    Creating this Halloween Ghost Veggie Platter is a perfect way to elevate your party spread with something healthy and delightful. It’s not just a snack but a conversation starter, adding a touch of whimsy to your festive table.

    As you gather around, let the vibrant colors and charming ghost shapes bring a sense of fun and nostalgia. It’s a reminder that even spooky season can be fresh, vibrant, and full of cheerful surprises.

  • Spooky Bats & Green Mash: Halloween Guacamole with Tortilla Chips

    Spooky Bats & Green Mash: Halloween Guacamole with Tortilla Chips

    Halloween is a time for creative bites that scare and delight in equal measure. This year, I decided to ditch the usual with a fun twist—bats! These bat-shaped tortilla chips framing a vibrant, creamy guacamole make my kitchen feel like a spooky cave.

    What makes this recipe special is the playful chaos it brings to the table. The smell of fresh avocados blending with zesty lime and a hint of smoky cumin creates a festive aroma ready to charm any ghost or goblin. Plus, the bat chips are easy, fast to make, and oddly mesmerising.

    Bat-Shaped Tortilla Chips with Guacamole

    This dish consists of crispy tortilla chips cut into bat shapes, served alongside a smooth, creamy guacamole made from ripe avocados, lime juice, and spices. The chips provide a crunchy texture, while the guacamole offers a cool, vibrant contrast, making for an eye-catching appetizer or snack.
    Prep Time 15 minutes
    Cook Time 10 minutes
    Total Time 25 minutes
    Servings: 4
    Course: Main Course
    Cuisine: American
    Calories: 220

    Ingredients
      

    • 4 pieces tortillas corn or flour tortillas
    • 2 ripe avocados soft, for easy mashing
    • 1 lime lime juice freshly squeezed
    • 1/2 teaspoon smoked cumin ground
    • 1/2 teaspoon salt
    • 1 tablespoon olive oil

    Equipment

    • Baking sheet
    • Sharp knife
    • Mixing bowl
    • Fork or masher
    • Serving platter

    Method
     

    1. Preheat your oven to 375°F (190°C). Place tortilla rounds on a baking sheet and bake until crispy, about 8–10 minutes, watching to prevent burning.
    2. While the chips are baking, peel and pit the avocados, then transfer the flesh to a mixing bowl.
    3. Add freshly squeezed lime juice and a pinch of salt to the mashed avocados, then mash with a fork or masher until smooth and creamy.
    4. Stir in the ground smoked cumin and olive oil to enhance flavor and achieve a silky, vibrant green guacamole.
    5. Remove the baked tortilla chips from the oven once they are golden and crispy. Let them cool slightly for easier handling.
    6. Use a sharp knife to cut each tortilla into bat shapes—create two small wings and a rounded body for each chip, ensuring they look like bats.
    7. Arrange the shaped chips on a serving platter around a bowl of the prepared guacamole, creating a spooky bat display.
    8. Serve immediately to enjoy the crispy texture of the chips with the cool, flavorful guacamole.
    This Halloween treat isn’t just about looks—it’s about the joy of mixing up something fresh and snackable. The crunch of the bat chips paired with the silky smooth guacamole makes every bite memorable.

    As the evening unfolds, this dish can be styled to suit any spooky theme or simple get-together. It’s a reminder that sometimes, the smallest ideas—like tiny bat silhouettes—can turn an ordinary snack into a memorable party highlight.