Boiling eggs might seem like a straightforward task, but for me, it’s become a small daily ritual—something I do slowly, paying attention to each step. It’s a chance to pause, breathe, and connect with the simple act of preparing food. In those quiet moments, I find a little peace amid the chaos of a busy day.
This recipe isn’t just about getting the perfect peel or a runny yolk; it’s about turning a routine into a mindful practice. As the water bubbles and the eggs gently jostle, I focus on the sounds, the smells, the tactile feel of the shells. It’s a form of meditation that always leaves me a bit more grounded, ready to take on whatever comes next.
Focusing on how boiling eggs can be a mindful, almost meditative ritual, turning a simple task into a moment of calm and connection amid a busy day.
The story behind this recipe
- Boiled eggs remind me of childhood mornings, sitting at the kitchen table as my mom carefully timed each batch. That quiet, almost ceremonial routine made me realize how simple food can be a moment of connection. It’s funny how such a humble task can carry so much nostalgia and calm.
- Over the years, I’ve played with different techniques—adding a splash of vinegar, trying various simmer times—but what stuck was the quiet rhythm of boiling, peeling, and savoring. It’s become a small act of mindfulness, a way to slow down and appreciate a tiny, perfect vessel of protein and comfort.
- heading
- story_type
Key Ingredients and Tips
- Eggs: Fresh eggs are less likely to crack and peel smoothly. If yours are a week old, they peel easier, but fresh ones have a firmer white with a slightly runny yolk that’s perfect for soft boiling.
- Water: I use cold tap water to start, because it heats evenly and reduces cracking risk. For a gentle boil, a slow, steady heat is best—no rolling boil that jostles the eggs too much.
- Salt: A pinch of salt in the water helps with peeling—makes the shell slip off easier once cooled. If you prefer, skip it, but I swear it’s worth it for the clean peel.
- Vinegar: Just a splash of vinegar in the water can help prevent cracking and makes peeling even smoother. It’s subtle, but noticeable when the eggs come out clean and unblemished.
- Ice bath: Prepare an ice bath before boiling; it immediately stops the cooking process and cools the eggs quickly. The contrast between hot and cold keeps the shells intact and makes peeling a breeze.
- Timing: My go-to is exactly 9 minutes for firm whites and slightly creamy yolks. Too long, and the yolk turns greenish; too short, and it’s runny. Use a timer, not guesswork.
- Shells: Gently tap and roll the eggs on a hard surface to crack the shell evenly. The thinner the shell, the easier it is to peel—be gentle to avoid tearing the white.
Spotlight on key ingredients
Eggs:
- Fresh eggs are less likely to crack and peel smoothly. If yours are a week old, they peel easier, but fresh ones have a firmer white with a slightly runny yolk that’s perfect for soft boiling.
- Water: I use cold tap water to start, because it heats evenly and reduces cracking risk. For a gentle boil, a slow, steady heat is best—no rolling boil that jostles the eggs too much.
- Salt: A pinch of salt in the water helps with peeling—makes the shell slip off easier once cooled. If you prefer, skip it, but I swear it’s worth it for the clean peel.
Water, timing, shells:
- Ice bath: Prepare an ice bath before boiling; it immediately stops the cooking process and cools the eggs quickly. The contrast between hot and cold keeps the shells intact and makes peeling a breeze.
- Timing: My go-to is exactly 9 minutes for firm whites and slightly creamy yolks. Too long, and the yolk turns greenish; too short, and it’s runny. Use a timer, not guesswork.
- Shells: Gently tap and roll the eggs on a hard surface to crack the shell evenly. The thinner the shell, the easier it is to peel—be gentle to avoid tearing the white.
Notes for ingredient swaps
- Eggs: If you’re out of fresh eggs, older eggs peel easier. Slightly less firm whites but still good.
- Water: Use filtered water if your tap has a strong mineral taste. It won’t affect the cooking, just the final flavor.
- Salt: Skip the salt if you prefer a less salty soak. It won’t impact peeling much, but may make shells slightly more stubborn.
- Vinegar: Apple cider vinegar can replace white vinegar for a milder tang. Still helps with shell integrity.
- Ice bath: Replace with very cold water and a handful of ice cubes. The quick chill is key, no matter the water type.
- Timing: For softer yolks, reduce boiling time to 6-7 minutes. For firmer yolks, go for 10 minutes. Adjust based on preference.
- Shells: Gently tap and peel under running water. If shells are stubborn, add a splash of vinegar to the water during boiling.
Equipment & Tools
- Small saucepan: To hold water and eggs, and provide a gentle simmer environment.
- Slotted spoon: To transfer hot eggs safely into the ice bath.
- Ice bath bowl: To stop cooking instantly and cool eggs quickly.
- Hard surface: To tap and crack the shells gently.
Step-by-step guide to boiling eggs
- Gather a small saucepan, enough to hold your eggs in a single layer, and fill it with cold water so that it covers the eggs by about an inch.
- Gently place the eggs into the saucepan, avoiding any drops that might crack the shells. Turn on the heat to medium-high and bring the water to a gentle, steady simmer—small bubbles should form around the eggs after about 5 minutes.
- Once simmering, set a timer for 9 minutes for firm whites with slightly creamy yolks. If you prefer softer yolks, aim for around 6-7 minutes, adjusting accordingly.
- While eggs cook, prepare an ice bath in a large bowl—fill it with cold water and ice cubes. This will stop the cooking instantly and make peeling easier.
- When the timer goes off, use a slotted spoon to transfer the eggs to the ice bath. Let them sit for at least 5 minutes, or until completely cooled and firm to the touch.
- To peel, gently tap each egg on a hard surface to crack the shell all over, then peel carefully under cold running water to help slip the shell off smoothly.
- Inspect the eggs for any cracks or blemishes. If the shells are smooth and come off easily, your eggs are ready to enjoy. Otherwise, give them a gentle rinse to clean up any stubborn bits.
- Serve immediately for best texture, or store in the fridge for up to 3 days. To reheat, briefly soak in hot tap water for a quick warm-up, then peel and enjoy.
Let the eggs sit in the ice bath for at least 5 minutes, then peel carefully under running water. Serve immediately or refrigerate in a covered container for up to 3 days.
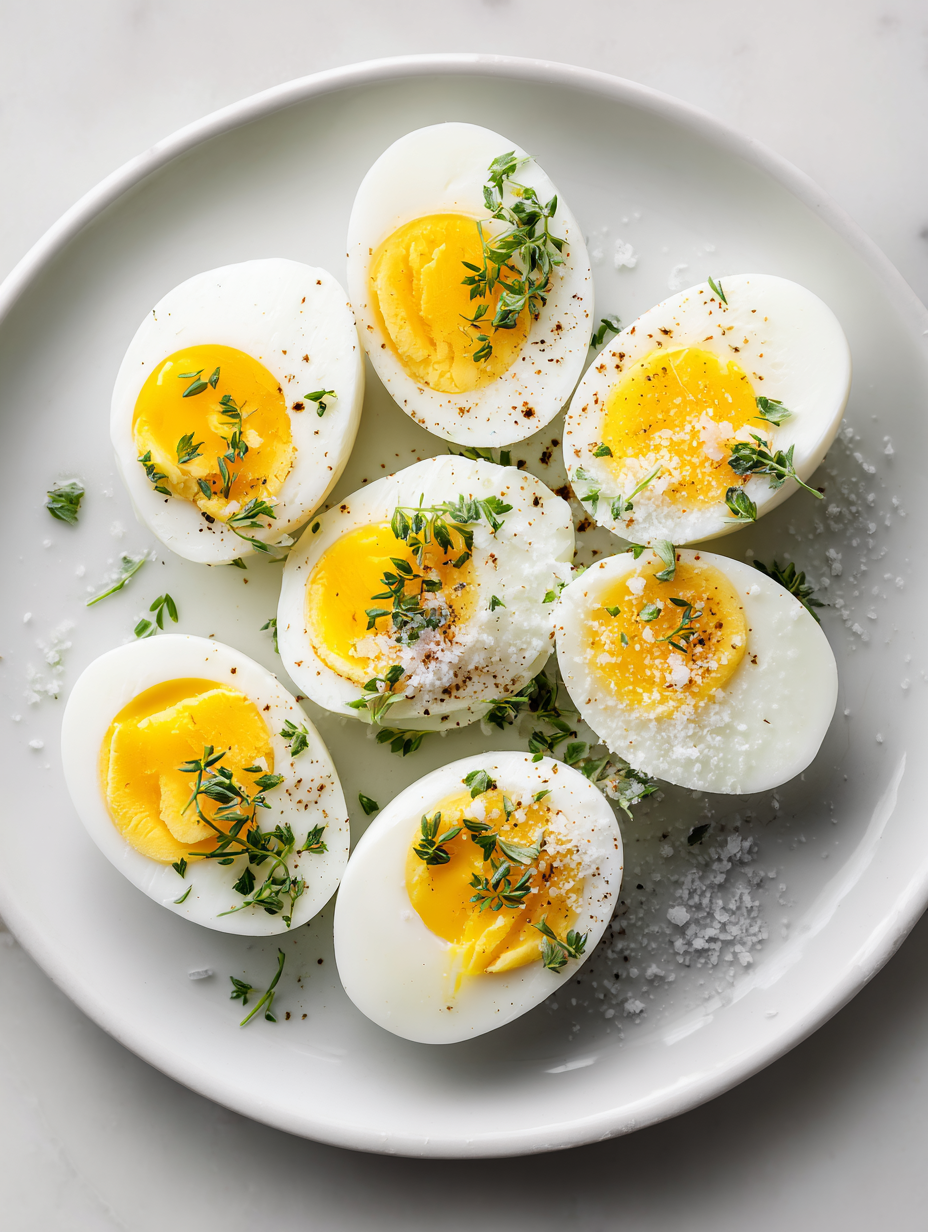
How to Know It’s Done
- Color: Whites should be opaque and firm, yolks slightly creamy but not runny.
- Texture: When gently shaken, the yolk should feel centered and slightly jiggly, not overly soft or chalky.
- Appearance: Shells should come off cleanly with minimal tearing, and whites should be smooth and unblemished.
Mindful Boiled Eggs
Ingredients
Equipment
Method
- Place your eggs gently into a small saucepan and cover them with cold tap water, about an inch above the eggs.
- Add a pinch of salt and a splash of vinegar to the water—these help make peeling easier and prevent cracks, but are optional.
- Turn the heat to medium-high and bring the water to a gentle simmer, with small bubbles forming around the eggs after about 5 minutes.
- Set a timer for exactly 9 minutes for firm whites and slightly creamy yolks, or adjust for your preferred consistency.
- While the eggs cook, prepare an ice bath by filling a large bowl with cold water and plenty of ice cubes.
- Once the timer rings, use a slotted spoon to transfer the eggs carefully into the ice bath, ensuring they are fully submerged.
- Let the eggs sit in the ice bath for at least 5 minutes, allowing them to cool completely and stop the cooking process.
- Gently tap each egg on a hard surface to crack the shell evenly, then peel carefully under cold running water to help shells slip off smoothly.
- Inspect the peeled eggs for smooth shells and firm whites. They are now ready to serve or store in the fridge for later.
Notes
Pro tips for perfect boiled eggs
- Bolded mini-head: Start with cold water → prevents cracking and ensures even cooking.
- Bolded mini-head: Simmer, don’t boil → a gentle bubble keeps eggs intact and yolks tender.
- Bolded mini-head: Timing is key → 9 minutes yields firm whites with creamy yolks, adjust for softer or firmer.
- Bolded mini-head: Ice bath immediately → stops cooking instantly, making peeling a breeze.
- Bolded mini-head: Crack and peel under water → helps shells slip off smoothly and keeps whites pristine.
- Bolded mini-head: Slight jiggle test → gentle shake confirms yolks are set but still tender inside.
- Bolded mini-head: Use fresh eggs for better texture → older eggs peel easier, but fresh ones hold shape better.
Common mistakes and how to fix them
- FORGOT to cool eggs quickly → peel easily with ice bath.
- DUMPED water too early → let eggs sit in ice bath for full cooling.
- OVER-TORCHED eggs → reduce boiling time to prevent green yolks.
- SKIPPED cracking shells gently → risk tearing whites, peel carefully under water.
Swift Fixes for Boiled Eggs
- If eggs crack during boiling, splash them into cold water to prevent further damage.
- When shells stick, soak eggs in cold water before peeling for easier removal.
- Splash cold water on hot eggs to stop overcooking and prevent green yolks.
- Patch cracks with a dab of egg white before boiling to seal and avoid leaks.
- Shield eggs with a gentle tap if peeling feels tough—use a damp paper towel for grip.
Prep, store, and reheat tips
- You can boil eggs a day ahead; keep them in their shells in the fridge for up to 3 days. The whites stay firm, and the yolks remain tender, but they might lose a touch of freshness.
- Peel the eggs if you prefer ready-to-eat snacks; store peeled eggs in an airtight container with a damp paper towel. Consume within 2 days for optimal texture and flavor.
- Reheat peeled eggs gently in hot water for about 30 seconds, just until warmed through. They’ll regain some softness, and you’ll notice a faint warm smell of the whites.
- For longer storage, freeze peeled eggs—though the whites become a bit rubbery, and yolks may change texture. Best used for salads or blending after defrosting.
- When reheating, avoid overheating, which can make whites rubbery and yolks chalky. Keep an eye on the clock and smell for a fresh, slightly warm aroma.
Top questions about boiled eggs
1. Why do I start with cold water?
A cold tap water start helps prevent cracking by gradually heating the eggs evenly, reducing stress on the shells.
2. What’s the ideal temperature for boiling eggs?
Simmering at around 85°C (185°F) keeps the eggs gentle and prevents jostling that causes cracks.
3. How long should I boil eggs for the perfect yolk consistency?
9 minutes gives firm whites and slightly creamy yolks; adjust based on whether you want runny or fully set yolks.
4. Why is an ice bath important after boiling?
Cooling eggs in an ice bath immediately halts cooking, makes peeling easier, and sets the whites firm and smooth.
5. How can I prevent eggs from cracking during boiling?
Cracked shells often mean they were too hot or jostled; cracking gently before boiling helps prevent this.
6. What’s the best way to peel boiled eggs?
Peeling under running cold water helps shells slip off easily by washing away small shell fragments and easing separation.
7. How long can I keep boiled eggs in the fridge?
Eggs are best stored in their shells in the fridge for up to 3 days; peeled eggs should be eaten within 2 days.
8. Can I reheat boiled eggs? How?
Reheat peeled eggs briefly in hot water or microwave on low power to warm without overcooking.
9. What signs indicate eggs are overcooked?
Overcooking causes greenish yolks and rubbery whites; reduce boiling time if this happens.
10. Should I use fresh or older eggs for boiling?
Using slightly older eggs makes peeling easier because the shell separates more readily from the white.
Boiled eggs might seem simple, but they carry a quiet, mindful rhythm that can turn a routine into a small moment of calm. When you focus on the textures, smells, and timing, it’s surprising how grounding such a humble task can be.
In busy mornings or quiet evenings, those perfectly peeled eggs become more than just a snack—they’re a tiny act of care. It’s these small rituals that remind us to slow down and appreciate the simple, honest work of cooking.