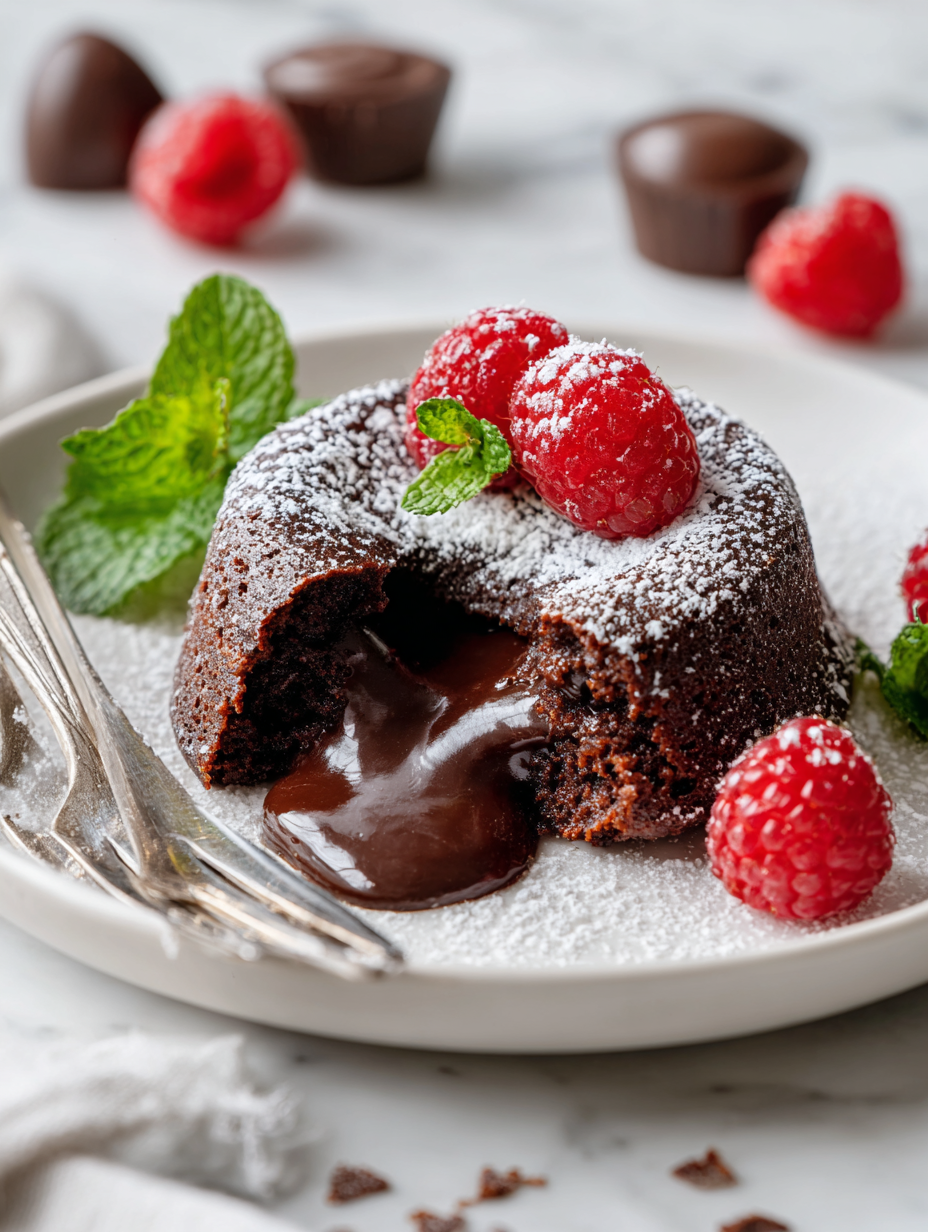
There’s something about that moment when you crack open a chocolate fondant and the warm, gooey center spills out that feels almost like a small miracle. It’s a dessert that demands patience and a fine eye for timing, but when it works, it’s pure magic—every bite a dance of textures and rich chocolate intensity. I love how it bridges simplicity and sophistication, perfect for special nights or those rare moments when you just need a little indulgence.
I’ve spent years trying to perfect that elusive ooze, tweaking textures and bake times. It’s a dish that keeps you humble—always a little different, sometimes a little stubborn. But once you nail that perfect molten core, everything else fades. That moment of anticipation, watching the edges set but the center still soft, makes all the effort worth it.
This recipe isn’t just about the chocolate; it’s about the quiet thrill of mastery. It’s a reminder that the smallest details—temperature, timing, even the thickness of your batter—can transform a simple dessert into a memorable experience. And honestly, it’s a kind of comfort to know that with a few ingredients and some careful steps, you can create something that feels both decadent and intimately yours.
Focusing on how the molten center of a chocolate fondant creates a sensory dance of warm, gooey richness with each bite, emphasizing the importance of timing and technique to achieve that perfect ooze.
The molten magic of chocolate fondant
- That first spoonful, with the warm, flowing center, makes me feel like I’ve captured a secret I want to keep forever.
- There’s a chaotic joy in watching the edges set perfectly while the middle remains irresistibly gooey—like a tiny triumph.
- I remember baking these for my family and seeing their eyes light up at that molten core, pure nostalgia in every bite.
- Getting the timing right is such a delicate dance; I’ve had moments where I thought I’d overdone it, only to find the magic inside still alive.
- It’s a dessert that whispers patience and precision, but rewards you with a moment of pure, indulgent bliss each time.
The story behind this recipe
- I first fell for chocolate fondant during a quiet weekend in Paris, sitting in a tiny café where the air was thick with the smell of melting chocolate and fresh pastry. Watching that molten center ooze out with each bite felt like discovering a secret only I knew. It’s funny how a simple dessert can carry so much nostalgia and quiet thrill of discovery.
- Over the years, I’ve chased that perfect ooze—adjusting bake times, experimenting with different chocolates, trying to get that balance between a firm exterior and a liquid heart. It’s a delicate dance, and every time I think I’ve nailed it, the oven has other plans. But that’s part of the charm, right? The unpredictability keeps you sharp.
- There’s something about the process that’s almost meditative—measuring, melting, timing—and the reward is a small, warm miracle. When done right, it’s pure, rich chocolate that feels almost rebellious in its simplicity. It’s a reminder that sometimes, the best things are the ones you create with patience and a little bit of chaos.
Chocolate Fondant Trivia
- Chocolate fondant, also known as molten lava cake, originated in France in the 1980s and quickly gained worldwide popularity for its dramatic presentation and rich texture.
- The key to its signature gooey center is a precise balance of baking time and temperature, often achieved through trial and error by pastry chefs experimenting with different recipes.
- Historically, the dish was created as a variation of classic chocolate cake, with the intention to serve a warm, flowing center that contrasts with a firmer exterior.
- Some culinary historians suggest that the first versions were inspired by the idea of a ‘chocolate souffle,’ but with less rising and more emphasis on the liquid interior.
Ingredient breakdown: key components
- Dark chocolate: I prefer a high cocoa content, around 70%, for that rich, slightly bitter depth. Swap with vegan or dairy-free chocolate if needed, but watch for changes in melting quality.
- Butter: I use unsalted, European-style for a silky texture that melts beautifully into the batter. You can substitute with margarine for a slightly different richness, but it won’t be quite the same.
- Eggs: Fresh, large eggs are my go-to—they give the batter structure and that tender crumb. For a lighter touch, try a mix of whole eggs and yolks, but skip the whites if you want that gooey center.
- Sugar: Granulated caster sugar dissolves smoothly and helps create that shiny crust. Brown sugar adds a caramel note, which is lovely, but can make the cake denser—use sparingly.
- Flour: Just a touch of plain flour is enough, to stabilize the batter. For a gluten-free version, almond or rice flour can work, but expect a slightly different texture.
- Optional flavorings: A splash of vanilla or a pinch of sea salt enhances the chocolate’s richness. Lemon zest can add a bright contrast if you’re feeling adventurous.
- Cooking spray or butter: To lightly grease your ramekins, ensuring the fondants release easily without sticking or breaking apart.
Spotlight on key ingredients
Dark chocolate:
- I prefer a high cocoa content, around 70%, for that rich, slightly bitter depth. Swap with vegan or dairy-free chocolate if needed, but watch for changes in melting quality.
- Butter: I use unsalted, European-style for a silky texture that melts beautifully into the batter. You can substitute with margarine for a slightly different richness, but it won’t be quite the same.
- Eggs: Fresh, large eggs are my go-to—they give the batter structure and that tender crumb. For a lighter touch, try a mix of whole eggs and yolks, but skip the whites if you want that gooey center.
Butter:
- I use unsalted, European-style for a silky texture that melts beautifully into the batter. You can substitute with margarine for a slightly different richness, but it won’t be quite the same.
- Eggs: Fresh, large eggs are my go-to—they give the batter structure and that tender crumb. For a lighter touch, try a mix of whole eggs and yolks, but skip the whites if you want that gooey center.
Notes for ingredient swaps
- Dairy-Free: Swap butter for coconut oil or dairy-free margarine. Expect a slightly different richness and a hint of coconut aroma.
- Vegan Chocolate: Use a high-quality vegan dark chocolate. The flavor stays deep, but the melt might be a touch less silky.
- Sugar Alternatives: Substitute with coconut sugar or maple syrup. Be aware of moisture content and adjust baking time accordingly.
- Gluten-Free: Almond flour or rice flour can replace regular flour. The texture will be denser and more crumbly, but still delicious.
- Sweetener Boost: Add a dash of espresso or coffee powder to intensify the chocolate flavor—just a small pinch for a smoky edge.
- Cocoa Powder: Use Dutch-processed cocoa for a mellower, less acidic taste. Natural cocoa offers more brightness and depth.
- Flavor Variations: Incorporate a splash of liqueur like Grand Marnier or Chambord for a sophisticated twist, but reduce liquid elsewhere.
Equipment & Tools
- Ramekins or mold cups: To shape and bake the fondants evenly.
- Bain-marie or microwave: To gently melt the chocolate without burning.
- Whisk: To combine ingredients and incorporate air.
- Sieve: To sift the flour for a light batter.
- Baking tray: To hold the ramekins during baking for stability.
- Knife or small offset spatula: To loosen and invert the fondants easily.
Step-by-step guide to chocolate fondant
- Preheat your oven to 200°C (392°F). Lightly butter your ramekins or mold cups, dust with cocoa powder to prevent sticking.
- Chop the dark chocolate into small pieces. Melt it gently over a bain-marie or in short bursts in the microwave, stirring until smooth and shiny, about 30 seconds at a time.
- In a separate bowl, soften the butter and mix with the melted chocolate until fully combined. Let it cool slightly, about 2 minutes.
- Add eggs one at a time, whisking vigorously after each to incorporate air and create a glossy batter. Then, whisk in sugar until smooth and slightly thickened, about 1 minute.
- Sift in the flour and fold gently just until no streaks remain. Be careful not to overmix; you want a light, airy batter.
- Divide the batter evenly among the prepared ramekins—about three-quarters full. Tap lightly on the counter to remove air bubbles.
- Place on a baking tray and bake for exactly 12-14 minutes. Check at the 12-minute mark; the edges should be set but the center still jiggly when gently shaken.
- Remove from oven and let sit for 2-3 minutes. The outer crust will firm up slightly, but the center remains molten and oozy.
- Run a small knife around the edges to loosen, then carefully invert each fondant onto serving plates. Be gentle—these are delicate.
- Serve immediately while warm. Optionally, dust with cocoa powder or drizzle with a little melted chocolate for extra flair.
Let the fondants rest for 2-3 minutes after baking. Invert onto plates carefully, then serve immediately to enjoy the molten center at its best.
How to Know It’s Done
- Edges are firm but the center jiggles slightly when shaken.
- Surface is shiny and cracks slightly when touched with a finger.
- The internal temperature reaches about 60°C (140°F) for that molten core.
Chocolate Fondant
Ingredients
Equipment
Method
- Preheat your oven to 200°C (392°F). Lightly butter your ramekins and dust them with cocoa powder to prevent sticking.
- Chop the dark chocolate into small pieces. Gently melt it over a bain-marie or in short bursts in the microwave, stirring until smooth and glossy.
- In a separate bowl, soften the butter and mix it with the melted chocolate until fully combined. Let it cool slightly so it doesn't scramble the eggs.
- Add the eggs one at a time to the chocolate mixture, whisking vigorously after each addition until the batter becomes glossy and slightly thickened.
- Stir in the caster sugar and vanilla extract, whisking until smooth and shiny.
- Sift the flour into the batter and gently fold it in with a spatula, just until no streaks remain. Be careful not to overmix to keep the batter airy.
- Divide the batter evenly among the prepared ramekins, filling each about three-quarters full. Tap the ramekins lightly on the counter to release any air bubbles.
- Place the ramekins on a baking tray and bake in the preheated oven for exactly 12-14 minutes. The edges should be set and firm, but the center should still jiggle when gently shaken.
- Remove the ramekins from the oven and let them sit for 2-3 minutes. The crust will firm slightly while the center remains molten and flowing.
- Run a small knife around each ramekin's edge to loosen the fondant, then carefully invert onto serving plates. Gently lift the ramekin to reveal the gooey center.
- Serve immediately while warm, perhaps dusted with a little cocoa powder or garnished with fresh berries for an elegant touch. Enjoy that luscious, flowing center with each spoonful.
Pro tips for perfect chocolate fondant
- Bolded mini-head: Use room-temperature eggs → They incorporate more smoothly, helping create a tender, uniform batter.
- Bolded mini-head: Chill the batter briefly → Resting for 15 minutes enhances the chocolate’s richness and improves texture.
- Bolded mini-head: Bake until edges are set → The center should wobble slightly, ensuring that perfect molten core.
- Bolded mini-head: Check for crackling sound → A gentle crackle indicates the fondant is just right—don’t overbake!
- Bolded mini-head: Invert carefully → Loosen with a knife and turn out onto a plate immediately for that oozy, gooey moment.
- Bolded mini-head: Serve straight from the oven → The middle remains liquid and luscious, offering the best sensory experience.
- Bolded mini-head: Use a timer and visual cues → Rely on both to avoid overbaking and losing that coveted molten center.
Common mistakes and how to fix them
- FORGOT to preheat oven → Ensure oven is fully preheated before baking.
- DUMPED batter into ramekins → Fill only three-quarters for even cooking and ooze.
- OVER-TORCHED fondants → Remove at 12-14 minutes; edges should be firm, center jiggly.
- FAILED to butter ramekins properly → Grease well and dust with cocoa powder for easy release.
Quick fixes and pantry swaps
- If fondant cracks during baking → Splash with a little hot water to even out cracks.
- When center isn’t oozy → Patch with a drizzle of melted chocolate before serving.
- If fondant is overbaked → Shield with a dusting of powdered sugar to hide firmness.
- When stuck to ramekin → Rescue by refrigerating briefly, then gently running a knife around to loosen.
- If you forget to butter ramekins → Swap with a light coating of cocoa powder for easy release.
Prep, store, and reheat tips
- Prepare the batter up to 24 hours in advance; keep covered in the fridge and bring to room temperature before baking for optimal ooze.
- Ramekins can be filled and refrigerated for up to 24 hours; cover tightly with plastic wrap to prevent staling and absorb fridge odors.
- Baked fondants are best enjoyed fresh, but can be stored in an airtight container in the fridge for up to 2 hours; reheat briefly in a warm oven (about 5 minutes at 180°C/356°F) until just warmed, watching for the center to stay gooey.
- Reheated fondants may lose some of their initial ooze; serve immediately after reheating for the best sensory experience, with a slight crackle on the surface indicating they’re just right.
Top questions about chocolate fondant
1. How do I get the perfect gooey center?
A gooey center is achieved by baking the fondant just until the edges are set but the middle still jiggles. Timing is key, usually around 12-14 minutes at high heat.
2. What if my fondant isn’t gooey enough?
If the fondant is overbaked, the center will be firm and less molten. To fix, serve immediately or reheat briefly, keeping an eye on the center’s jiggle.
3. Can I use milk or white chocolate?
Use high-quality, fresh dark chocolate with about 70% cocoa content for rich flavor and good meltability. Lower cocoa or different chocolates can change the texture and taste.
4. How do I prevent sticking?
Lightly butter your ramekins and dust with cocoa powder to prevent sticking. Greasing well is crucial for easy release without breaking the fondant.
5. What oven temperature and time should I use?
Baking at 200°C (392°F) for 12-14 minutes is typical. Check at the 12-minute mark; edges should be firm, center still slightly jiggly.
6. Can I make fondant in advance?
You can prepare the batter ahead, cover tightly, and refrigerate for up to 24 hours. Bring to room temp before baking for best results.
7. How should I reheat leftovers?
Serve immediately after baking for the best molten effect. Reheat briefly in a warm oven, but beware of overcooking the center.
8. My fondant cracked, what now?
If the fondant cracks or breaks, gently patch with melted chocolate or serve with a dusting of powdered sugar to hide imperfections.
9. Should eggs be cold or room temperature?
Use room-temperature eggs to ensure a smooth, airy batter. Cold eggs can cause the batter to seize or be uneven.
10. How do I know when it’s done?
Always check the fondant visually and by jiggle; the edges should be set but the center still wobbles slightly for that perfect ooze.
There’s something about pulling a warm chocolate fondant from the oven, the aroma of cocoa filling the air, that feels like a quiet celebration of simple pleasures. Each oozy center is a little reminder that with patience and attention, even a humble dessert can feel extraordinary.
Sharing this with someone you care about turns it into a moment of real connection—watching their face light up as the molten chocolate spills out is a small, imperfect joy. It’s a reminder that sometimes, the best things in life are those that take a little effort and a lot of love.