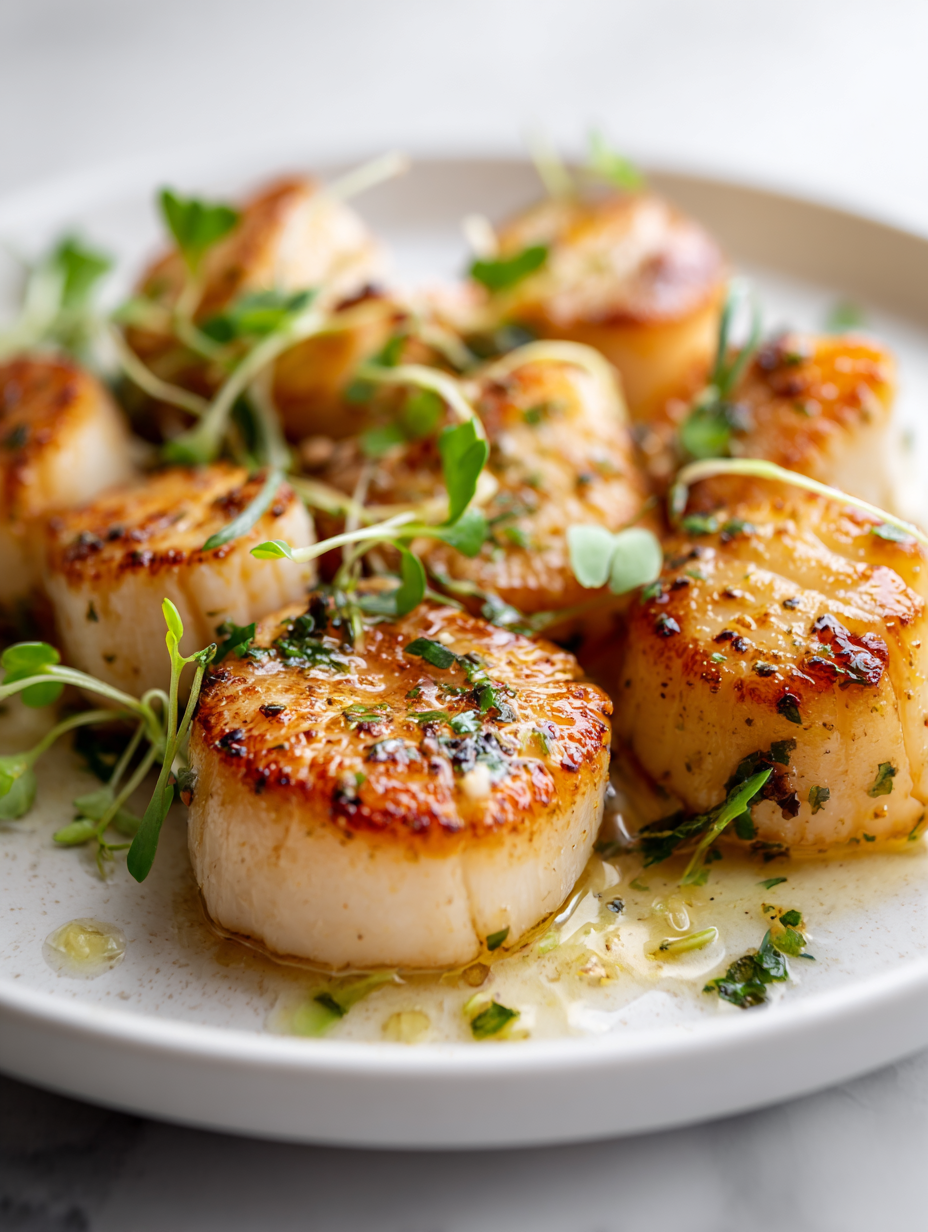
Seared scallops are all about that perfect contrast—crisp, caramelized exterior with a melting, almost custardy inside. It’s a texture dance that keeps you coming back with each bite, feeling like you’ve unlocked a secret to elevating simple ingredients. Every time I cook them, I get that little thrill of watching them turn golden and listening to that satisfying sizzle.
This isn’t just about technique; it’s about capturing the tactile magic of seafood. A quick, hot sear is enough to transform a humble scallop into something special—crunchy on the outside, tender on the inside, with a burst of natural sweetness. It’s straightforward but feels like an achievement, especially when you get that perfect caramelization without overcooking.
Focusing on the texture contrast—crispy exterior with a tender, almost creamy interior—this recipe emphasizes the tactile delight that makes seared scallops so addictive, turning a simple shellfish into a sensory experience.
The tactile dance of seared scallops
- Seared scallops remind me of summer evenings by the coast, where everything feels simple and bright.
- The first time I nailed that perfect golden crust, I felt a quiet pride I hadn’t expected from a home-cooked meal.
- Watching them sizzle and turn caramel-brown is oddly exhilarating, like witnessing a tiny culinary miracle.
- There’s a nostalgic rush in flipping these delicate morsels—it’s almost meditative, a moment of pure focus.
- I love how each bite delivers a burst of sweetness, a reminder of why I keep coming back to seafood.
The tactile magic of scallops
- Searing scallops started as a way to make a simple dinner feel a bit more special, but I quickly realized it’s about that fleeting moment—when the surface hits that perfect caramelization and the inside remains tender and sweet. Watching them turn golden and hearing that satisfying sizzle became my little ritual, a reminder that simple techniques can turn humble ingredients into something memorable.
- I remember the first time I cooked these with a messy, hurried kitchen around me. Somehow, that chaotic energy made the process feel more alive. Now, it’s a dish I turn to on quiet nights, where I want the act of cooking to feel grounding and honest, not polished or perfect but real and flavorful.
- heading: The tactile magic of scallops
Historical and Cultural Trivia
- Pan searing scallops became popular in French cuisine, where their quick cook method highlights their natural sweetness and tender texture.
- Historically, scallops were considered a luxury seafood, often reserved for special occasions and refined dining experiences.
- The technique of searing shellfish like scallops is believed to have originated from coastal fishing communities, emphasizing simplicity and speed to preserve freshness.
- In many cultures, scallops symbolize prosperity and good fortune, often featured in celebratory dishes and festivals.
Ingredient breakdown
- Sea scallops: I look for dry-packed, firm scallops with a pearl-like sheen. Skip pre-soaked ones—they can be watery and soggy, dulling that crisp exterior.
- Salt: I use kosher salt generously—this helps draw out moisture and enhances flavor. Too little and they’re bland; too much can be overwhelming, so find that balance.
- Black pepper: Freshly cracked adds a smoky, sharp bite that complements the sweetness. Skip pre-ground; it loses its punch quickly.
- Oil: I prefer neutral oils like grapeseed or canola for high heat, giving that even, crackling sear without imparting extra flavor. Olive oil can burn at high temps—be cautious.
- Butter: A splash of butter at the end adds richness and a nutty aroma. Don’t cook scallops in butter alone; it burns easily, so combine it with oil for safety.
- Lemon: Brightens everything—just a squeeze right before serving. Skip processed lemon juice; fresh zest and juice give that clean, zingy pop.
- Optional herbs: A few sprigs of thyme or parsley can add freshness if you like. Use sparingly, as they can overpower the delicate scallop flavor.
Spotlight on key ingredients
Sea scallops:
- I look for dry-packed, firm scallops with a pearl-like sheen. Skip pre-soaked ones—they can be watery and soggy, dulling that crisp exterior.
- Salt: I use kosher salt generously—this helps draw out moisture and enhances flavor. Too little and they’re bland; too much can be overwhelming, so find that balance.
- Black pepper: Freshly cracked adds a smoky, sharp bite that complements the sweetness. Skip pre-ground; it loses its punch quickly.
Lemon:
- Oil: I prefer neutral oils like grapeseed or canola for high heat, giving that even, crackling sear without imparting extra flavor. Olive oil can burn at high temps—be cautious.
- Brightens everything—just a squeeze right before serving. Skip processed lemon juice; fresh zest and juice give that clean, zingy pop.
Notes for ingredient swaps
- Sea scallops: I prefer dry-packed, firm scallops with a bright pearl-like appearance. If you’re using pre-soaked or wet scallops, pat them dry thoroughly—water will hinder that crispy sear.
- Salt: Use kosher salt for better control and flavor enhancement. Table salt can be too salty or uneven—adjust accordingly.
- Black pepper: Freshly cracked black pepper adds a smoky, sharp bite. Pre-ground pepper loses its punch quickly, so grind fresh for the best aroma.
- Oil: Neutral oils like grapeseed, canola, or vegetable oil work best at high heat. Olive oil can burn easily, so keep an eye on the temperature and add butter later for richness.
- Butter: For that nutty, rich finish, add a small pat of butter at the end. Skip cooking scallops directly in butter—burning can ruin the flavor.
- Lemon: Brighten the dish with fresh lemon juice or zest. If unavailable, a splash of lime or a vinegar drizzle can mimic that zing.
- Herbs: Use thyme, parsley, or chives sparingly to add freshness. Dried herbs aren’t ideal here—they lack the vibrant aroma fresh herbs bring.
Equipment & Tools
- Non-stick or stainless steel skillet: to evenly sear the scallops with minimal sticking
- Tongs: to flip and handle the scallops gently
- Paper towels: to thoroughly dry the scallops for proper searing
- Small spoon: to baste with butter or add aromatics
Step-by-step guide to pan searing
- Gather your equipment: a non-stick or stainless steel skillet, tongs, a small spoon, and paper towels. Purpose: to ensure even searing and easy handling.
- Pat the scallops dry thoroughly with paper towels. Purpose: removing moisture helps achieve a crisp crust.
- Season the scallops generously with kosher salt and freshly cracked black pepper. Purpose: to enhance flavor and draw out moisture.
- Heat your skillet over high heat until it reaches about 200°C (390°F). Purpose: to get that perfect sear temperature.
- Add a neutral oil like grapeseed or canola. Wait until it shimmers and just begins to smoke. Purpose: for a crackling, even sear.
- Place the scallops in the hot pan, spaced apart. Do not overcrowd. Purpose: to prevent steaming and promote browning.
- Cook for about 2 minutes without moving them. Watch for a golden-brown crust forming. Purpose: to develop that caramelized exterior.
- Flip the scallops using tongs or a spoon. Cook for another 1-2 minutes. They should be opaque and firm to the touch. Purpose: to finish cooking without overdoing it.
- Optional: add a small pat of butter, a sprig of thyme, or garlic during the last 30 seconds. Purpose: to add richness and aroma.
- Remove scallops from pan and let rest for 1 minute. Purpose: to allow juices to redistribute, keeping them tender.
- Plate immediately, with a squeeze of fresh lemon or herbs if desired. Purpose: to serve at optimal freshness and flavor.
Let the scallops rest for a minute to settle their juices. Plate immediately, optionally garnished with lemon and herbs, to enjoy their full flavor and texture contrast.
How to Know It’s Done
- The scallops develop a deep golden-brown crust with a slight caramel sheen.
- The surface is crisp and slightly resistant when gently pressed with tongs.
- Inside is opaque and tender, with a slight spring when pressed.
Perfectly Seared Scallops
Ingredients
Equipment
Method
- Pat the scallops thoroughly dry with paper towels, removing excess moisture for optimal searing. Feel how they become firm and pearl-like to the touch.
- Season each scallop generously with kosher salt and freshly cracked black pepper, ensuring even coverage. The seasoning enhances their natural sweetness.
- Heat your skillet over high heat until it’s shimmering hot, almost smoking, and add the neutral oil. Wait until it just begins to shimmer and subtly smoke, signaling readiness.
- Gently place the scallops in the hot pan, spacing them apart to prevent overcrowding. You should hear a satisfying sizzle as they hit the pan.
- Cook the scallops undisturbed for about 2 minutes, watching as the underside forms a deep golden-brown crust. They will sizzle and release a rich aroma.
- Use tongs to flip each scallop carefully, aiming for an even golden surface. Cook for another 1-2 minutes until opaque and firm to the touch.
- Add a tablespoon of butter and a sprig of fresh thyme or parsley if desired, spooning the melted butter over the scallops for extra richness. Let cook for 30 seconds.
- Remove the scallops from the pan and let them rest for about 1 minute to allow juices to settle, ensuring they stay tender and juicy inside.
- Squeeze fresh lemon juice over the scallops and garnish with additional herbs if using. Serve immediately while hot for the best texture and flavor contrast.
Pro tips for perfect scallops
- Preheat thoroughly: Get your pan hot enough that a drop of water sizzles instantly—aim for that shimmering shimmer, not smoking haze.
- Dry scallops: Pat them thoroughly with paper towels—moisture is the enemy of that perfect sear and golden crust.
- Don’t overcrowd: Space scallops out in the pan—crowding causes steaming, not searing, and ruins that crispy exterior.
- Resist moving: Once in the pan, leave scallops undisturbed for about 2 minutes—watch for that rich, golden crust to form before flipping.
- Use high smoke point oil: Grapeseed or canola work best—wait until it shimmers and just begins to smoke before adding scallops.
- Finish with butter: Add a small pat during the last 30 seconds—this adds richness and a nutty aroma, but don’t cook scallops in butter alone to avoid burning.
- Serve immediately: Rest for 1 minute off heat, then plate—serving hot ensures the perfect contrast between crispy exterior and tender inside.
Common mistakes and how to fix them
- FORGOT to dry scallops thoroughly → They won’t sear crisply, so pat dry with paper towels.
- DUMPED oil into hot pan → Use just enough to coat the bottom lightly, prevent splatter and burning.
- OVER-TORCHED the scallops → Lower heat slightly if crust is darkening too fast, avoid burnt flavor.
- UNDERESTIMATED resting time → Rest scallops 1 minute before serving to keep them tender and juicy.
Quick fixes and pantry swaps
- If scallops stick, splash a bit more oil and gently loosen with a spatula.
- When scallops are rubbery, overcooked—reduce cooking time or heat slightly lower.
- Dumped too much salt? Rinse scallops quickly and pat dry before searing again.
- When aroma of burnt oil appears, shield scallops with a splash of water or lower heat.
- If scallops lack crust, rescue with a quick 30-second high heat blast—then finish cooking.
Prep, store, and reheat tips
- Pat the scallops dry with paper towels before refrigerating—this prevents excess moisture and keeps them ready for searing, enhancing that crispy crust.
- Store scallops in an airtight container in the fridge for up to 24 hours—use them soon after for optimal freshness and tender texture.
- If you need to prep in advance, rinse and pat dry, then keep wrapped tightly in plastic—they’ll be best used within a day to prevent spoilage.
- Reheat scallops gently in a hot skillet for 30 seconds per side—look for a slight shimmer and aroma of toasted seafood, but avoid overcooking.
- Cooked scallops are best enjoyed fresh, but if needed, store leftovers in the fridge for up to 24 hours—reheat carefully to preserve tenderness and prevent rubberiness.
Top questions about pan seared scallops
1. How do I choose the best scallops for searing?
Look for dry-packed scallops with a firm texture and a slight pearl sheen. Wet scallops tend to steam, making it hard to get that crispy crust.
2. Why is my scallop not crispy enough?
Pat them very dry with paper towels—moisture is the enemy of a good sear. The drier, the better for that golden crust.
3. How hot should the pan be for searing scallops?
Use a high smoke point oil like grapeseed or canola. Heat the oil until it shimmers—this is the moment to add scallops.
4. How do I know when scallops are cooked properly?
Cook scallops for about 2 minutes on each side. They should turn opaque and develop a deep golden-brown crust. Overcooking makes them rubbery.
5. Should I cook scallops in butter or oil?
Add a pat of butter during the last 30 seconds for richness, but don’t cook scallops directly in butter as it burns easily.
6. How long should I rest scallops before serving?
Serve immediately after resting for a minute. They’re best hot, with a squeeze of lemon or fresh herbs for brightness.
7. What if my scallops stick to the pan?
If scallops stick, splash a little more oil and gently loosen with tongs. Use a non-stick pan if sticking persists.
8. What if my scallops are rubbery?
Overcooked scallops turn rubbery and lose their delicate texture. Reduce heat or shorten cooking time if they overcook.
9. Can I prepare scallops ahead of time?
Store raw scallops in an airtight container in the fridge for up to 24 hours. Pat dry before cooking to maintain crispness.
10. What if the oil starts smoking excessively?
If the oil smokes too much, lower the heat slightly or add a splash of water to cool it down quickly.
Seared scallops bring a satisfying crunch and tender, sweet interior that’s hard to beat on a busy weeknight. They remind me that simple techniques can turn fresh ingredients into something special, especially during this season of bright flavors and quick meals.
When you get that perfect golden crust, it’s a small sense of victory—like capturing a fleeting moment of culinary clarity. These scallops are a reminder that sometimes, less really is more, especially when it comes to showcasing the natural beauty of seafood.